- Qualcomm Launches Snapdragon 4 Gen 2 Mobile Platform
- AMD Launches Ryzen PRO 7000 Series Mobile & Desktop Platform
- Intel Launches Sleek Single-Slot Arc Pro A60 Workstation Graphics Card
- NVIDIA Announces Latest Ada Lovelace Additions: GeForce RTX 4060 Ti & RTX 4060
- Maxon Redshift With AMD Radeon GPU Rendering Support Now Available
Social & RSS Feeds
Latest Videos


Latest News
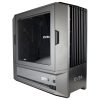
A Computer Case, Or Tiny Life House? A Review Of EVGA’s DG-87 Gamer’s Case
by Tom Roeder on September 28, 2016 in Cases & PSUs
EVGA has been expanding into more and more markets lately, including computer cases. This is not an easy market to break into, with so many already great choices out there. EVGA is making an aggressive move into this market with its DG (Designed For Gaming) series of cases, and as we find out, there’s lots to be impressed by.
Page 2 – The Build
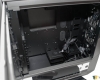
I have never built a PC in a case this big before, and one thing I learned was, you don’t reach around a case this large: you walk around a case this large.
First thing, I removed the side door, which comes off easily thanks to the quick release hinges, which is a really nice touch. One thing worth mentioning, is you don’t need to install any motherboard standoffs.
The back of the case actually has the mounting holes raised up, so you just lay in your board and screw it down. A small detail, but one that makes the build a little easier.
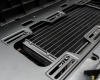
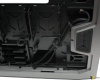
Next I mounted my radiator and fans to the top of the case. This was easy enough, and the hoses on my all-in-one cooler were plenty long enough for what I wanted to do here.
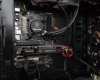
Next came the GPU, TV tuner card, and a sound card that doesn’t work properly, and I only added because it lights up (yes, I am that petty). I didn’t care for the expansion slot covers here. They overlay each other at the top of each one, so if you want to remove one in the middle, it makes it a little more work than is necessary. Not a major deal, but I found it a little annoying.


Next came the PSU, which with the removal of a plate on the back, slides in easily from the back. There is also a temperature sensor that you can mount wherever you choose, this connects to the onboard fan controller and reports the temperature to that and the EVGA software.
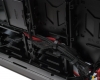
Next I mounted and cabled my SSD and the other cabling for the build. There is a myriad of cable routing holes with premium silicone rubber grommets. At no point did I find myself making any compromise on how I routed my wires and cables because there wasn’t an available hole where I wanted one. EVGA really gave the system builders every fathomable choice possible.
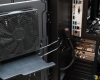
Next came time to run the cables through the grommet in the back corner, land all the connections, and close the door, making this the cleanest build I have ever built. And this is where I encountered a pretty major flaw in the case’s design. As I mentioned, I installed a useless (albeit pretty) sound card, but I am using the on-board audio from my motherboard. And where the connectors are, you can’t plug in a standard 3.5mm stereo connector to the speaker out port and close the door, because of the air diverter that is installed on the door in between the two fans. Heartbreak.
Luckily, this back door is easily removed. All you have to do is open it, unplug the fan connectors, and lift up and it comes right off the hinges. The door easily comes apart with a few Phillips screws removed, and I was able to easily remove this divider, and now the door closes beautifully. I found the placement of this divider in a bad location, as I anticipate my ASUS motherboard will not be the only one with the audio connectors in that spot.

Support our efforts! With ad revenue at an all-time low for written websites, we're relying more than ever on reader support to help us continue putting so much effort into this type of content. You can support us by becoming a Patron, or by using our Amazon shopping affiliate links listed through our articles. Thanks for your support!