- Qualcomm Launches Snapdragon 4 Gen 2 Mobile Platform
- AMD Launches Ryzen PRO 7000 Series Mobile & Desktop Platform
- Intel Launches Sleek Single-Slot Arc Pro A60 Workstation Graphics Card
- NVIDIA Announces Latest Ada Lovelace Additions: GeForce RTX 4060 Ti & RTX 4060
- Maxon Redshift With AMD Radeon GPU Rendering Support Now Available
Social & RSS Feeds
Latest Videos


Latest News
An In-Depth Look at openSUSE 11.3
by Rob Williams on August 2, 2010 in Software
Since it’s been quite a while since I last took openSUSE for a spin, I couldn’t resist downloading the 11.3 release that came out in mid-July. To see how the distro fares today, I installed it onto my home PC and used it for just over a week. So, read on for an in-depth look at what’s new and notable, and also for my experiences.
Page 3 – YaST (Yet another Setup Tool)
As I mentioned in the intro, SUSE isn’t SUSE without YaST, as it’s a dominant feature and selling-point. Its full name is “Yet another Setup Tool”, and chances are, you can tell just by that what its goals are. Because configuring Linux hasn’t always been quite so simple, the original SUSE developers built YaST to take out the pain of both installing and configuring the OS, and over the years, it’s become more full-featured and ever-more impressive.
A moment ago, we took a look at the install process, and believe it or not, that installer is also a part of YaST. YaST aims to replace all other configuration tools that might ship with a distro and its desktop environments, and although other configuration tools are generally included, such as KDE’s “System Settings”, the general idea is that people will use YaST instead for system-specific settings.
Everything from the basic configuration of your system to installing new software is handled through YaST, and even if it’s not immediately obvious, most things you will do configuration-wise will have YaST involved. Once into your desktop, you can access YaST by clicking on the KMenu and heading to Applications > YaST. Because YaST allows access to sensitive configuration options, a root password must be entered.
There are many available options for you to peruse through, so in order to show them all at once, I had to expand the window to almost 1600px across and 1000px deep. Apologies to those running smaller resolutions.

It’s near impossible for me to predict what options or sections people will use most, because generally speaking, our configurations are going to be different, and also our goals. But if you have to configure some piece of hardware, or tweak one, then you can likely take care of it here. The first option to really catch my eye was “Joystick”, but unfortunately, that option only seems to apply to those plugged into old-school audio cards. I plugged in an Xbox 360 controller, and while it was picked up successfully in the background, there was no immediate way to test it out.
Like most consumer Linux distributions, openSUSE has a full-featured online updater tool. By default, the service for this will run in the background, and an icon will appear in the system tray whenever important updates are available. During my one week with openSUSE, there were three occurrences when updates were available. Installing the patches were simple… simply click to install and enter a password.
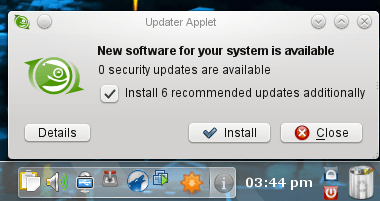
Going through YaST, and selecting the Online Update option, you can take the manual route to updating. As soon as I hit the desktop after the installation, there were a fair number of updates available, which you can see in the below screenshot. From here, the process was once again simple… click “Accept” and type in your password.

As I’m using an NVIDIA GeForce GTX 285 graphics card in my PC, openSUSE automatically installed the open-sourced Nouveau driver. For general use, this driver is fine, but for those looking for the best 3D acceleration possible, an official driver will be required (openSUSE doesn’t include the official NVIDIA driver by default as it’s proprietary). So, the first real task I set out to take care of was finding out how to install the official NVIDIA driver with YaST.
I was a bit surprised to find no results at all when searching for “NVIDIA” in YaST, but at the same time, it was understandable. However, this lead me to hit a major complaint I have with Linux… the requirement to head over to a search engine to find out how to do something. For me, as someone who enjoys tweaking, that’s not a big deal, but for new users, it can be a little disheartening and tedious.
Regardless, after doing a bit of searching, I found out that I had to add an official NVIDIA repository to the list of repositories already available in SUSE. Doing this is simple, and as you can see from the first screenshot on this page, there’s an option right at the top to configure this. After I added the proper URL (not Web-viewable) as a repository, I found results for “NVIDIA” in YaST just fine.

I’ll talk a bit more about the software configuration later. One of the next places I had to tackle was the “Boot Loader”, as for some reason, even though the installer picked up on my Gentoo installation, it wasn’t bootable. In heading into the GRUB configuration, I could easily understand why, but for the sake of doing it through YaST, I loaded up the Boot Loader option, and then went into the manual configuration pane.

Gentoo was originally configured as follows:
title Gentoo Linux 2.6.34 (/dev/sda5)
rootnoverify (hd0,4)
chainloader +1
For some reason, YaST tried to set up the Gentoo entry as if it was a Windows install, and that simply wasn’t going to work. So after some quick editing, I changed the entry as required, and then my Gentoo install become bootable once again. This is only a minor issue, and one that few people are going to experience. YaST did a fair job setting up the Windows entry, as that install was bootable, but for those who have other Linux distros installed, you might have to take the same manual route as I did.
One area experienced users might want to check out is the “System Services”, where you can configure all of the services that are set to run on boot. The list is rather large, but if there’s a service you need running that’s not, chances are it can be found in here.

Due to a problem I have with my motherboard, my Ethernet wasn’t functioning after I landed at the desktop for the first time. After a second reboot, I still didn’t have net access, so I found myself having to take advantage of the network configuration tool. As hoped, it was rather straight-forward, with numerous options available.

I connect to the net via a simple DHCP connection, so the overall process was simple. If you have a more complicated setup, then a little more time might be needed.
Thanks to the fact that YaST offers a staggering amount of configuration possibilities, I can’t tackle them all. So the last thing I’ll focus on is the “System Backup”, which as you might expect, is used to backup all of your important files, primarily documents. This cannot be used to back up your system as a whole as far as I can tell, but rather to resupply your PC with your personal files after a rescue or re-installation.


To set up a backup plan, you need to click on “Profile Management” and then click the appropriate option. After proceeding, you need to tell openSUSE where to save the backup, and whether it will be saved locally or via a network share (to another PC or something like a NAS box). You also have the option of choosing the type of compression, and also whether or not volumes will be created (rather than one monolithic file).
The rest of the process is simple, with the most difficult part being what to back up and what to leave aside. By default, almost anything of importance will be backed up, with the main exceptions being system files. Once your profile is in place, you can run the backup manually anytime you like, or configure automatic backups to run daily, weekly or monthly, and at any time of the day that works best for you.
It goes without saying that YaST offers an incredible amount of configuration, and for the most part, I find the tool, or rather group of tools, fairly simple to use overall. Throughout all of my testing, I ran into minimal issues with YaST. I’m not quite sure about that strange font it uses for the title of the windows though…

Support our efforts! With ad revenue at an all-time low for written websites, we're relying more than ever on reader support to help us continue putting so much effort into this type of content. You can support us by becoming a Patron, or by using our Amazon shopping affiliate links listed through our articles. Thanks for your support!

Rob Williams
Rob founded Techgage in 2005 to be an 'Advocate of the consumer', focusing on fair reviews and keeping people apprised of news in the tech world. Catering to both enthusiasts and businesses alike; from desktop gaming to professional workstations, and all the supporting software.


