- Qualcomm Launches Snapdragon 4 Gen 2 Mobile Platform
- AMD Launches Ryzen PRO 7000 Series Mobile & Desktop Platform
- Intel Launches Sleek Single-Slot Arc Pro A60 Workstation Graphics Card
- NVIDIA Announces Latest Ada Lovelace Additions: GeForce RTX 4060 Ti & RTX 4060
- Maxon Redshift With AMD Radeon GPU Rendering Support Now Available
Social & RSS Feeds
Latest Videos


Latest News
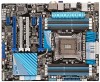
ASUS P9X79 PRO Motherboard Review
by Rob Williams on March 22, 2013 in Motherboards
Intel’s X79 platform may seem a little dated by this point, but it in fact remains the best choice for those needing to build the biggest, baddest PCs around – especially with Ivy Bridge-E likely 9+ months away. Complementing X79’s goals perfectly is ASUS’ P9X79 PRO, a motherboard that offers a rich feature-set in both hardware and software.
Page 2 – A Look at the EFI
An archive including all of these screenshots can be snatched here (.ZIP, 3.6MB).
For ASUS, the hardware is just one-half of the motherboard equation; the company also believes that the EFI and desktop software is also important, and that’s something we sure can’t disagree with. The interesting thing about ASUS and EFI is that it was the first company out the door with a solution, and further, it to this day still offers the best, easiest-to-use solution on the market. Such claims are useless without further words, so allow me to expand.
It’s become clear to me that to some companies, the EFI is little more than a BIOS to pretty up. I admit, when I first saw EFI hit the market, all I actually thought about was how cool it looked. But after actually using the different solutions on the market, I’ve come to realize that looks should come last on the bullet-list, not the forefront. Again, it’s all about ease-of-use.
When you boot into ASUS’ EFI, you get a no-nonsense “EZ Mode” screen that allows you to quickly monitor system sensors (temperature, fan speed and voltages) – which to some, might be all that’s needed. How many times have you built a system and have had to mess around in the BIOS in order to get to the PC Health location to look at the temperatures? Generally, the reason you do this is because you want to make sure you installed the CPU cooler correctly – so it’s maddening when you have to waste time with it. Here, the information is laid out, plain and simple.

Most enthusiasts are going to shove the EZ Mode aside pretty quickly in order to get into the nitty-gritty options, and this introduces another way that ASUS’ EFI is so easy to use. Straight from this EZ Mode, you can hit F3 in order to get the menu you see below. This allows you the quickest possible access to DIGI+ power control, fan control, various overclocking options and the EZ Flash 2 EFI-flashing utility. This is convenience at its finest.
If you never want to see the EZ Mode, it can be disabled so that you’ll be greeted to the traditional layout system just fine. Personally, I found myself liking the EZ Mode screen as a start-up well enough to keep it, and then just relied on the shortcuts to get to specific areas quickly.

Behold, the “Advanced Mode”:

Before we go further, I’d like to touch on a couple of points. I mentioned the “ease-of-use” aspect of ASUS’ EFI a couple of times above, but most of the reasons are impossible to acknowledge simply with images alone. So, I hope you’re hungry for more words.
Since EFI’s introduction, I’ve found that most companies believe that EFI = Mouse Use. You can use a mouse, of course, and it’s in fact a great option for EFI, but simply put, the EFI should never be built around the idea that the user is going to use a mouse. Some of you might be able to relate to the less-than-perfect movement of a cursor when moving it on a monitor that has a native resolution higher than the content that’s displayed. EFI (to my knowledge) never scales to your native resolution, and past that, it’s not accelerated in the sense that your desktop is. This results in a design that’s not so natural-feeling, at least for me.
MSI is particularly a guilty party in this regard. Its EFI is designed in such a way that it’s simply easier to stick with the mouse (even if you don’t want to use it). For example, you can see three major options on either side of the center. You’d assume that you could hit the right arrow key while on “Settings” to go over to “Browser”, but not so. Instead, you must push the down arrow a couple of times to reach your destination.
I believe that the EFI should work like a traditional old-school BIOS where menus are up top, and “Esc” will push you back a menu – a scheme ASUS’ EFI follows. In addition, here you’re also able to type in your values rather than hit enter and select an option from a drop-down – both options is best, having just the latter is not.
I do expect that as time goes on, the other solutions will improve. After all, we really are still in the early days of EFI adoption on the enthusiast side. However, what this highlights is just how on top of things ASUS was, to actually launch with a solution so good right off-the-bat, that it’s been able to continue using the same design since.
In the past, our look at the BIOS / EFI has been rather brief, but going-forward, we’re going to begin picking and choosing some aspects of each EFI worth talking about – essentially, features that caught our eye and left an impression. There’s little point in discussing each and every section or option (and I won’t even pretend like I understand half of what’s in the tweaking section), but the images are here for those who do in fact want to see all of what the EFI offers. Don’t want to click on each and every image? Hit up the link at the top of the page to snag them all in one go.
Ai Tweaker
After first entering the EFI, the first stop for most enthusiasts will be the second menu, “Ai Tweaker”. This is where all of the overclocking-related options are stationed, with the most popular options found up top. The first option should be used by those interested in setting their XMP memory profile and then simply allow that to handle the overclock. Alternatively, you can choose the manual option and choose your basic overclocking options as normal.

Since its first P67 offerings, ASUS has implemented an overclocking mechanic that automatically boosts your CPU speed even if you don’t touch the BCLK or ratios – simply changing the memory clocks (even on an unlocked processor) will do it. If you don’t want this functionality, you can change the Turbo Ratio manually to put the CPU back to its default per-core values.
The reason ASUS auto-OCs your CPU is because it’ll provide a free and absolutely safe boost (in its opinion, and ours), and even with the boost, power efficiency shouldn’t be affected except at max load – but it’d be the hope that whatever you’re using your CPU for will finish quicker as a result. Even so, while I’m all for this mechanic being default, I do wish there were an option to disable it for those who want it (like me when I’m testing various things).
I’ll let the rest of these options speak for themselves, and give major kudos to those who can make sense of even half of them.


Advanced
If this is the Advanced section, the previous one should really be called “Hella-Extreme”. Under Advanced, you can tackle everything from CPU configuration (HyperThreading, active cores, ratio, Turbo, C-states), SATA configuration (including hot-plugging), USB control and a plethora of peripheral configuration options.


Monitor
The monitor section is where some good stuff happens. At the forefront are statuses for temperatures, voltages and fan speeds. Further down are a slew of options related to tweaking the fans via the Q-Fan Control feature.

The Low Limit option here refers to the minimum RPM value that a fan can reach before the board gives off a fan-warning error. Past that, each fan can have its own speed profile, with Standard being the default. That option allows the fans to speed up or down automatically based on CPU temperature. For those who prefer their PC as quiet as possible and are not quite as concerned with achieving the best-possible temperatures, there’s the Silent option. For the overclockers, there’s Turbo, which runs all fans at their maximum speeds. *
* Correction: Turbo does not ramp up the fans to 100%, but rather sticks to normal scaling. The difference is that it’s more aggressive, catering to those who never want temperatures to be an issue.

An option I failed to do any real testing with here was Manual, although I made up for it with the Ai Suite II software that I’ll tackle on the next page. Manual allows you to set a multitude of values to each fan. If the CPU reaches 60°C, would you like all fans to ramp up to 80%? You can do that. For most, the automatic fan control is going to be sufficient, but for who prefer ultimate control over even the most minute details, the options are right here.
Boot
If you’re looking to disable the board’s boot splash screen, disable fast boot or change the boot order, it can be done right here in the Boot menu (surprised?). To enable the fastest possible boot times that affect the boot straight up until the Windows desktop, a couple of options are worth paying attention to here, such as Fast Boot (enabled by default) and USB device initialization. In truth, none of these options should have to be touched, but if you happen to have a stubborn USB device that fails to initiate properly, you’ll want to change the USB Support mode to Full Initialization. It’ll slow-down the boot speed, but that’s a small trade-off for having that USB device function before the POST finishes.


Tool
The last menu in ASUS’ EFI is Tool. Here, you can find the EZ Flash 2 EFI-flashing utility, a DRAM SPD-reading tool (a fantastic feature since almost no memory vendor includes the entire list of timing values on their website), EFI (or overclocking) profiles and Drive Xpert for taking advantage of the on-board RAID controller.


It goes without saying, but I’ll say it anyway: ASUS produces a very nice EFI here. It’s not only feature-packed, but it’s easy-to-use (there I go again). Simply put, there are a couple of other manufacturers that should definitely take note here.
From hardware to EFI to… software! Let’s press onward.

Support our efforts! With ad revenue at an all-time low for written websites, we're relying more than ever on reader support to help us continue putting so much effort into this type of content. You can support us by becoming a Patron, or by using our Amazon shopping affiliate links listed through our articles. Thanks for your support!

Rob Williams
Rob founded Techgage in 2005 to be an 'Advocate of the consumer', focusing on fair reviews and keeping people apprised of news in the tech world. Catering to both enthusiasts and businesses alike; from desktop gaming to professional workstations, and all the supporting software.


