- Qualcomm Launches Snapdragon 4 Gen 2 Mobile Platform
- AMD Launches Ryzen PRO 7000 Series Mobile & Desktop Platform
- Intel Launches Sleek Single-Slot Arc Pro A60 Workstation Graphics Card
- NVIDIA Announces Latest Ada Lovelace Additions: GeForce RTX 4060 Ti & RTX 4060
- Maxon Redshift With AMD Radeon GPU Rendering Support Now Available
Social & RSS Feeds
Latest Videos


Latest News
BitFenix Prodigy M Micro-Tower Chassis Review
by Ryan Perry on July 20, 2015 in Cases & PSUs
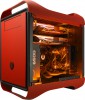
Whether space is at a premium, or you simply want something portable, BitFenix’s small form factor Prodigy M chassis might be exactly what you need. Whether it’s more for the features or the brilliant colours, it’s hard to walk by one without at least giving it a good once over, which is exactly what we’re going to do.
Page 2 – Installation & Testing
Even though it’s not a component in the final build, we decided to test fit an optical drive to check for clearance issues. What we found was that the drive partially covered the fan on our large test GPU that uses the standard reference cooler. This could severely limit the amount of cool air that can be pulled into the video card and could cause higher than normal temperatures.

The other hiccup that we ran into had to do with our power supply, and isn’t a flaw in the design of the chassis per se, but rather with the orientation of the pins on the power supply itself. In the shot below we see that the 90 degree cable had to be bent sharply in order to clear the edge of the recessed power supply area. Again, it comes down to the power supply being used, so hopefully it’ll be smooth sailing for most.

By the time all was said and done, it took about an hour and a half to install our test system into the Prodigy M, which is quite a bit longer than it normally takes using a standard chassis, however this was more or less expected due to the small form factor and interior layout.
The overall build quality remained very high during the installation, however the top handles flexed more than what we were personally comfortable with when it came time to transport the fully built system, and in the end we found it less stressful to carry it from the bottom. Our test system is pretty basic, but we could imagine that packing this chassis full of drives and a liquid cooler could cause some serious problems if the handles aren’t up to the task of supporting the extra weight.
With the build running longer than expected, we decided to forgo tidying up the cables and simply stashed them in the very welcomed space between the power supply, optical drive, and video card. Here’s what we ended up with.

All of our testing is performed in a near steady 20°C ambient environment with readings taken before and after with a standard room thermometer. AIDA64 Extreme Engineer is used for monitoring and recording all system temperatures throughout the testing process.
Windows is allowed to sit idle for 10 minutes after startup to ensure all services are loaded before recording the idle CPU and GPU temperatures. CPU load temperatures are generated by performing a 20 minute run of OCCT LINPACK using 90% of the available memory, while GPU load temperatures are generated by OCCT’s built in test, also for 20 minutes.
Stock CPU settings were obtained by setting the AI Tweaker option with the BIOS to Auto and the maximum stable overclock frequency of 4.0GHz was obtained after extensive testing to ensure stability. The final clocks for the GPU are 760MHz on the core and 1000MHz QDR (4000MHz relative) for the memory with the voltage increased to 1.087V using MSI’s Afterburner overclocking utility. As with the CPU overclock, testing was done prior to ensure full stability.
| Techgage Chassis Testing System | ||||
| Processor | Intel Core i5-661 – Dual-Core (3.33GHz) | |||
| Motherboard | ASUS P7H55D-M EVO mATX – H55-based | |||
| Memory | Corsair Dominator 2x2GB DDR3-1600 7-8-7-20-2T | |||
| Graphics | EVGA GeForce GTX 470 | |||
| Storage | Western Digital 2TB Green | |||
| Power Supply | Antec TP-750 Blue | |||
| Chassis | BitFenix Prodigy M | |||
| CPU Cooling | Thermaltake Jing | |||
| Et cetera | Windows 7 Ultimate 64-bit | |||
| Idle | Load | |
| Processor | 36 | 55 |
| Graphics Card | 43 | 93 |
| Processor (OC) | 37 | 67 |
| Graphics Card (OC) | 44 | 95 |
Stock idle and load temperatures stayed well under the thermal limits of the CPU and GPU, and were on par with another micro-ATX chassis that we tested out a while back, the Phanteks Enthoo EVOLV. The EVOLV uses a more traditional layout, but at the expense of a larger footprint. With regards to thermal performance, the two systems were neck and neck during overclocked testing.
We also wanted to see just how much affect the optical drive would affect GPU temperatures since it covered almost half of the fan. Thankfully, it only resulted in an increase of an extra degree, but at 96 degrees, that’s still plenty high, and those using an aftermarket cooler with a dual fan design could notice different numbers as well since one fan would be completely covered. Luckily, optical drives seem to be on the way out for most.
Finally, for those who value silence, the system remained extremely quiet, even with the fans running at 100%.

Support our efforts! With ad revenue at an all-time low for written websites, we're relying more than ever on reader support to help us continue putting so much effort into this type of content. You can support us by becoming a Patron, or by using our Amazon shopping affiliate links listed through our articles. Thanks for your support!