- Qualcomm Launches Snapdragon 4 Gen 2 Mobile Platform
- AMD Launches Ryzen PRO 7000 Series Mobile & Desktop Platform
- Intel Launches Sleek Single-Slot Arc Pro A60 Workstation Graphics Card
- NVIDIA Announces Latest Ada Lovelace Additions: GeForce RTX 4060 Ti & RTX 4060
- Maxon Redshift With AMD Radeon GPU Rendering Support Now Available
Social & RSS Feeds
Latest Videos


Latest News
Cooler Master CoolViva Pro
by Greg King on April 26, 2007 in Cooling
As their name suggests, Cooler Master is no stranger to cooling products. They were however new to graphics card cooling, but no longer thanks to their CoolViva Pro. We are taking their first GPU cooler for a spin to see if their legendary quality is carried over here.
Page 2 – Installation, Testing, Final Thoughts
The test card what will be used in this review is an eVGA 7800 GTX. The 7800 series of cards can run hot and should provide a suitable card to test the capabilities of the Cool Viva Pro.
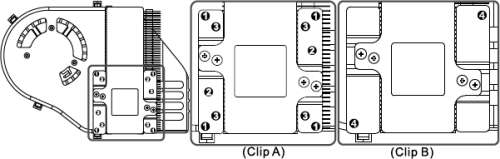
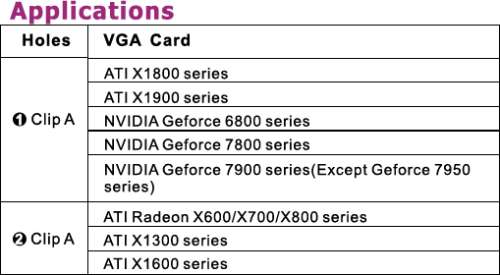
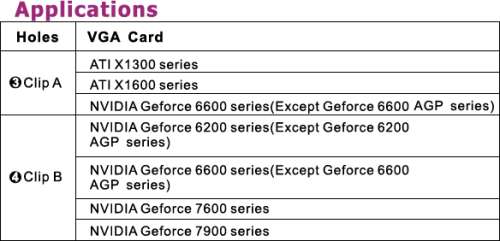
First up, we need to identify the correct holes to screw the posts into. These will be the posts that run through the mounting holes on the PCB of the video card and must be placed in the correct holes. To aid in the installation, Cooler Master provides a thorough manual. For those of you reading this review looking for the proper holes to use, you’re in luck. Borrowed directly from the Viva Pro .pdf, here are the hole assignments.
As mentioned earlier in the review the card that we are using to test out the Viva Pro is the 7800 GTX.


Included with the Viva Pro is a small square foam spacer. This is to protect the chip itself should the cooler shift and move. Chips can be very brittle and this spacer will aid in protecting the chip if there is not one around the GPU already. In the case of this card, there is already a spacer surrounding the chip so the included foam spacer is not needed.

Once we figure out which hole we need to place the posts in, we screw them in and prepare to place the cooler on the video card.

When the posts are placed through the mounting holes, we place the four metal caps on the end and tighten them down. In our case, we were able to tighten them down all the way to the end of the threads on the posts. Others might be different so please be careful when installing the Viva Pro on your card.

When the cooler is secured onto the card, the final thing to do is place the provided ramsink on the memory and plug in the fan. Some cards use a 3 pin plug and others use a 4. To accommodate this difference, Cooler Master has placed one of each plug on the power cable to the fan.

Once installed, we can see in the next photo how it looks the 7800 GTX. As the picture shows, the cooler is rather large but is actually shorter than the Zalman 9700 heatpipe cooler that can be seen in the back ground. When installed, there shouldn’t be any issues with clearing the door on any case that can accommodate a large CPU cooler like the Zalman.

When viewed from the top, we see that the Viva Pro is wide as well. This can almost be considered a three slot cooler since it takes up that much space.

Testing and Conclusion
To test the Cool Viva Pro, we will record both the temperatures when idle and when under extreme load. Recording the idle temps is simple. To record the load temps, the thermal monitor in the NVIDIA drivers is loaded up and we will let it record the temps as an hour of Command and Conquer III is played. I know it’s a rough job but someone has to test this stuff.
We will also find the maximum overclock that we could achieve with both the stock cooler installed, as well as the Viva Pro.
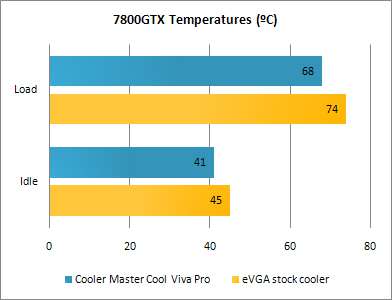
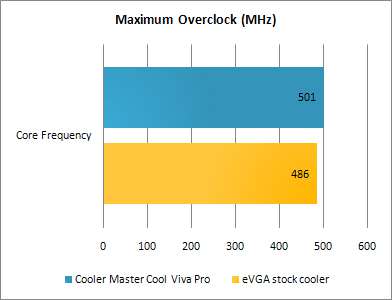
There you can see the performance differences between the stock cooler and the Cooler Master Viva Pro. In our tests, the only thing that we found the cooler to do really well is operate in complete silence. Granted the temperatures of the GPU were cooler with the Viva Pro but they weren’t exactly what we were expecting. However, with the Cooler Master on the 7800, we were able to get a 15 MHz higher overclock than we were with the stock cooler. For those of you that overclock your CPU, this might not seem like a lot but with video cards, it makes a considerable difference.
Installation of the card was simple and honestly only took about 20 minutes, of that 20, approximately 10 of that was removing the stock heatsink from the video card. Once installed, we saw just how big the thing is. Dwarfing the card it was installed on the looks of the cooler never caught on around the office. Perhaps it’s just the way it looks on a green PCB but I honestly find the Viva Pro to be ugly. It means well, and performs better than a stock cooler, but it really doesn’t bring anything to the table in the looks department. This is surprising considering the stellar cases and HDD enclosures that Cooler Master manufactures.
At the end of the day, the Cooler Master Cool Viva Pro does what it says it does. It operates quietly and does perform better than a stock cooler. With that said though, anyone who is vain enough to care about how things look, which is approximately 95% of all gamers, this might be a card you want to skip on. If you disagree with me, please let me know if the forums but I honestly don’t think that it brings anything to the table in the looks department. Taking all of this into consideration, the Cooler Master Cool Viva Pro gets a 6 out of 10.
- Pros
- Easy to install
- Includes 8 ramsinks
- Silent
- Inexpensive at $30.00 (US) around the web
- Cons
- HUGE!
- Ugly
Discuss in our forums!
If you have a comment you wish to make on this review, feel free to head on into our forums! There is no need to register in order to reply to such threads.

|
|

Support our efforts! With ad revenue at an all-time low for written websites, we're relying more than ever on reader support to help us continue putting so much effort into this type of content. You can support us by becoming a Patron, or by using our Amazon shopping affiliate links listed through our articles. Thanks for your support!