- Qualcomm Launches Snapdragon 4 Gen 2 Mobile Platform
- AMD Launches Ryzen PRO 7000 Series Mobile & Desktop Platform
- Intel Launches Sleek Single-Slot Arc Pro A60 Workstation Graphics Card
- NVIDIA Announces Latest Ada Lovelace Additions: GeForce RTX 4060 Ti & RTX 4060
- Maxon Redshift With AMD Radeon GPU Rendering Support Now Available
Social & RSS Feeds
Latest Videos


Latest News
Cooler Master Silencio 550 Mid-Tower Chassis Review
by Ryan Perry on August 22, 2011 in Cases & PSUs
In developing a chassis, companies like Cooler Master have to decide whether the focus will be on cooling or noise, because it’s extremely difficult to have a chassis excel in both. The Silencio 550 proves this, because while it becomes the quietest chassis we’ve ever tested, it comes at the expense of higher temperatures.
Page 3 – Installation & Testing
There were no real snags that kept us from installing the components that make up our test system, but there are things to watch for. The first is that even standard-sized power supplies will block off part of the cable management area directly in front of it, possibly limiting the number of cables that can be routed through.
All cables were able to be routed as intended but space was tight, even using a light system like ours. It looks like this was intended for lower wattage power supplies with a smaller foot print. If an even larger power supply is to be used this area will be mostly if not entirely inaccessible.

Installing the motherboard was a snap once the standoffs were installed in the proper configuration. The included socket made short work of this and the motherboard and liquid cooler installed easily. Users running a 120mm all-in-one liquid cooler shouldn’t run into any problems and those using air coolers will be good as long as it doesn’t exceed 6.1″ (155mm) in height.

There is nothing to report with the hard drives either. With a rail on each side, the 3.5″ drives slid into the bay cleanly. A 2.5″ solid-state drive was installed onto the center tray and then the tray and rails slid into the bay as a complete unit.

The GPU also installed cleanly and was held in place securely thanks to the thumbscrews. Plastic retention mechanisms have been a love/hate feature for me lately and there has probably been more hate than love, so I was relieved to see thumbscrews here. Users with extra long video cards that are over 11″ including power connectors will end up with no choice but to remove the top section of the hard drive cage.

Once the optical drive was installed into the top 5.25″ drive bay and secured into place by sliding the tool-less lock back, I started working on something else and knocked the lock forward, disengaging the pegs that hold the drive in place. These locks moved a bit too freely so some extra resistance would be nice to ensure nothing gets jostled out of place.

Two of the top I/O leads ran into problems when it came time to connect them. The front panel audio lead wasn’t long enough to reach the header at the back of the motherboard when routed through any of the cable management areas, but this was remedied by running it through a hole at the bottom of the motherboard tray that is left when the metal is punched out and bent to form a tab used to help keep the power supply in place.
The USB 3.0 lead ran into a similar problem. It could not be routed through any of the cable management areas and still reach the back of the case, so it was run across the motherboard above the GPU and out a PCI slot that had the cover removed. As far as I can see there is no other way for this to be done due to the short length of the lead.

With the system built I wanted to check out the front fan filter that is on the backside of the plastic vents that are visible from the outside. It attaches to the raised areas on the vents with two screws on the top and bottom edges. As a bonus I was able to see how the door is kept shut when I found a metal piece hot glued to the bottom corner, and a magnet in the same corner of the door is hidden behind the foam lining. This creates enough resistance to keep the door from swinging open, but without creating too much pull making it hard to open or causing the door to slam shut.

Testing the X-dock hot swap bay was next. When a drive is slid in, the connection is nice and secure but allowed for the drive to be removed with less force than others I have tested. The drive slides far enough into the case that it sits flush and allows the door to be closed. When it came time to read the drive, nothing I did would make it show up until the system was reset with the drive still in the bay. This is the same Windows 7 install used in all of our case testing to date since I came on board, so I can vouch that AHCI is enabled and other hot swap bays have worked without issue. Well, at least the SD card reader worked like a champ.

Cable management has never been my strong suit, but I was able to come up with what you see here. The cable management options may not be overwhelming, but on a case like this, and without a window, it hardly matters unless you intend to show it off regularly. Nothing in this build should interfere with airflow meaning temperatures can stay as low as possible.

I decided to take the path of least resistance when it came to where the leads were tucked on the backside of the motherboard tray. At first I had used cable ties to hold them tight against the tray but could not get the panel to slide forward far enough to fasten the thumbscrews because of the foam lining. Instead there was just enough extra space in front of the rolled edge of the motherboard, so it was a trade off where a slightly messier build won in favour of a lot of frustration and a side panel that bows out.

Testing
All of our testing is performed in a near steady 20°C ambient environment with readings taken before and after with a standard room thermometer. AIDA64 Extreme Engineer is used for monitoring and recording all system temperatures throughout the testing process.
Windows is allowed to sit idle for 10 minutes after startup to ensure all services are loaded before recording the idle CPU and GPU temperatures. CPU load temperatures are generated by performing a 20 minute run of OCCT LINPACK using 90% of the available memory, while GPU load temperatures are generated by OCCT’s built in test, also for 20 minutes.
Stock CPU settings were obtained by setting the AI Tweaker option with the BIOS to Auto and the maximum stable overclock frequency of 4.0GHz was obtained after extensive testing to ensure stability. The final clocks for the GPU are 760MHz on the core and 1000MHz QDR (4000MHz relative) for the memory with the voltage increased to 1.087V using MSI’s Afterburner overclocking utility. As with the CPU overclock, testing was done prior to ensure full stability.


The components used for testing are:
|
Component
|
Techgage Test System
|
| Processor |
Intel Core i5-661 – Dual-Core (3.33GHz)
|
| Motherboard |
ASUS P7H55D-M EVO mATX – H55-based
|
| Memory |
Corsair Dominator 2x2GB DDR3-1600 7-8-7-20-2T
|
| Graphics |
EVGA GeForce GTX 470
|
| Audio |
On-Board Audio
|
| Storage |
Western Digital 2TB Green
|
| Power Supply |
Antec TP-750 Blue
|
| Chassis |
Cooler Master HAF 932 Advanced
Cooler Master Silencio 550 Corsair Obsidian 650D Corsair SE White 600T NZXT H2 Rosewill Blackhawk Sentey Arvina Silverstone Raven RV03 Thermaltake Level 10 GT |
| CPU Cooling |
Corsair H60 (Exhaust Configuration)
|
| Et cetera |
Windows 7 Ultimate 64-bit
|
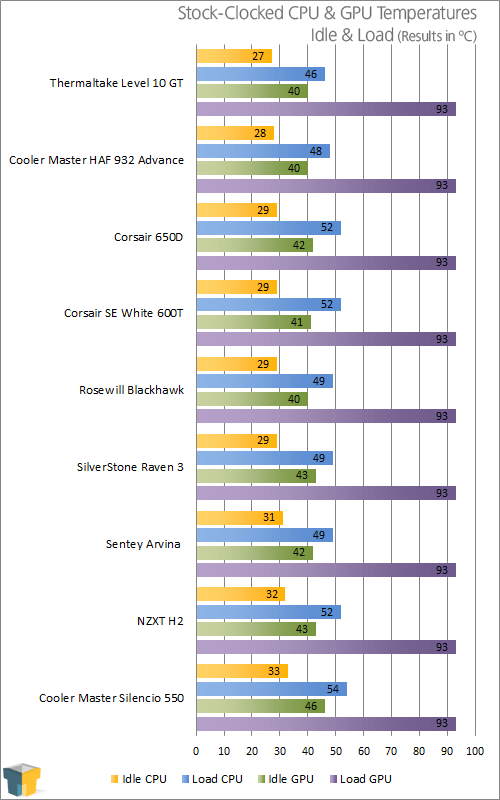
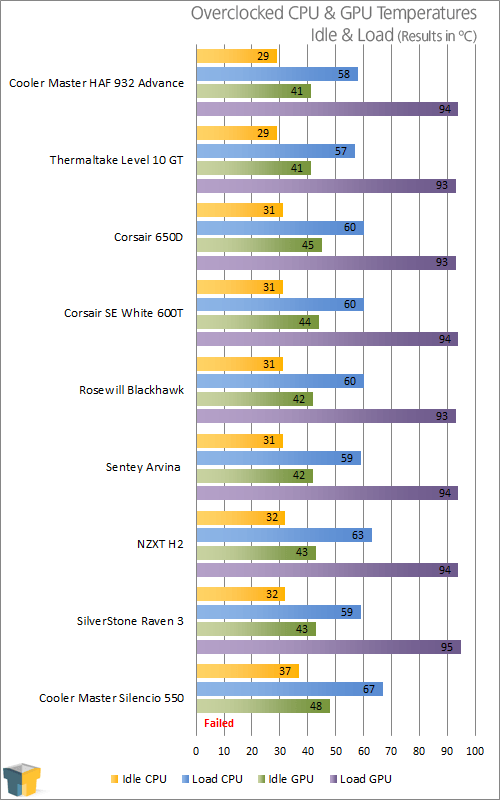
Well this is a first. During testing, our overclocked GPU locked up at 97°C while the fan was running at 98% after only 10 minutes. I would have thought that the GTX 470 had a few degrees left before it started to cause problems, but it gave up at that point and lead me to believe the card itself had failed after the desktop was displayed, as a scrambled mess of artifacts appeared when the system was reset. Luckily, after letting the system sit for a while, everything checked out. This temperature far exceeds that of the other cases, so airflow is very restricted.
Turning to the CPU, the same picture is painted with an increase of 4 degrees on top of any of the other cases. 67 degrees is still within the thermal limits, but it’s creeping close to the 72 degree cut-off specified by Intel.
An increase in component temperature is to be expected considering the Silencio is all about keeping noise contained inside. Less noise means less vents and less vents means less airflow. The foam padding on the inside does a lot to trap heat as well. This is not the only “silent case” in our data base though. The NZXT H2 turned in respectable numbers but it ships with an extra fan, all fans spin at higher RPMs, it features a front to back hard drive orientation and most of all, is roomier inside.
It would be silly not to mention sound levels considering why the Silencio was developed. Overall, it kept the system fairly quiet, even with the H60 and GPU fans running at full tilt. Having used the NZXT H2 in a backup system, I know what it’s capable of, and the Silencio takes it one step further by muffling system noise better.
What the Silencio 550 lacks in cooling prowess it makes up for in noise reduction so potential buyers will need to decide what’s more important.

Support our efforts! With ad revenue at an all-time low for written websites, we're relying more than ever on reader support to help us continue putting so much effort into this type of content. You can support us by becoming a Patron, or by using our Amazon shopping affiliate links listed through our articles. Thanks for your support!