- Qualcomm Launches Snapdragon 4 Gen 2 Mobile Platform
- AMD Launches Ryzen PRO 7000 Series Mobile & Desktop Platform
- Intel Launches Sleek Single-Slot Arc Pro A60 Workstation Graphics Card
- NVIDIA Announces Latest Ada Lovelace Additions: GeForce RTX 4060 Ti & RTX 4060
- Maxon Redshift With AMD Radeon GPU Rendering Support Now Available
EVGA P55 FTW

It’s been a while since I last took a look at a motherboard that I knew I wanted in my own machine, but EVGA’s P55 FTW ended that drought. The board lacks S-ATA and USB 3.0, but it has everything else, from great aesthetics and design to impressive overclocking, along with a handful of useful features not often found on the competition’s boards.
Page 10 – Overclocking EVGA’s P55 FTW
Before we get into our overclocking results, allow me to clarify how we do things. In order to declare an overclock as “stable”, we stress it as hard as possible for a certain period of time, both with CPU-related tests and also GPU-related, to conclude on what we’ll be confident is 100% stability throughout all possible computing scenarios.
For the sake of CPU stress-testing, we use LinX. Compared to other popular CPU stress-testers, LinX’s tests are far more gruelling, and proof of that is seen by the fact that it manages to heat the CPU up to 20°C hotter than competing applications, like SP2004. Generally, if the CPU survives the first half-hour of this stress, there’s a good chance that it’s mostly stable.
If the CPU stress passes without error, then GPU stress-testing begins, in order to assure a system-wide stable overclock. To test for this, 3DMark Vantage’s Extreme test is used, with the increased resolution of 2560×1600, looped nine times. If this passes, some time is dedicated to real-world game testing, to make sure that gaming is just as stable as it would be if the CPU were at stock. If both these CPU and GPU tests pass without issue, we can confidently declare a stable overclock.
Overclocking with EVGA’s P55 FTW
For some reason, when I took a look at EVGA’s X58 SLI board earlier this year, I seemed to be the only one on planet earth who had a rough time overclocking it. Similar to Intel boards, I just couldn’t reach a stable overclock very easily, no matter how modest. So for that reason, I was a bit skeptical about jumping into overclocking on this board, but fortunately, my experience from the X58 SLI didn’t carry over into this one.
While I’m not a novice overclocker, I’m not one who takes things ultra-seriously, either. So, I don’t exhaust all of the options in the BIOS in order to maximize the overclock, primarily due to time and lack of reason. Also, since I tend to battle with higher-than-normal room temperatures (something that plagues me all too often), I can’t seem to reach an impressive top-end overclock lately. Normally, 3.7 – 3.8GHz is generally were my max stable clock lays.
One thing I noticed about overclocking with this board is that the Turbo is not included into the equation, as it is with recent ASUS and Gigabyte boards I’ve looked at. On those other boards, even though the Core i7-870’s default multiplier is 22x, its Turbo multiplier is 24x, and that’s what the boards use when choosing a manual bus speed.
Since that’s not the case here, the multiplier is always 22x, which simply means you need to have a higher bus speed. This isn’t likely to affect your desired CPU frequency, but if you are an extreme OC’er, it may (I am uncertain of how high the bus speed can typically go on P55 boards, but my experience has ranged between 190 – 210MHz for stable operation).
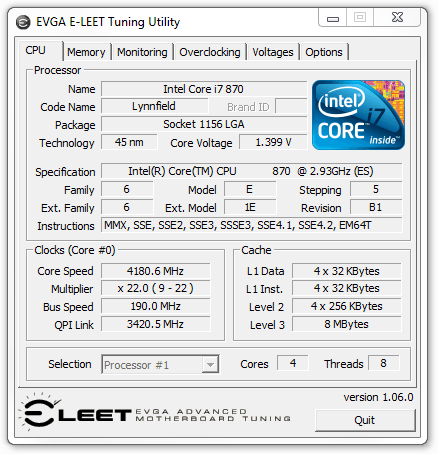
Due to time constraints, I wasn’t able to dedicate as much time to overclocking the board as I’d like, but without too much effort, I was able to hit 4.20GHz moderately stable (7 passes of LinX, then fail). I’m certain that with more caressing, that can become even more stable, and higher clocks could even be reached. To hit 4.2GHz with such ease though is impressive, and if you don’t ever plan to go that high, hitting whatever clock you have your sights on should prove even easier.
To report our overclock, I normally show a CPU-Z screenshot above, and if you aren’t familiar with “E-LEET”, then you might immediately think that’s what is up there. But rather, this is EVGA’s overclocking tool, which mimics the aforementioned CPU-Z. The tabs up top allow the usual overclocking options, for those who prefer to do things in software. I am not one of those people, however, so I stuck to the BIOS for all of the overclocking I did with this board. EVGA’s tool is nice, but when you are toying around with potentially unstable clocks, the quicker method is dealing with the BIOS, not booting up into Windows each time.
Support our efforts! With ad revenue at an all-time low for written websites, we're relying more than ever on reader support to help us continue putting so much effort into this type of content. You can support us by becoming a Patron, or by using our Amazon shopping affiliate links listed through our articles. Thanks for your support!


