- Qualcomm Launches Snapdragon 4 Gen 2 Mobile Platform
- AMD Launches Ryzen PRO 7000 Series Mobile & Desktop Platform
- Intel Launches Sleek Single-Slot Arc Pro A60 Workstation Graphics Card
- NVIDIA Announces Latest Ada Lovelace Additions: GeForce RTX 4060 Ti & RTX 4060
- Maxon Redshift With AMD Radeon GPU Rendering Support Now Available
Social & RSS Feeds
Latest Videos


Latest News
GIGABYTE G1.Sniper 5 Motherboard Review
by Rob Williams on December 2, 2013 in Motherboards
Gamers with deep pockets who appreciate motherboards packed to the gills with features, features, and more features ought to have a look at GIGABYTE’s G1.Sniper 5. Its black and green aesthetics are eye-catching, sure, but its feature-set would surely make its rivals green with envy. Read on to find out what we think of the G1.Sniper 5!
Page 2 – A Hardware Tour of GIGABYTE G1.Sniper 5
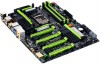
To help kick things off, we’ll make use of a GIGABYTE-provided image of the G1.Sniper 5, offering a top-down view that lets us grasp the board’s layout much easier.
One thing that helps the G1 series stand out of the crowd is its aggressive green+black color scheme, and not to mention its heatsink design. On the Sniper 5, GIGABYTE avails the opportunity to integrate the top heatsink into a water cooling setup – so for those who have one, you’ll be able to keep temperatures around this area much cooler than would be possible on air.
In a recent motherboard review, I mentioned that it used to be that you’d have to spend hundreds of dollars on a motherboard in order to get a good assortment of fan headers (at least 6). Well, if that’s the case, then what about a motherboard that does cost hundreds of dollars – $400 to be exact? Well, you’re given what I believe is the highest number of fan headers ever seen on a desktop board.

In total, the G1.Sniper 5 includes a staggering nine fan headers – 7 of which are 4-pin. As has become a regular sight, 2x 4-pins are located to the top-right of the CPU socket, while another can be found to the bottom-left. Along the bottom of the board, there are four more. The board’s 2x 3-pin headers can be found to the right of the DIMM slots – perfect for a RAM fan or top-mounted fans.
Other notable features: Onboard buttons (power, reset, CMOS clear), an LED BIOS code display, 2x USB 3.0 headers, a separated audio solution (electrically, not physically), a small fan to the top-right of the CPU socket, and the 8-pin motherboard connector in the exact orientation I like to see them in.
GIGABYTE has done a great job overall here with the layout, although it’s worth pointing out that if all four x16 slots are populated with a dual-slot GPU, all of the x1 slots become unusable. For a lot of people, this won’t be an issue, but given the fact that the included Wi-Fi card is destined for one of these slots, GIGABYTE in effect prevents you from taking advantage of two board features at the same time – 4-way GPU, and Wi-Fi. I’ll jump to conclusions, however, that Wi-Fi is going to be low-priority on a quad-GPU setup.
Alright – let’s buckle-up and go on this hardware tour.
As covered on the previous page, the G1.Sniper 5 supports 32GB of RAM with its 4 DIMM slots, with further support of up to DDR3-3000 speeds. At the top-right corner of the board are three buttons; red = power, blue = reset, and black = CMOS clear. Below these are the board’s 2x 3-pin fan headers and LED BIOS code readout.

Looking at the shot above, and to the right of the DIMM slots, we can see two switches. These correlate to the dual-BIOS function; one acts as a switcher, and the other disables the dual-BIOS function for those who don’t want it (I can’t come up with a reason for doing that). Also worth pointing out is the red USB 3.0 internal header – a convenient spot for those using front-panel peripherals (such as the one included with the board).
Moving to the bottom-right part of the board we can see an attractive heatsink (which cools the Intel Z87 chipset), BIOS battery, ATX chassis connectors, another USB 3.0 internal header, two internal USB 2.0 headers (one is half cut off in the photo), and finally, two of the bottom 4-pin fan headers.

The next shot is interesting for a couple of reasons. For starters, we can see the Creative audio solution to the left, which has been separated from the rest of the board with a trace path. We can also see the other two bottom 4-pin fan headers, along with the 4x x16 and 3x x1 PCIe slots.

Audio is a major focus of GIGABYTE’s latest G1 series, a point that is proven with the inclusion of a feature most people won’t take advantage of: A removable OPAMP, which can be seen in the below image, near the center. One feature a lot of people with higher-end headphones might want to take advantage of is the built-in amplifier – but, it works only when using the front panel audio connector (the internal header is also located on this “card”).

For those who feel more confident when their audio components are gold-plated, GIGABYTE has got you covered here.
And here is the LGA1150 socket in all its glory. Exciting stuff, huh? More worth looking at might be the heatsink solution which has input/output water cooling barbs on either side, in addition to a small fan located to the top-left. Motherboards that feature built-in water cooling capabilities are hardly new, but GIGABYTE’s implementation looks quite good here.

Below is a better look at the top of the board. It’s crowded, but it shouldn’t be crowded enough to prevent most large CPU heatsinks from being used (it’s worth double-checking in case you are planning to use a mammoth cooler, though).

We’ve covered a number of things in this article so far that helps set this board apart from most, and it’s time to add another to the list: Dual HDMI ports. I admit to having a horrible memory, but I do not recall ever seeing this in a motherboard before. The idea is that you could use one HDMI port for audio, and the other for the display (which would assume you’re plugging into an amp, and not into a monitor that has built-in speakers). Like the rest of the audio-related hardware, these ports are gold-plated.

In addition to the HDMI ports, there’s also a DisplayPort, 2x USB 2.0 ports, 6x USB 3.0 ports, the dual LAN options, and full complement of audio jacks. Oh – and for those with the need, a PS/2 keyboard or mouse port (I like to call these the “Oh crap, the computer is beyond repair so I need a non-USB keyboard to fix it” port).
All motherboards include accessories, so let’s start with some that – once again – set this board apart. First, an additional OPAMP is included for those who want to fiddle with their sound reproduction, along with the tool required to remove the one on the board.

To help prove that GIGABYTE isn’t just implementing a feature like this to separate itself for the sake of separating itself, it offers an OPAMP kit that provides three other solutions: Burr-Brown, Linear Technology, and Analog Devices.
As of the time of writing, however, I couldn’t find that particular kit available anywhere, which leads me to believe that it’d be easier found in Asia. Still, it’s the thought that counts, and there are certainly many ways to procure different OPAMPs on these shores.
For the Wi-Fi solution, the single antenna that ships with this board can also be seen in the above photo (it connects to both available connectors on the included card).
Finally, a look at the crazy assortment of other accessories GIGABYTE has included here.

Because AMD’s vendors have made sure to include a CrossFire bridge with each card, one is never included with a motherboard – except here, apparently. For SLI, every possible bridge is included – another rarity.
Apart from that, we can see the I/O back panel, 6x SATA cables, a USB cable which connects the Wi-Fi card to an onboard connector, the Wi-Fi/Bluetooth PCIe card, and front-panel accessory which adds 2x USB 3.0 ports to the PC.
You might be wondering why a Wi-Fi card would need a USB cable, and I was right there with you. GIGABYTE offers an iOS app that allows you to negotiate data transfers with this Wi-Fi solution, as well as manage EasyTune settings (think remote overclocking). As I don’t own an iOS device, this isn’t a feature I tested, but fortunately it seems pretty self-explanatory. Let’s hope Android will get some love down the road.
Onward to a look at the EFI.

Support our efforts! With ad revenue at an all-time low for written websites, we're relying more than ever on reader support to help us continue putting so much effort into this type of content. You can support us by becoming a Patron, or by using our Amazon shopping affiliate links listed through our articles. Thanks for your support!

Rob Williams
Rob founded Techgage in 2005 to be an 'Advocate of the consumer', focusing on fair reviews and keeping people apprised of news in the tech world. Catering to both enthusiasts and businesses alike; from desktop gaming to professional workstations, and all the supporting software.


