- Qualcomm Launches Snapdragon 4 Gen 2 Mobile Platform
- AMD Launches Ryzen PRO 7000 Series Mobile & Desktop Platform
- Intel Launches Sleek Single-Slot Arc Pro A60 Workstation Graphics Card
- NVIDIA Announces Latest Ada Lovelace Additions: GeForce RTX 4060 Ti & RTX 4060
- Maxon Redshift With AMD Radeon GPU Rendering Support Now Available
Social & RSS Feeds
Latest Videos


Latest News
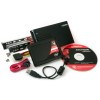
Kingston SSDNow M Series Bundle
by Rob Williams on May 22, 2009 in Storage
Have the urge to jump on the SSD bandwagon, but don’t want to go through the hassle of yet another format and OS re-installation? Don’t fret, because Kingston has got you covered. With their new SSDNow M Series bundle, you’ll have all you need to upgrade from your current drive, while keeping your OS configuration and applications intact.
Page 3 – Cloning Process
It goes without saying, but I’ll say it anyway. Whenever you do anything system-intensive to your PC like this, especially dealing with partition-changes, it’s absolutely imperative that you back up all of the data you need from your main drive. It’s unlikely that the process will fail, but you certainly don’t want to take a chance. There’s no telling what state a power surge or outage would leave your PC in.
You are in some ways protected even during the cloning process though. Because the Acronis software allows you to retain all data on the original drive, rather than deleting it, even if the process fails, nothing should happen to that data. After all, the software isn’t writing to that drive, but the new one. But, it’s still better to be safe than sorry, as they say. When it comes to your personal data, you do not want to take things lightly.
Because the entire process takes place in a bootable environment, I had no method of taking screenshots, so apologies for the lack of those. For the most part though, there’s not much to see, and the entire process is rather simple. The environment itself has Windows XP features, such as the window styling, but it’s actually built on-top of a Linux kernel, and we can assume that one application used for this process is ‘dd’ – a popular choice used by Linux users looking to copy data byte-by-byte.
To prepare for the clone process, you need to install the SSD into your computer, preferably as the main drive (installing it into the S-ATA 0 port) and then moving the source drive to any port after it. If you’re doing this on a notebook like I am, then all you need to do is put the original hard drive into the enclosure, and then install the SSD into the system. Overall, this process is simple.
Once you boot up with the included CD-ROM, you are welcomed by Acronis True Image HD, and three simple options. You can either back up your entire hard drive to a single file (a la Norton Ghost), restore that image, or clone an entire drive. If you picked up this kit, chances are you will want to clone and avoid the others. However, if you have more than one hard drive installed in your PC, and a backup file would fit on one of those, that’s an option you might want to take advantage of prior to the cloning process.
Choosing the cloning option will again avail a few more options, all of which are straight-forward. The most important of them all is whether or not you want to retain the data on the source drive, and that’s an option I recommend. If the clone goes well, you can easily format the drive after you get your machine back up and running. After choosing the options you need to, the cloning process gets underway. In our case, the entire process took about two beers… err… one hour to complete, so it’s rather fast overall.
With the cloning process complete, all you have to do is reboot your computer and await the boot process, which now will take place on your ultra-fast storage device. At this point, you are free to remove the source hard drive, and if you are using the enclosure, you can go ahead and format (assuming your PC boots fine), and from this point forward, you can continue using the enclosure to use your old hard drive as external USB storage.
Here’s how things looked after I got back into Windows on the new SSD:

As you can see, there’s absolutely no fragmentation, and that’s what we’d expect with a brand-new hard drive. We have quite a bit of our drive space used, but not so much that it will degrade performance. Below, you can see exactly how much free space we had.

But what about performance? After all, that’s what we’re all here for!

While our speedy 7200RPM mobile hard drive hit an average of 65.3 MB/s read speed, the SSD boosted that drastically to 176.7 MB/s. And where latency is concerned, there’s no comparison: 0.2 ms for the SSD and 16.4 ms on the mechanical drive.
It’s important to note that SSDs will vary in speed on some machines, primarily if you have a slower processor. On our notebook, we’re using a 2.0GHz CPU, and believe it or not, that proves to be a little bit of a bottleneck. To take full advantage of the speed, we recommend at least a 2.5GHz processor, as we’ve reviewed notebooks with such chips and found them to have ideal SSD performance. If you’re on a desktop and are using a decent CPU (and assuming you are purchasing an SSD, chances are you have one), you should be ready to see 200MB/s+ average read speeds and <0.1 ms latencies.

Support our efforts! With ad revenue at an all-time low for written websites, we're relying more than ever on reader support to help us continue putting so much effort into this type of content. You can support us by becoming a Patron, or by using our Amazon shopping affiliate links listed through our articles. Thanks for your support!

Rob Williams
Rob founded Techgage in 2005 to be an 'Advocate of the consumer', focusing on fair reviews and keeping people apprised of news in the tech world. Catering to both enthusiasts and businesses alike; from desktop gaming to professional workstations, and all the supporting software.


