- Qualcomm Launches Snapdragon 4 Gen 2 Mobile Platform
- AMD Launches Ryzen PRO 7000 Series Mobile & Desktop Platform
- Intel Launches Sleek Single-Slot Arc Pro A60 Workstation Graphics Card
- NVIDIA Announces Latest Ada Lovelace Additions: GeForce RTX 4060 Ti & RTX 4060
- Maxon Redshift With AMD Radeon GPU Rendering Support Now Available
Social & RSS Feeds
Latest Videos


Latest News
Zalman VF3000N GPU Cooler
by Rob Williams on September 6, 2010 in Cooling
The summer might be about over, but the need to keep our graphics cards cool is one that never goes away. To help make sure that our GTX 200 cards are running at their best, Zalman has released the VF3000N cooler. It offers an abundance of fins and copper, a lot of room for airflow, and a surprisingly easy installation process.
Page 2 – Installation and Testing
As this is the first GPU cooling review we’ve done in quite a while, we’re still ironing out our methodology. So, this review will act as the base for things to come. Since GPU cooling is quite important as far as we’re concerned, we’re interested in publishing regular looks at the various solutions available.
Because this cooling review will be somewhat of a “one-off” (due to the fact that this cooler is for a last-gen card), we lack any sort of comparison – except to the stock cooler. In future reviews, we’ll have roundups and the like in order to develop those important comparisons.
To help push our GPU’s hard for testing, we utilize OCCT 3.1.0, which in our experience proves to be the most effective way to stress the card hard. It’s comparable to LINPACK for CPU stress-testing, in that the test is likely overkill, but it gives us the worst-case scenario which is good for obvious reasons.
After the PC is booted up and reaches the desktop, it’s left to idle for five minutes, at which point GPU-Z is loaded up to track temperatures. We then run a 15 minute run of OCCT’s GPU stress test, which is more than enough to push GPUs to their breaking point.
Since I use a GeForce GTX 285 in my personal PC, I decided to perform the testing there. My build isn’t the best, with a bit of a rats nest going on, but both the stock cooler and this one were in the same situation for testing, so it’s of no issue. A picture of the final install is shown at the end of this page.
|
Component
|
Model
|
| Processor |
Intel Core i7-965 Extreme Edition – Quad-Core, 3.20GHz, 1.30v
|
| Motherboard |
Gigabyte GA-X58A-UD5 (Rev 1.0) – X58-based, F5 BIOS
|
| Memory |
Kingston HyperX – 12GB DDR3-1333 7-7-7-24-1T, 1.60v
|
| Graphics | EVGA GeForce GTX 285 1GB |
| Audio | |
| Storage | |
| Power Supply | |
| Chassis | |
| Display |
Dell 24" 2408WFP
|
| Cooling | |
| Et cetera |
Before jumping into the test results, let’s first get this thing installed, shall we? I admit that at first, I was a little overwhelmed as to the complexity of the entire setup… it’s far from being an all-in-one cooler that you simply slap on the card. Don’t believe me? Check it out:

The reason for all of the individual pieces is that the cooler supports the GeForce GTX 260, 275, 280 and 285, which can have slightly differing layouts. That said, you won’t get the VF3000N installed in 15 minutes, but rather closer to an hour. We’ll see if that hour is worthy with a look at our results later.
The first step for installation is to remove the old cooler and clean up the remaining residue. You’ll need to clean the memory chips, GPU die and also the NVIO (chipset to the left). To start things off, I used a couple of Q-Tips and then my fingers to scrub off as much of the residue as possible. Afterward, I put a bit of rubbing alcohol on some paper towel and gently cleaned up to as good a state as possible. The end result wasn’t so bad!

After the card is cleaned up, you’ll need to install the various heatsinks that are included with the kit. The first one I recommend installing is for the NVIO, since once in place, it’s secure and won’t accidentally be knocked out during the installation of the others. Afterward, the FET heatsinks are likely the best to tackle, followed by the many small memory heatsinks.

With all of the heatsinks installed, the job is almost done. You’ll need to take four “nipples” and screw them into four outward holes (is this a hardware porno?), and then put a rubber ring on each, to give a bit of a cushion for when the cooler is secured to the card.

At this point the cooler can be attached to the card, and once done, the card’s backside will have the four screws visible and ready to use. Before securing the cooler, you need to put down a PVC washer on each of the exposed screws, and then attach a spring to each of the fixing nuts. Then it’s just a matter of screwing the nuts into place, and ta da, the job is done.

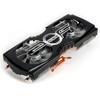
Here’s the card in its completed form:

The VF3000N has a downside, but it leads to an upside. As you can see in both the above and below photos, the cooler is a bit taller than the reference, so rather than simply taking up the room of two slots, it instead bumps that up to three. That’s the downside… the upside is that because of its larger frame, the cooling-ability should be superb.

The above picture doesn’t reflect it, but once the GPU is installed into your PC, you need to connect the included fan controller that allows you to throttle the fan depending on what you want… silence or improved cooling ability.
With everything installed and ready to go, how well does Zalman’s nifty-looking cooler compare to the reference?

With the VF3000N utilizing the lowest fan speed possible, the GeForce GTX 285 dropped 13°C at idle, and 16°C at load. In this fan mode, the card is barely audible – only heard if you have your chassis door off and are at almost ear-level with the card. During my tests, the hard drives reading data were louder.
With the fan cranked to its maxed point, the temperatures at idle decreased by another 3°C and had a much more significant 8°C drop at load. Given that most hardcore gamers will prefer to keep the fan maxed for the best performance and stability, we can effectively say that the cooler dropped the temperature by 24°C at load, and 16°C at idle. Given that we were dealing with 96°C load temperatures beforehand, this is quite nice performance.

Support our efforts! With ad revenue at an all-time low for written websites, we're relying more than ever on reader support to help us continue putting so much effort into this type of content. You can support us by becoming a Patron, or by using our Amazon shopping affiliate links listed through our articles. Thanks for your support!

Rob Williams
Rob founded Techgage in 2005 to be an 'Advocate of the consumer', focusing on fair reviews and keeping people apprised of news in the tech world. Catering to both enthusiasts and businesses alike; from desktop gaming to professional workstations, and all the supporting software.


