- Qualcomm Launches Snapdragon 4 Gen 2 Mobile Platform
- AMD Launches Ryzen PRO 7000 Series Mobile & Desktop Platform
- Intel Launches Sleek Single-Slot Arc Pro A60 Workstation Graphics Card
- NVIDIA Announces Latest Ada Lovelace Additions: GeForce RTX 4060 Ti & RTX 4060
- Maxon Redshift With AMD Radeon GPU Rendering Support Now Available
Social & RSS Feeds
Latest Videos


Latest News
In Win X-Fighter Mid-Tower
by William Kelley on July 22, 2009 in Cases & PSUs
We’ve taken a look at an almost countless number of computer cases over the years, but the X-Fighter is unlike many of them in various ways. The most noticeable feature is its design, which is very sci-fi inspired. Past that, there’s been a lot of thought gone into the chassis’ cooling-ability, and that proves to be one of its nicest features.
Page 1 – Introduction
Established in 1985, In Win has been around since the dawn of the home PC. Starting out with building cases, they have expanded to power supplies and storage devices. Over the years, they have steadily grown into a very successful business and have won many awards along the way. Safety and customer satisfaction have been their key goals.
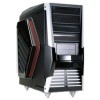
Today we take a look at the company’s X-Fighter. It comes heavily modified straight out of the box and sports various visual cues from the spacecraft of Sci-Fi movies. Even a quick glance will tell you that this is no ordinary case. There are sharply angled lines, adjustable vents and special lighting effects which will tantalize your creative inner being.
Not wanting to be all show and no go, there has been some real thought into the cooling capabilities as well. The front 120mm intake fan comes equipped with an easy-to-remove filter as do the side vents. To the rear we get a 120mm exhaust fan, while the lower half of the motherboard sports a set of 80mm fans dubbed the “VGA Turbo Cooling System”.
Closer Look
Out of the well packed box we get our first impression of the X-Fighter. The black and silver color scheme is done pretty well. The 5 1/4″ slot covers are made of mesh for extra airflow. There is a large power switch that spans the front panel with a reset switch safely tucked behind it.

The left side panel is a very elaborate design. Here we see the large louver style adjustable vents which also has the X-Fighter logo embossed in. The striking red accent really adds a nice touch and stands out sharply from the black coloring of the panel itself.

Both side panels are held in place with a nice simple clasp design. While I found them effective to use, the panels were not the easiest to seat into place in order to clamp them down. The plastic was of a good solid feel and they should hold up well.

The right side panel is somewhat plain and lacking of any styling cues. It is worth mentioning that they did recess an area in order to give you some grip when sliding the panel off for any work you need to do inside.

At the back we find a typical layout which places the power supply at the top of the chassis. Pre-drilled and rubber grommeted holes for external water cooling tubing are positioned here as well. The exhaust fan grating is large and will allow good airflow with little impedance. Be very mindful of all the edges on the motherboard tray area. They are all quite sharp and can easily cause injury.

On the top panel we find the I/O panel is set towards the rear and at a nearly 90 degree angle. We are given 2 USB ports, 2 e-SATA ports, 1 FireWire and microphone/headphone jacks. The placement so far towards the back could pose problems for people who house their PC in a recessed area.

Another striking design touch are the spiked case feet. I am not sure what they were trying to accomplish with this design, but this is going to be a love it or hate it feature. For me, I am on the fence as to how I feel about them. If the power supply was bottom mounted then they would be very useful for allowing airflow. Since this is not the case, I really do not understand this setup and would have preferred more traditional rubber feet.

Moving towards the interior, I wanted to highlight the inside of the side panel. In Win has chosen to include the Intel spec adjustable cooling duct. Both the duct and the lower grating are given filters. Sadly, the upper filter does not stay in place well if the duct is removed for those of use with tall non-reference CPU coolers.

Once you get inside you get your first glimpse of the “VGA Turbo Cooling System”. The large plastic housing also helps direct airflow over and around the hard drive mounting area. I really would have liked to of seen the inside painted black to match the exterior since it does make for a cleaner and richer look.

Once you fold down the cover there is room for four hard drives to be mounted internally. The included tool-less mounting rails are well-built and are coated with rubber to help isolate noise from vibrations.

Housed in a specially designed casing, all the tool-less rails for you ODD, HDD and floppy type drives are stored neatly and within close reach. This is a great feature that takes advantage of an area that is not likely to see anything else installed.

The PCI area also features a tool-less clip design to hold all your expansion cards in place. The slot covers do not come pre-installed and there are only 6 included… so those of you who that do not install any cards here will have an open slot. While this is not a huge deal, it is strange that there were not a full complement of seven covers included.

An easily removable 120mm exhaust fan is installed in the rear inside a clip on housing. The extra space next to the power supply is given to the holes for external water lines. The I/O wiring is up here as well. I was not happy with the placement of these wires as they are too close to the power supply and those of us with larger supplies will have issues with this design. You will have to be careful not to pinch the wires when installing your power supply.

Access to the front 120mm intake fan and its filter is gained by a simple press of a lever, The hard drive cage pivots out so that it easily clears the front section of the case.

Another lever allows the assembly to slide out with a quick push. This is a well-thought-out design as I have seen multiple cases that turn this into quite the chore with less accessible designs.

There is not much in the way of extras included. We get a simple fold-out user’s manual as well as a small bag of screws, plate covers and a 3 to 4 pin converter for a single fan. Since most of the motherboard standoffs are embossed into the motherboard tray, there isn’t much need for anything extra.

Overall build quality is good and the structure is solid. The plastic feels strong and does not creak or bend while being handled. Space is somewhat limited seeing that this is a mid-tower. Let’s get right to the installation and testing on the next page, as well as my final thoughts.

Support our efforts! With ad revenue at an all-time low for written websites, we're relying more than ever on reader support to help us continue putting so much effort into this type of content. You can support us by becoming a Patron, or by using our Amazon shopping affiliate links listed through our articles. Thanks for your support!