- Qualcomm Launches Snapdragon 4 Gen 2 Mobile Platform
- AMD Launches Ryzen PRO 7000 Series Mobile & Desktop Platform
- Intel Launches Sleek Single-Slot Arc Pro A60 Workstation Graphics Card
- NVIDIA Announces Latest Ada Lovelace Additions: GeForce RTX 4060 Ti & RTX 4060
- Maxon Redshift With AMD Radeon GPU Rendering Support Now Available
Social & RSS Feeds
Latest Videos


Latest News
SilverStone Raven RV02 Full-Tower
by William Kelley on October 7, 2009 in Cases & PSUs
SilverStone’s Raven RV01 chassis might not have been the most well-received, but the company has attempted to make up for all the mistakes of the initial chassis with a follow-up, the RV02. Fortunately, the company has done just that, and except from a rather minor issue, and possibly its price, this is almost a perfect chassis.
Page 1 – Introduction
If I were asked as to which component of the modern PC which has seen the least true innovation, I would quickly answer “the chassis”. It would be unfair to say that there have not been noticeable steps forward in design and construction, but there really has not been a revolutionary leap forward, either. Thankfully, the poor breathing white boxes of the 90’s are long behind us, and we are finally starting to see some big strides forward.
The current driving force behind nearly all current case configurations is airflow. Whether we like it or not, PC components are getting hotter and larger. CPU manufacturers are adding more and more cores to their processors, and video cards seem to grow an inch with every new release. Heatsinks are growing proportionally as well, and the once exotic water based cooling solutions are now becoming common place, requiring more free space and airflow. It makes one wonder just how far ahead these designers must look to even stay with current technology.
Founded in 2003, SilverStone has quickly become one of the first names that comes to mind when thinking of high-end PC components. From power supplies to cooling solutions as well as the chassis and other peripherals, they have proven time and time again their ability to build high-quality and top-performing products.
With the release of the original Raven RV01, we finally saw a design like no other with the implementation of turning the motherboard 90 degrees. The only other “radical” change attempted before this was the short-lived BTX design which flipped the motherboard to the opposite side of the chassis. While the RV01 had growing pains, it finally offered some real change in design and some outside-the-box thinking. The second generation RV02 looks to be taking the original concept further along the evolutionary ladder. So let’s haul it out of the box and see just how far and in which direction it takes.
Closer Look
Once out of the highly decorated box, we get our first look at the Raven RV02. As usual, SilverStone has done an excellent job with protective packaging. My first impression was definitely positive as the high level of quality of the manufacturing is readily evident. There is a solid feel and all the lines and gaps in the panels are straight as an arrow. Even the plastic has a high-end feel with no creaking or looseness anywhere. The paintjob is also without flaws.

As per this design, the left side panel of the chassis is devoid of windows and venting. Looking down along the side you get a strong impression of the depth of the chassis, which comes in at just under 26″. Conventional chassis’ are usually this tall, not this deep. Other than the SilverStone logo on the top rear, there is not much else to look at here.

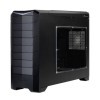
Swapping sides shows off the oversized window on the right side panel. I was fully impressed with the quality here and the strong stiff feeling of the windowed panel. Many times strength is sacrificed in order to have a larger opening. Those of you that enjoy looking in at the inner workings of your monster will not be disappointed in the least at the panoramic sizing of the opening.

Staring down the top from front to back allows us to take in the simple yet very effective design. In the very front there is a large V shaped piece that glows blue when your PC is on. Directly behind that there is a reset button on the right and a power button on the left. Between those controls are two well-placed USB ports with headphone and microphone jacks in between. I really like the spacing since far too many others place the USB ports too close together making them nearly impossible to use at the same time. The fully functional venting dominates the rest of the topside with the rest of the I/O connections hiding beneath.

To the rear of the chassis we are once again reminded of the uniqueness of the design. There is a large filtered opening in the middle that allows you to install the power supply in an orientation to draw in fresh air from the outside. The filter is simple to remove with a quick press of the tabs. To the top of the rear is the slot for you to run all your cabling cleanly outside.

Dropping down to the bottom we see the heart of the cooling system. Three speed adjustable oversized 180mm filtered fans draw in massive amounts of air. The openings are large and the spacing of the grating is also quite large, causing little to no turbulence in incoming airflow, which also gives the side benefit of keeping the noise down.

You external water cooling enthusiasts are also given openings fitted with grommets at the rear as well. While I am not sure of the awkwardness of the angles and how that would affect tubing routing, there are both kink resistant tubing and elbowed fittings available to take care of any problems in this department. While on the subject of water cooling, SilverStone includes brackets to internally mount a radiator up to 360mm long.

With a quick pull the top cover pops off for quick access to the input output section of your PC. It is hard to tell in this picture but they have recessed this area two inches with a further inch and a half available under the meshed panel. There is ample room for cabling while keeping the interference for exiting airflow down to an absolute minimum. This is a far better implementation over the original RV01.
You are also given eight PCI slots should you desire to really push the envelope with multiple video cards. A single 120mm fan takes care of exhaust duties over the CPU area. The power supply is mounted in the rear of the chassis keeping it in a “normal” orientation which addresses another major shortcoming of the original’s bottom mount design.

Between the exhaust fan and the power supply are three small slide switches that control the speeds of the bottom mounted 180mm fans. On high-speed, the fans are slightly audible while setting them all to low takes their noise nearly completely away. I personally like this placement since there is little effort required to access them to change speeds on the fly should you choose to. If you decide to use a fan controller instead of the included controls, you will be happy to know that they have given all of the case fans plenty of length to reach the 5 1/4″ slot area without the need for extensions.

I wanted to highlight another well-thought-out detail at the top rear. Keeping the cabling cleanly routed outside is a must and this large fortified bracket is well suited for the job making removing and installing the cover a breeze without the fear of pinching the cables.

From the inside looking down we see the heart and soul of the cooling system. Three 1800mm fans intake cool outside air from the bottom of the chassis and pull it over the entire heart of your PC. The thick plastic grates are strongly secured and the spacing and size of the holes also minimize air turbulence and noise. Take note that your hard drives will also receive all the air they need to stay nice and cool.

To help keep out the dust we are given large and simple-to-remove filters placed under each fan. Removing the side panel is all the is required to simply slide them out of their homes in order to give them a cleaning. This is one of the best implementations of fan filters I have seen to date.

Another trademark SilverStone feature is the quick release tool-less 5 1/4″ locks. With a quick push on the top to release and another push on the bottom to firmly lock your drives in place there is no fuss in the installation and removal process. Drives are held very firmly in place and this will undoubtedly benefit noise reduction by not allowing any unwanted vibrations from looseness.

Hard drive mounting is facilitated with an easy to remove cage at the bottom front. Eight thumbscrews are used to secure it firmly in place. Drive orientation is kept perpendicular to the bottom of the chassis and this will allow the air to flow around and between for maximum efficiency.

With the drive cage removed from the chassis we see the oversized slots for airflow as well as the rubber isolators for each screw. It was a simple affair to slide in drives and align the screw holes. The supplied hardware firmly attaches the drives while giving them room to float on the rubber isolators.

The inside of the rear of the motherboard tray is set aside for cable management. There are plenty of slots for the included reusable wire ties as well as regular cable ties should you choose so. There is roughly just over an inch in space between the tray and the side panel so you will have no problems tucking all your wiring inside and out of the interior airflow.

One important feature to highlight here is the large opening behind the CPU mounting area. By giving us this nice access hole we have the ability to simply and quickly remove install heat sinks and cooling devices of all kinds onto the processor without needing to remove the motherboard from the tray. While this may be a feature that is not put to the test very often you will be very pleased when you do need it since there is nothing worse than having to tear down your PC just to install a new cooler.

Included with the case is a large assortment of accessories for adapting to your required configuration. From the 2.5″ SSD converter to the 3 1/2″ to 5 1/4″ bay adapters, there is nothing left out here. There are more than enough screws for all your peripherals as well as some adapter plates for the internal mounting of water cooling radiators. I really liked the inclusion of the fan power plug since it will power three fans off of one power plug. The included instruction manual is somewhat small and devoid of much detail, although it is a decent guide that will help you figure out what you need to.

Onto the installation and temperature testing!

Support our efforts! With ad revenue at an all-time low for written websites, we're relying more than ever on reader support to help us continue putting so much effort into this type of content. You can support us by becoming a Patron, or by using our Amazon shopping affiliate links listed through our articles. Thanks for your support!