- Qualcomm Launches Snapdragon 4 Gen 2 Mobile Platform
- AMD Launches Ryzen PRO 7000 Series Mobile & Desktop Platform
- Intel Launches Sleek Single-Slot Arc Pro A60 Workstation Graphics Card
- NVIDIA Announces Latest Ada Lovelace Additions: GeForce RTX 4060 Ti & RTX 4060
- Maxon Redshift With AMD Radeon GPU Rendering Support Now Available
SUSE Studio: The Do-it-Yourself Linux

Linux is well known for being very customizable, but with SUSE Studio, things are taken to an entirely new level. Imagine taking a base template, building on top of it with your personal software choices, then configuring countless other aspects (even a SQL database), and then building it as a bootable ISO or VM. That’s exactly what makes SUSE Studio so great.
Page 1 – Introduction
If you’ve ever dreamed of building your own Linux distro, or have given it a try in the past but found it to be too complicated, then the service that SUSE Studio avails is bound to intrigue you. Well, as long as you’re perfectly happy with openSUSE, that is.
I first learned of SUSE Studio a a few months ago, and though I don’t dabble with openSUSE all too often, the idea behind the service was far too interesting to ignore. It wasn’t so much the premise of the service, but the fact that it was unbelievably robust. Rather than it be a question of, “What can it do?”, it was more like, “What can’t it do?”.
To put it simply, SUSE Studio is a service that allows you to compile many different aspects of a distro together in order to ultimately build something you could call your own. Since the base of the process is openSUSE, an already well-established distro, you won’t have to worry about every little aspect of building a distro truly from scratch, such as hardware-detection, the installer, et cetera.
Like any new self-respecting service site, SUSE Studio is in its beta stage, and is currently only accessible if you have received an invite. Luckily, anyone can sign up and hope for such an invite, so if you’re interested in taking the service for a good spin, sign up right away and cross your fingers that you’ll get your invite in good time. At it stands, there is no word on when the service will launch to the public or remove its beta tag.
Closer Look at SUSE Studio
Before I jump into our in-depth look at the service, I’d like to preface everything by suggesting who should, and who shouldn’t be prepared to use SUSE Studio. If you consider yourself a Linux newbie, chances are you don’t want to dive into something like this, because the service gives a lot of control, and you’re bound to welcome yourself with a lot of trial and error. If you want to just get up and running with a Linux install, I’d recommend downloading the full-blown version of SUSE, or another popular distro (Fedora, SabayonLinux, PCLinuxOS and Ubuntu are my recommendations).
Who this service is designed for are those who understand Linux a little bit better than the average user. Understanding the desktop is one thing, but in order to build something with SUSE Studio that you’ll be happy with, you’ll want to understand a little bit of the back-end as well, and especially know which applications you’ll want to be bundled with the finished distro. After all, building your own distro is supposed to ultimately please you, so if you overlook some key factors, you may end up having to configure the installed distro more so than if you had of just downloaded the full-blown openSUSE DVD.
Or, you could not listen to me at all and give it a try regardless. After all, there’s nothing really at risk except your time, so if you’re at all intrigued by the idea of customizing and building your own distro, by all means give it a go.
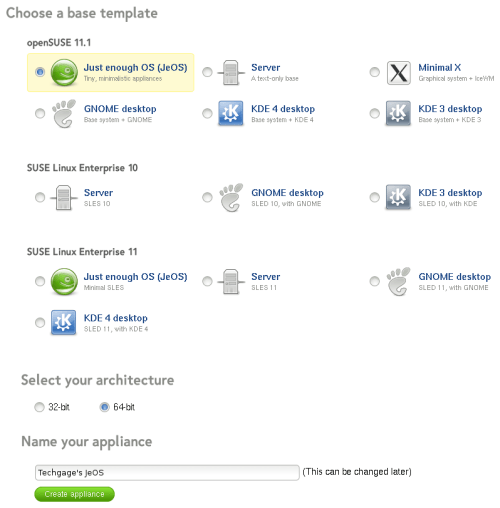
Once you’re logged into the service, you’ll be immediately greeted with the page that allows you to get right to building and customizing your very own distro. Here, you can choose from one of the many “base templates”, separated into three categories: openSUSE 11.1, SUSE Linux Enterprise 10 and SUSE Linux Enterprise 11. Unless you’re looking to build a Linux server or business PC, you’ll just want to pay attention to the first section.
The first two available options are to build a text-only distro, while the other four allow you to bundle in a desktop environment. These include the minimalistic IceWM, GNOME, KDE 3 and also KDE 4. You can also name your distro at the bottom to something that will help you better pick it out later, should you design more than one.
For my first distro, to help breathe in the full experience quicker, I went with JeOS, the text-only distro. The first tab worth checking out is Software, which is where most of the software configuration takes place. Here, you can search for software using the available search box, or browse by category. It’s important to note that each base template truly is a “base”, in that software, unless it’s explicitly needed, is not included.
To give the search feature a whirl, I searched for Lynx, a text-based web browser that deserves to be installed on any Linux system, especially a text-only one. Sure enough, the result came right up, and adding it was as simple as clicking the “+ add” button to the left. If you’re unsure about the application you’re about to add, you can look at the “Popularity” tab, as the longer the bar, the more common its inclusion in other people’s builds.
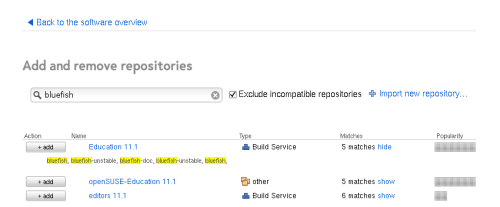
Should the application you’re looking for not exist in openSUSE’s base repository, you have the option of adding others to your list. If you’re unsure whether the application you want is available in any available repository, you can use the search box and after a second of waiting, you’ll have your answer. After you add a repository to your list, the search box on the main page will include it in its query.
As if that feature wasn’t cool enough, you even have the ability to pre-install software not found in any repository. There are a few possible options here. The first and perhaps most common will be the “Upload RPMs” option as seen on the screenshot of the Software tab above. With it, you simply upload an RPM (common Linux package manager) file, and because all of the relevant information is found inside, the installation will pretty much be taken care of for you.
Support our efforts! With ad revenue at an all-time low for written websites, we're relying more than ever on reader support to help us continue putting so much effort into this type of content. You can support us by becoming a Patron, or by using our Amazon shopping affiliate links listed through our articles. Thanks for your support!


