- Qualcomm Launches Snapdragon 4 Gen 2 Mobile Platform
- AMD Launches Ryzen PRO 7000 Series Mobile & Desktop Platform
- Intel Launches Sleek Single-Slot Arc Pro A60 Workstation Graphics Card
- NVIDIA Announces Latest Ada Lovelace Additions: GeForce RTX 4060 Ti & RTX 4060
- Maxon Redshift With AMD Radeon GPU Rendering Support Now Available
Social & RSS Feeds
Latest Videos


Latest News
Thermaltake Armor A90 Mid-Tower
by William Kelley on August 9, 2010 in Cases & PSUs
Looking for a mid-tower chassis that offers a big bang for a small buck? Thermaltake hopes to win us over on those claims with its Armor A90, a chassis built from the ground up with military-like design cues in mind, and also one that includes numerous convenience features, superb airflow, and a modest $90 pricetag.
Page 1 – Introduction
It seems that in today’s world, war not only sells, it sells extremely well. First person shooters are more popular than ever and there are millions of online soldiers out there just itching to pull the trigger. While game developers have been quick to capitalize on this trend, peripheral manufacturers have been slow to adopt. Just as in real-life war, shooting first gets the kill and the victory.
When Cooler Master developed its CM Storm line of products, we finally got some seriously good war-themed products. We reviewed the company’s two chassis models last year, the Scout and the Sniper. Both carried out the theme well and I was certain there would be other makes throwing their respective hat into the ring… but nothing materialized. It seemed like the war was over before it even began!
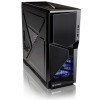
Thermaltake, arguably one of the oldest and largest manufacturers, has jumped into the fray by releasing the Armor A90. Even the name screams “weapon” and just a quick glance at the all black exterior shows it is planning on bringing a gun to a water balloon fight. The sharp-angled edges and large expanses of mesh further enhance the look and feel of military hardware.
The PC chassis has made some serious strides over the last 5 years and consumers are extremely demanding and expect a huge bang for every buck. Most don’t wish to mod their own design and even fewer are willing to sacrifice performance as well as expecting noise to be kept down to a whisper. Engineering and designer jobs have become tougher than ever and there is little room for error. So let’s get the A90 out of the box and onto the bench and put it through its paces and see just how well Thermaltake has planned its latest assault on the chassis world.
Closer Look
Seemingly as usual, UPS was kind enough to test the protective packaging of the box while shipping our review sample to us. Everything was in fine shape inside the box save for the 5.25″ bay cover which was missing. The large Styrofoam pads took a few shots with ease and the plastic covering prevented any surface marring. The front of the case uses a strong angled pattern reminiscent of a Stealth Fighter.

With the door open you get a better look at the external expansion bay area. There are accommodations for three 5.25″ devices as well as one external 3.5″ bay. To the right of the door is the I/O panel with two USB ports as well as microphone and headphone jacks. Next up are the HDD activity LED, system power indicator LED as well as a recessed reset button are below the I/O area. The power button is the diamond shaped area beneath the 3.5′ bay on the right.

A quick tug on the bottom of the front panel is all it takes to pop it off to expose the front 120mm intake fan which also sports blue LEDs. There is room for dual 120mm fans and you can also configure it with one large 200mm fan. With 6 hidden 3.5″ HDD bays right behind this area, your drives will get plenty of fresh cool air drawn over them.

On to the right side panel we see the sharp angle theme is carried through with a small window included as well as an optional 120mm cooling fan location. It should be noted that this fan opening was well thought out and kept down low as to not interfere with any tall CPU coolers on the market. This has been a problem for most cases with a fan in this area.

The left side panel is also stamped with the theme and is otherwise as one would expect. I want to point out that the edges of the panels are double rolled and there is little flex. The stronger they make these panels the more they are able to silence internal noise so another thumbs up here.

I was happy to see that Thermaltake choose to stamp the top panel as well as recessing the grating for the exhaust fan. Also included up here are two more USB ports as well as an eSATA port. It is very noteworthy to point out that there is a ton of space between the ports so that even large USB devices will not interfere with the ability to use all the ports.

Once looking down on the bottom, we see that there was plenty of attention paid to the power supply venting area. Large rubber feet keep it up high enough to allow plenty of airflow when you mount your power supply to pull fresh air in from below. Also note the large vent openings on the bottom of the front panel to channel even more airflow in through.

Looking closer at the power supply area we get to see the easily removable filter screen to help reduce dust intake into your power supply. This is an often overlooked option and is very welcome to those of us (especially me) who have a dusty home.

On the backside we see the standard ATX layout. Ample venting as well as vented PCI slot covers allows that much more heat to flow out of the case. There are punched holes for water lines to pass through to the outside should you choose.

On the inside we will take a clockwise tour of the various areas. The rear 120mm exhaust fan is of the silent type and the extra large holes in the grating means low turbulence for ultra low noise. This fan uses a three pin motherboard style connector for power.

Up top is a huge 200mm unit sporting blue LEDs. Should you choose, you can replace this fan with a single 120mm fan as well. This fan uses a Molex style power connector.

The 5.25′ expansion bays are a tool-less design and a quick pull on the tab unlocks the holder to allow you to slide in your drives. The tabs lock the drives in very securely as well.

All six internal 3.5″ bays use the same style tab design for quick installation of your drives. While there is really no vibration or sound dampening features built in, your drives are held very securely and I noticed no wayward noises from this area when the PC was powered up and running.

There is a ton of room to allow the largest power supply made ample breathing room. The adjustable bracket is easily moved to securely lock your power supply into place. This is one of the first chassis I have ever used that you could actually leave the PSU unscrewed and yet it would be held very firmly in place.

The I/O panel wiring is straightforward to use and labeled clearly. There is plenty of length no matter where your particular motherboard has its headers. We get two for the 4 USB ports, the eSATA connection, and one for sound that accommodates both HD and AC97 style motherboards.

With the rear side panel off, we see that there is no room allowed for wiring to run behind the motherboard. Thermaltake instead chose to use the space behind the 3.5″ bays as a cavity to house any extra wiring you should need to store. This does make it awkward to run the CPU power wire, but all the rest of the system wiring has plenty of hiding space.

The included hardware package is devoid of any zip ties which is really a pet peeve of mine. You do get plenty of screws as well as an installation guide. Rounding out the package are 2 grommets for the water line holes should you choose to use water cooling as well as a motherboard speaker.

The chassis is built very well and is very robust. There is no noticeable flex even with both side panels removed and the strong construction will surely help with noise reduction. I was able to sit on the top panel with little fear of damaging its structural integrity. I have to admit I was getting anxious to get the build process going as see just how well it performs under fire.

Support our efforts! With ad revenue at an all-time low for written websites, we're relying more than ever on reader support to help us continue putting so much effort into this type of content. You can support us by becoming a Patron, or by using our Amazon shopping affiliate links listed through our articles. Thanks for your support!