- Qualcomm Launches Snapdragon 4 Gen 2 Mobile Platform
- AMD Launches Ryzen PRO 7000 Series Mobile & Desktop Platform
- Intel Launches Sleek Single-Slot Arc Pro A60 Workstation Graphics Card
- NVIDIA Announces Latest Ada Lovelace Additions: GeForce RTX 4060 Ti & RTX 4060
- Maxon Redshift With AMD Radeon GPU Rendering Support Now Available
Social & RSS Feeds
Latest Videos


Latest News
OCZ 2GB DDR3-1600 Titanium – Intel XMP Edition
by Rob Williams on February 7, 2008 in Miscellaneous
DDR3 might be slow to catch on, but the competition is fierce and the selection, huge. One of the first DDR3 kits to really catch my eye was OCZ’s Titanium 2GB PC3-12800, featuring an XMP profile to offer even better settings than what are advertised. Luckily, it also has some OC’ing room to boot.
Page 2 – Stable Overclocks, Memory Bandwidth
|
|
We’ve covered the fact that these are 800MHz 8-8-8 modules, but we’ll now touch on the XMP capabilities, which increase performance all around. First and foremost, it’s important to note that for these to work with XMP, an Intel X38/X48-based motherboard must be used. The X38 chipset introduced support for XMP, as we discussed further in the interview mentioned earlier.
That said, another important fact to note is that just because there is an XMP setting for improved timings, it in no way guarantees that such a setting will be stable on your particular setup. XMP profiles are designed to offer good overclocked settings without forcing the user to do all of the tweaking on their own. It goes without saying that manually overclocking would yield better results, but for those not familiar with overclocking, XMP is a fantastic solution.
So, if an XMP profile doesn’t seem to work for you, it’s likely to be a limitation of the processor you are using. With today’s CPUs and motherboards, however, it’s very unlikely that anyone will run into a show-stopping error with these, since most, if not all, current motherboards should be able to handle the overclock.
One of the reasons I like XMP is thanks to the fact that companies like OCZ don’t include lackluster profiles. Instead, they are profiles that even a casual overclocker would be able to select and be pleased with. In the case of these modules, the second profile offers the same DDR3-1600 speeds, but with much better timings of 7-6-6-28. The tRAS can also be tightened further, but it’s rare to see an actual performance increase there.

Your guess is as good as mine regarding the second profile of DDR3-1714, but it’s there for the taking if need be. However, the timings are a far more loose 9-9-9, so should be avoided. These are performance modules, after all.
Chips used in DDR3 are certainly getting better, proven by the fact that such a nice combination of frequency and timings can be stable with only 1.9v. Granted, that’s still not low, and a RAM fan is always recommended, but it’s a lot better than the 2.0v+ that would have been required for that with kits last summer.
Overall, I have to admit I am impressed by the overclocking ability of this kit. It’s changed my thinking on what the Titanium-colored heat-spreaders represent, because they are indeed fairly overclockable, as you can see below.
- Stable Settings
- 800MHz, 8-8-8-28-1T 1.8v
- 800MHz, 7-6-6-28-1T 1.9v
- 850MHz, 7-6-6-28-1T 2.0v
- 900MHz, 8-8-8-28-1T 2.16v
I should note that for a setting to be considered stable, it needs to run through MemTest for Windows for up to at least 500% for total memory installed. Once completed, a half-hour loop of 3DMark 06 is run to assure absolute gaming stability. Lastly, stock settings are restored, and then the overclocked setting is chosen once again to make sure that it was not a lucky one-time affair.
That said, the kit did prove a little tricky to overclock at the top-end setting. The first three settings mentioned above were an absolute breeze, but at DDR3-1800 speeds, more tweaking was required. In the end, most of the problem surrounded the motherboard Northbridge voltage, which had to be raised to support the higher FSB.
Aside from that though, even the DRAM voltage had to be applied a small step at a time. At 2.10v, it was deemed unstable. At 2.2v, it was also deemed unstable. It was with a fined-tuned 2.16v that the kit became completely stable. Finicky, but I was glad to see that such speeds were possible.
Testing Methodology
For our memory reviews, we use Windows XP as our OS choice due to it’s lightweight (when compared to Vista) stature. Before benchmarking, the hard drive is first defragged with Diskeeper 2008. Before testing begins, the Diskeeper service is disabled and the computer sits idle for five minutes. Our testing machine is as follows:
- Processor: Intel Core 2 Extreme QX9650 Quad-Core 3.0GHz
- Motherboard: ASUS Maximus Extreme
- Memory: OCZ 2GB Titanium DDR3-1600 Intel XMP Edition
- Sound: Onboard HD Audio
- Storage: Seagate 7200.10 320GB x 2
- Power Supply: Corsair HX620W
- Chassis: Antec P182 Mid-Tower
- Etcetera: Windows XP Professional SP2
- Cooling: Corsair Nautilus 500
Each benchmark is run three times, with the results averaged. For our memory testing, we use both SiSoftware’s Sandra XII and Lavalys’ Everest Ultimate Edition.
Memory Bandwidth
One area where DDR3 excels when compared to DDR2 is raw memory bandwidth. There is lots, and on a kit such as this, there could be as much as 100% more when compared to a standard DDR2 offering. Having a huge amount of bandwidth will aide with processing large projects, although the real-world benefits of seeing a number higher than 8,000MB/s is debatable.
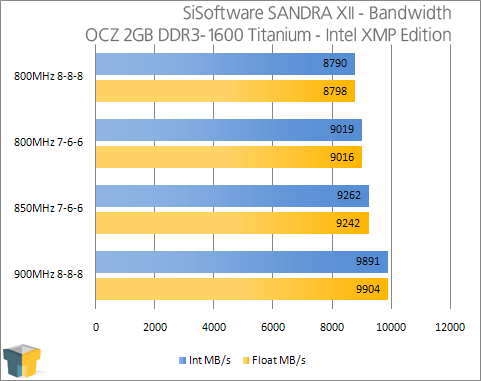
Our top overclock, though not much greater than stock, made quite a difference on the average bandwidth output here. Despite our 900MHz setting having to suffer with tighter timings, the extra bandwidth should outweigh the loss in latency.
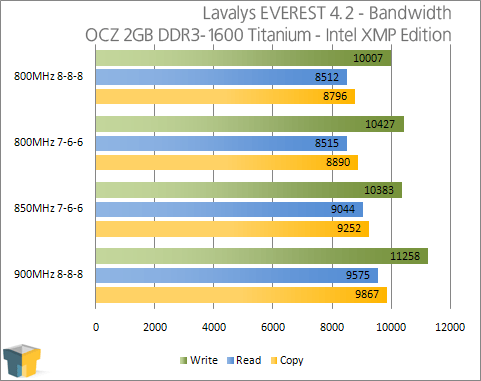
First-generation DDR3 kits were unable to break through the 10,000 mark in Everest, but stock speed takes care of that here. Similar to our Everest test, the top overclock reigns supreme, even though it’s timings are more loose.
On the next page, we will take a look at the latency these modules offer and wrap up with our final thoughts.
|
|

Support our efforts! With ad revenue at an all-time low for written websites, we're relying more than ever on reader support to help us continue putting so much effort into this type of content. You can support us by becoming a Patron, or by using our Amazon shopping affiliate links listed through our articles. Thanks for your support!

Rob Williams
Rob founded Techgage in 2005 to be an 'Advocate of the consumer', focusing on fair reviews and keeping people apprised of news in the tech world. Catering to both enthusiasts and businesses alike; from desktop gaming to professional workstations, and all the supporting software.


