- Qualcomm Launches Snapdragon 4 Gen 2 Mobile Platform
- AMD Launches Ryzen PRO 7000 Series Mobile & Desktop Platform
- Intel Launches Sleek Single-Slot Arc Pro A60 Workstation Graphics Card
- NVIDIA Announces Latest Ada Lovelace Additions: GeForce RTX 4060 Ti & RTX 4060
- Maxon Redshift With AMD Radeon GPU Rendering Support Now Available
Social & RSS Feeds
Latest Videos


Latest News
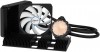
Ice-cold Temperature Killa: Arctic Accelero Hybrid II-120 GPU Cooler Review
by J.D. Kane on July 21, 2014 in Cooling
There’s no question about it: AIO water cooling solutions are here to stay. They’ve been around for CPUs; but what about GPUs? Arctic has that base covered, and it sent us its Accelero Hybrid II-120 with the unspoken promise that it is superior to any stock cooling solution. But just how good is it?
Page 2 – Installation
The next series of pictures will show you the installation phase. It’s not meant to replace the instructions provided by Arctic; these shots merely show the real-world application of those instructions.
Installing the Arctic Accelero Hybrid II-120 onto your graphics card is what I would consider an intermediate-level operation. Raw novices might be intimidated with the prospect of first uninstalling their graphics card’s stock cooler, then installing an aftermarket cooler afterwards. However, it’s all a matter of understanding which screws you need to remove from your graphics card (not all of them need to come off), then following Arctic’s very good instructions to install the Accelero Hybrid II-120.
A reference-design EVGA GeForce GTX 680 is our GPU guinea pig. It’s the same graphics card I used in January 2014 for one of Arctic’s competitor’s products. The photo below shows the GTX 680 with its cooling apparatus completely removed. Your graphics card will look something like this once you’ve removed its cooler.

Note that the GPU itself (the big chip in the middle of the PCB) still has some residual TIM (thermal interface material). This residual TIM will need to be removed before installing a new cooler onto the graphics card. I wipe the old TIM off with a paper towel soaked with 98% isopropyl alcohol.

It’s very important to remove the old TIM from the graphics chip. I also lightly clean with graphics RAM chips and the voltage regulators (the big and small black chips, respectively) with a wipe of alcohol-dipped paper towel as well, just to remove any residual thermal pad material from them.
Before installing any aftermarket equipment, it’s a good idea to perform an inventory of the included parts in the package. The instruction sheet provides a call-out of all the needed components. After checking that I have everything I need, I proceed with the installation.

The first step is to prepare the bolts needed to fix the GPU block onto the graphics card PCB. The photo above shows is a close-up of one of the bolts (the instruction sheet calls these “Long Screws”) installed onto the GPU block. Note the nylon washer also installed. Be mindful that you may also need to add another nylon spacer to your installation; the instructions specify which graphics card models need which nylon washers and spacers to install. It’s therefore highly recommended to read and follow the instructions.

Next is preparing the light blue thermal pads for installation. Arctic provides a good-sized rectangle of thermal pad; it’s up to the user to cut appropriately-sized pieces so that these could be installed on the backside of the PCB, directly over where they are on the side where the GPU block is installed.

After the thermal pad pieces are cut to size and positioned correctly, the next step is to take the clear plastic protective film and lay it out over where your thermal pads are positioned. Cut out appropriately-sized and correctly-positioned openings on the protective film so that the thermal pad pieces can then interface with the backside heat sink unit. The way I did this (not pictured; it’s simply impossible to photograph the clear protective film without camera flash destroying the picture) was to lay the film over the graphics card, trace the thermal pad positions over the film with a fine Sharpie marker, then cut out the tracings with a very sharp X-Acto knife.

Once the protective film has its openings cut out, you can then mate your graphics card with the Accelero Hybrid II-120. It’s a simple matter of following the provided instructions. Once you’re done, your graphics card should look like the above photo.
A final note about assembly: Don’t forget to plug in your radiator fan! The 120mm fan Arctic provided is supposed to plug into the fan header on your graphics card. If you choose a different fan for the radiator, for whatever reason, don’t forget to plug it in somewhere!
With assembly all done, let’s move on to some performance testing and some final thoughts.

Support our efforts! With ad revenue at an all-time low for written websites, we're relying more than ever on reader support to help us continue putting so much effort into this type of content. You can support us by becoming a Patron, or by using our Amazon shopping affiliate links listed through our articles. Thanks for your support!