- Qualcomm Launches Snapdragon 4 Gen 2 Mobile Platform
- AMD Launches Ryzen PRO 7000 Series Mobile & Desktop Platform
- Intel Launches Sleek Single-Slot Arc Pro A60 Workstation Graphics Card
- NVIDIA Announces Latest Ada Lovelace Additions: GeForce RTX 4060 Ti & RTX 4060
- Maxon Redshift With AMD Radeon GPU Rendering Support Now Available
Social & RSS Feeds
Latest Videos


Latest News
Thermaltake Armor LCS VE2000BWS
by Rob Williams on October 19, 2006 in Cases & PSUs
Thermaltake has had great success with their Armor and Kandalf cases, and there was a natural step to take to bring them both to the next level… water cooling! For $100 more above the price of a standard Armor case, you can have one complete with a well designed WC setup.
Page 6 – Testing and Temperatures, Final Thoughts
When I first received this case, my mom fancied the design so she claimed it for when I was done with the review… Mothers! Anyway, she’s still on Socket A, and I had an Intel Dual Core lying around doing nothing. So needless to say, this proved to be a perfect opportunity to upgrade her PC and also test one of the hottest beasts out there. Here are the system specs:
- CPU: Intel 820D 3.36GHz – 3.92GHz
- Motherboard: ASUS P5WD2-E Premium
- Memory: OCZ SOE 2GB PC2-6400
- Video: BFG 6800GT PCI-E 256MB
- Sound: Onboard HD Audio
- Storage: Western Digital 200GB
- Etcetera: Windows XP Professional w/ SP2, NVIDIA 81.98 Drivers
- Cooling: Thermaltake LCS
I don’t have comparison results for you today, due to the fact that the Intel hasn’t been used in months. However for the sake of any comparison, at 3.92GHz, the Intel ran up to 72°C with the ambient room temp being 80°F, using the Corsair Nautilus 500. During testing for the LCS, ambient room temperature hovered between 75°F – 77°F for 3.36GHz testing and 80°F – 81°F during the 3.92GHz testing.
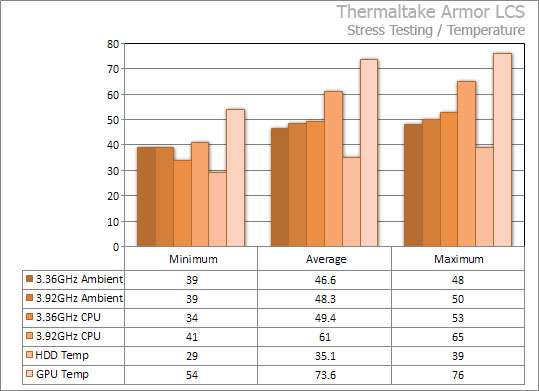
For a beastly 110W chip, I am impressed with the 3.36GHz not going above 50°C. That’s two cores, fully stressed, at the same time. Not bad at all. What I am most impressed with more though is that at 3.92GHz, it proved 7°C lower than what I accomplished previously with the Corsair Nautilus. Whether it’s a straight out better water cooling system of better air design is beyond me, but as a whole, it’s a great setup.
The lower ambient temps certainly did not help out the GPU at all. Still, not too bad considering the card before an RMA reached 90°C with ease. HDD temps are also respectable, considering it was stressed over the period of eight hours!
Am I impressed? Without doubt. The results would be even more impressive with a Conroe or AM2 machine, but this Netburst is known to run hot. I did not hit 70°C like I had previously though, and that’s what I am most impressed by.
Final Thoughts
As soon as I pulled the Armor LCS out of the box, I was impressed many times over. To date, it is by far the best put together case I have used, due to it’s large stature and also the evident thought process that’s gone into it. The case as a whole is also great looking, but not over the top. Classy so to speak.
You receive the case with clear instructions, and with all of the important parts already mounted for you. The only fan to add is the one in the top of the case, and that’s only because you need the room to put the PSU into place first. That said… the inside of the case is well designed and made installation rather easy. Having a vertical PSU and the ability to mount HDD’s beside it leaves a lot of room, especially if you don’t plan on adding any hard drives to the normal area.
Another feature I really liked was the fact that you can hide extra PSU cables in the utmost top compartment, which is directly behind the power on/off switch in the front. There is not -that- much room in here, really, but enough to hide a few of the cables to allow for better airflow. If you have a modular PSU, this won’t matter to you.

Besides the small issue of properly installing the final tube that runs from the rad to the tank, the case is very installation friendly. The slots have pull tabs that proved to be the easiest I’ve used, and the CD-Rom installation could not be easier. Nothing to slide or unscrew… simply pull the plastic piece, put the CD-Rom in place and secure it again. I did not test any HDD’s this way however. That in itself should prove quite easy though if you plan to mount them directly in front of the rad.
Airflow was taken into consideration with this case, and it shows. On the backside of the case we have a 80mm and 120mm fans used as exhausts, including one also at the top of the case. In the front, we see two 120mm fans mounted on the radiator, which sucks in cool air from the room, which in turn keeps the rad at a respectable level. I don’t have a single complaint with the fan placement… it just makes sense. There is no fan in the door, which is simply because it’s not needed. This is actually a good thing in the long run, since you will not have an additional fan to worry about cleaning dust out of.


What would I have liked to see? Longer tubes supplied for one. I -nearly- made a big mistake when cutting a tube but luckily was able to remedy it quickly. If someone smacks down a lot of cash for such a case though, they should never have to run into this problem. Even if the supplied tube was 25% longer, it could allow a good amount of slack in case someone poorly planned a cut.
The fact that the tank was unable to be secured with at least two screws was odd to me. Despite the fact of the manual telling me to secure it in this exact spot, there is just no way that two of the holes would align properly.
Maybe one of my biggest gripes after it’s all said and done, is that this case is hard to move! Not in the heavy sense, but in the sense that there is no easy spot to grab a hold of. You -can- reach underneath on each end and pick it up that way, but that could prove difficult for some. It doesn’t run on wheels, so the computer won’t slide. In the end, the case probably weighs around 50lb after everything is installed and water is added. Perhaps wheels would have been a welcomed feature?

Perhaps the best part of this case… is the price. The standalone Armor retails for $150US, but the LCS version is only $100 more. If you are to purchase the Armor on it’s own and then gather WC’ing parts afterwards, it will cost you more than $100 easy. The LCS offers the parts to cool your CPU, installs the rad beforehand, and includes exactly what you need to get installation done quickly. The only thing the case did not include, which I wish it had, were GPU blocks. Tt sells those, and additional tubing/coolant extra.
Here are a few more additional points that I’d like to point out:
- Included are two bottles of Coolant. Even after installation, I still had 60% of one bottle left… for future use.
- The manual is clear and concise, easy to follow. Slightly better descriptions in some parts would be nice though.
- This case was -well- packaged. If it arrives are your door damaged, it was probably thrown off a mountain first.
- Very little need for screws. After you screw in the motherboard and PSU, you can set the screwdriver aside.
- Depending on where you mount your CD-Rom, you -may- have a difficult time having the cable reach your motherboard.
- The case overall is incredibly quiet for all that’s going on. You definitely hear a hum, but it would not be considered loud.
For the asking price, this is a great offering from Thermaltake and it deserves a 8 out of 10. In future versions of the case, I’d love to see an addition of a longer tube, GPU block, handle of some sort… or wheels, easier mounting of the tank… et cetera. Nothing majorly wrong with this case though, so it’s well worth your hard earned money should you want it. If you like this idea but are not fond of the Armors look, you may want to check out the Kandalf LCS which is similar, but has an entirely different front panel. Not to mention a triple 120mm radiator!
- Pros
- Excellent case that offers sufficient room
- Radiator is in an odd spot, but is pre-installed to make for easier overall installation
- Cooling ability and airflow is above average
- Quiet operation
- $250 price is well worth it
- Cons
- Some installation hitches could have been easily avoidable
- Hard to physically transport the case
- The addition of a GPU block would have made this case a steal
Discuss in our forums!
If you have a comment you wish to make on this review, feel free to head on into our forums! There is no need to register in order to reply to such threads.

|
|

Support our efforts! With ad revenue at an all-time low for written websites, we're relying more than ever on reader support to help us continue putting so much effort into this type of content. You can support us by becoming a Patron, or by using our Amazon shopping affiliate links listed through our articles. Thanks for your support!

Rob Williams
Rob founded Techgage in 2005 to be an 'Advocate of the consumer', focusing on fair reviews and keeping people apprised of news in the tech world. Catering to both enthusiasts and businesses alike; from desktop gaming to professional workstations, and all the supporting software.


