- Qualcomm Launches Snapdragon 4 Gen 2 Mobile Platform
- AMD Launches Ryzen PRO 7000 Series Mobile & Desktop Platform
- Intel Launches Sleek Single-Slot Arc Pro A60 Workstation Graphics Card
- NVIDIA Announces Latest Ada Lovelace Additions: GeForce RTX 4060 Ti & RTX 4060
- Maxon Redshift With AMD Radeon GPU Rendering Support Now Available
Zalman CNPS7X LED CPU Cooler Review
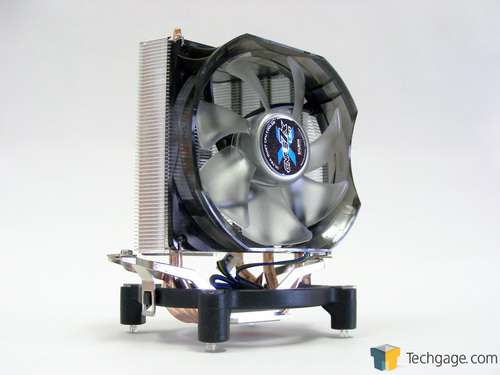
Need proof that sufficient CPU cooling doesn’t need to be expensive? The ~$45 Zalman CNPS7X LED is it. Taking after the design of the much more expensive CNPS11X, the CNPS7X uses fewer heatpipes and a smaller 92mm fan, resulting in a modest size and silence – even with a decent CPU overclock under its belt.
Page 2 – Installation & testing
As mentioned, AMD users are good to go. Just spread some thermal interface material on the CPU, loosen the screws that secure the metal loops on either side of the cooler, slip the loops over the plastic tabs on the cooler mounts and tighten them back down.
Luckily things aren’t much harder for Intel users. For LGA775 and 1156/1155 systems the correct socket must be selected by moving the indicator on each of the pins before pressing the platform down around the CPU socket. Since LGA1366 systems have a dedicated platform, users can just put it in place and go. The correct pegs are then push down into the openings in the four corners forcing the pins to spread and lock in place on the other side of the motherboard.
Next, the cooler goes on much in the same fashion as an AMD system. Loosen the screws that secure the loops on either side, put them over the tabs on the platform and tighten them into place.
The instructions say that the screws holding the loops in place should be completely removed but this is not necessary, at least in LGA775, and LGA1156/1155 systems. I found it easier simply to loosen the screws to allow the loops to move back and forth and as you will see, this ended up being a necessity. The cooler comes with the loops in place for the above sockets so LGA1366 users will need to remove the screws to move the loops to the outside position in order to fit the larger socket.
The heatsinks around the socket on our test motherboard caused a conflict when it came time to install the cooler. This was noticed before locking the platform down, so it was easy enough to fix. By only loosening the loops the cooler was placed onto the platform and then both were installed at the same time. The pins were then pushed down, locking the platform in place, and the screws that secure the loops were tightened to finish the installation. The tabs on the platform just barely came into contact with the heatsinks, so installing the cooler after the platform would not be an option because there wouldn’t have been any room to slip the loops over them.
From start to finish the entire installation process took only about 15 minutes and that was after learning about the clearance issues. If it weren’t for that, I’m sure I could have kept it at single digit minutes. This means less messing around with a complicated mounting system and more time testing and enjoying your new toy, which I doubt anybody will complain about. Here’s the finished product:
Testing
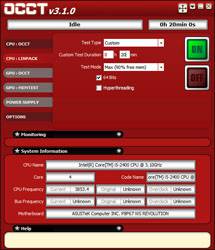
Stock CPU settings were obtained by setting the AI Tweaker option within the BIOS to Auto. and the maximum stable overclock frequency of 3.85GHz was obtained after setting the base clock to 107 and the multiplier to 36. Our locked CPU was able to do this on stock voltage so the vcore was raised to 1.25V to generate additional heat.
All of our testing is performed in a near steady 20°C ambient environment with readings taken before and after with a standard room thermometer. AIDA64 Extreme Engineer is used for monitoring and recording all system temperatures throughout the testing process. All fans are run at 100% during testing and all coolers have any pre-applied thermal interface material replaced with Zalman’s ZM-STG1 Super Thermal Grease due its ease of application that virtually eliminates the possibility of skewed temperatures due to poor surface contact.
Windows is allowed to sit idle for 10 minutes after startup to ensure all services are loaded before recording the idle CPU temperature. CPU load temperatures are generated by performing a 20 minute run of OCCT LINPACK using 90% of the available memory.
The components used for testing are:
|
Component
|
Techgage Test System
|
| Processor |
Intel Core i5-2400 – Quad-Core (3.10GHz)
|
| Motherboard |
ASUS P8P67 WS Revolution – P67-based
|
| Memory |
Corsair Dominator 1x2GB DDR3-1600 7-8-7-20-2T
|
| Graphics |
AMD Radeon 5450
|
| Audio |
On-Board Audio
|
| Storage |
Kingston/Intel SSDNow M Series 80GB SATA II SSD
|
| Power Supply |
Corsair HX650 650W
|
| Chassis |
Thermaltake Armor A90 Mid-Tower
|
| CPU Cooling |
Corsair H50
Corsair H60 Corsair H70 Zalman CNPS7X LED |
| Et cetera |
Windows 7 Ultimate 64-bit
|
And the results!
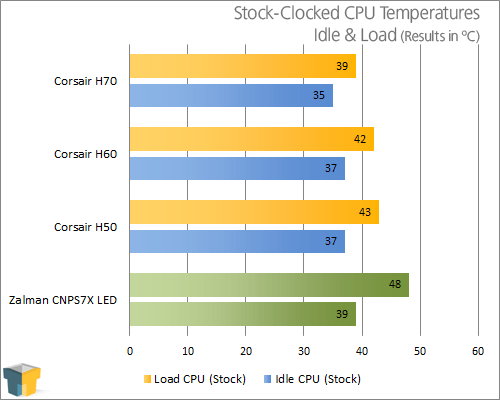
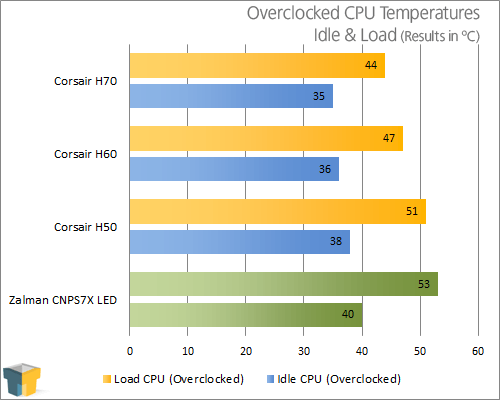
I feel bad pitting a cooler like this against the rest of the pack, because they are clearly aimed at a different type of user. The Zalman cooler was able to keep temperatures in check but without another air cooler to compare it to, it’s at a disadvantage – although I think the results do paint a very pretty picture.
Given that the thermal limit of our test CPU is 72.5 degrees Celsius, I’d say that the CNPS7X does the job incredibly well. It can’t quite stand up to the liquid coolers but only allows the CPU to get 2 degrees warmer than the H50.
Perhaps the best feature of all is the fact that this cooler is dead silent whether running with the resistor cable or not. Even at full speed the only sound made by our test system was the sound of air being pushed.
From looks to performance to sound, it seems like CNPS7X has everything wrapped up. Speaking of which…
Support our efforts! With ad revenue at an all-time low for written websites, we're relying more than ever on reader support to help us continue putting so much effort into this type of content. You can support us by becoming a Patron, or by using our Amazon shopping affiliate links listed through our articles. Thanks for your support!


