- Qualcomm Launches Snapdragon 4 Gen 2 Mobile Platform
- AMD Launches Ryzen PRO 7000 Series Mobile & Desktop Platform
- Intel Launches Sleek Single-Slot Arc Pro A60 Workstation Graphics Card
- NVIDIA Announces Latest Ada Lovelace Additions: GeForce RTX 4060 Ti & RTX 4060
- Maxon Redshift With AMD Radeon GPU Rendering Support Now Available
Social & RSS Feeds
Latest Videos


Latest News
Zalman VF3000F GTX 570/580 GPU Cooler Review
by Rob Williams on August 10, 2011 in Cooling
NVIDIA’s GeForce GTX 580 is a beast of a card, able to reach 80°C with minimal effort. So what about those who value high performance along with silence? There are some options, such as Zalman’s VF3000F after-market cooler. But with it requiring three slots in your PC, and $75 from your wallet, can it deem itself worthy?
Page 2 – Installation and Testing
The first required step of installing any graphics card cooler is to uninstall the other one, and in this case, that cooler was reference. This is where, somewhat hilariously, we ran into our first roadblock, but it’s far from being the fault of Zalman.
For some reason, even though both of our GTX 580 cards came straight from NVIDIA, the cooler on one card was secured using six-side star screws that I’ve never seen before. I had to use the smallest Allen wrench (hex key) I own to unscrew them, and this is where the roadblock hit me hard.
While I managed to get half of the screws undone no problem, the others refused to come out, as if they were stripped. This totally ruined our chances of installing this cooler on that card, so I implore anyone who plans to buy this or another third-party cooler to make sure first that they’ll even be able to get the stock cooler off. This was the first time I ever encountered this problem, and I’m hoping it’ll be the last. Our second GTX 580 thankfully had regular screws so we were able to remove the reference cooler without an issue.

Once the card is clean, each one of the memory chips (12 in total) and mini MOSFETs (22 in total) need to have thermal paste applied to them. If that sounds tedious, it’s because it is. Zalman includes with the VF3000F a tube of its ZM-STG2 thermal paste, but like all thermal paste, it’s difficult to push out onto small chips like these and spread out. On a big CPU, it’s fine, but here, not so much.
I’m afraid to admit that this is where I took a shortcut. After applying some thermal paste to the first memory chip, I realized that doing the rest was just going to be rife with tedium, due to how slow the paste comes out and how hard it is to apply neatly. Thus, I replaced the included thermal paste with Zalman’s own STG1. Since first discovering it years ago, I haven’t been able to let it go. It in essence allows you to apply the paste like nail polish (not that I understand this too well), and because its more of a liquid than other pastes, it both applies and removes easier than any other – it’s truly unparalleled.
That said, even with paste that’s much easier to use, the mini MOSFETs area did end up a little messier than I had planned. Still, good coverage all-around.

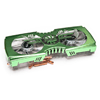
With the card itself prepped, the next step is to take the included large heatsink and apply 10 super-small ‘rubber rings’ to each one of the holes on the back, which are shown applied in the photo below. These are rubber on one side, sticky on the other, and require a steady hand to apply properly. These are used to reduce vibration between the cooler and the card.

Prior to affixing the heatsink to the card, 10 PET washers need to be applied to the back of it, one over each of the holes that corresponds with the holes on back of the heatsink. You will be able to easily tell the appropriate locations, or simply look at the photo below to see where they are meant to be applied. Once done, you can place the heatsink on the card and use the included bolts to connect the two pieces together.

At this point, here is where we stand:

With the card where it is now, we’re almost done. On the heatsink, nipple screws and rubber rings need to be attached to the heatsink base, as seen here:

After, a fair amount of thermal paste is to be applied to the GPU. Rather than push a huge pile of the stuff to the center of the chip, I’d recommend creating a thin spiral shape, making sure that the entire surface will be covered once the cooler is put into place. You do not want to put too much, however, as the paste could leak out on either side, and could become a detriment to the overall performance.
Before the heatsink is attached to the card, you will need to combine the included springs and fixing nuts together so that the spring’s widest opening faces the card. Once that’s done, you can combine the heatsink to the card and use these new fixing nut + spring combos to secure the pieces together.
In case it’s not obvious enough from that statement, it takes a mere 4 screws to remove the entire heatsink from the card. In the event that you want to replace the thermal paste, detaching the two segments is very, very easy.

After the card is installed into your PC, the fan controller module will need to be connected. Installing this is simple, but one 3-pin motherboard header will be required (or a 3-pin to Molex connector adapter if one doesn’t exist).
While all of the performance testing was conducted with our GPU test PC, using a Cooler Master HAF X full-tower chassis, the card’s home for the time-being is my personal PC, so I’m using it for the sake of photos to give an idea of what it looks like installed, replete with its fan controller module:

“Domination” is a good term to use here, because when I look at this photo, all I can see is the VF3000F. If not for the fact that the motherboard I’m using includes a 1x PCIe slot at the top, I wouldn’t have been able to use this card (or, my ASUS Xonar STX). Also, when using a cooler like this, SLI is going to be a tough deal to manage.

Support our efforts! With ad revenue at an all-time low for written websites, we're relying more than ever on reader support to help us continue putting so much effort into this type of content. You can support us by becoming a Patron, or by using our Amazon shopping affiliate links listed through our articles. Thanks for your support!

Rob Williams
Rob founded Techgage in 2005 to be an 'Advocate of the consumer', focusing on fair reviews and keeping people apprised of news in the tech world. Catering to both enthusiasts and businesses alike; from desktop gaming to professional workstations, and all the supporting software.


