- Qualcomm Launches Snapdragon 4 Gen 2 Mobile Platform
- AMD Launches Ryzen PRO 7000 Series Mobile & Desktop Platform
- Intel Launches Sleek Single-Slot Arc Pro A60 Workstation Graphics Card
- NVIDIA Announces Latest Ada Lovelace Additions: GeForce RTX 4060 Ti & RTX 4060
- Maxon Redshift With AMD Radeon GPU Rendering Support Now Available
CoolIT Domino A.L.C. CPU Cooler

If you want to get rid of that air CPU cooler, but find water-cooling too complicated and expensive, CoolIT might have just what you’re looking for. Their Domino A.L.C. is designed to offer greater cooling-abilities over air, while retaining reasonable noise-levels. Best of all, it’s inexpensive, at $80, and won’t hold back your impressive overclocks.
Page 1 – Introduction
Overclocking has become so much the norm over the past few years that it has helped kick start the release of a whole new range of products. The task of keeping these super-hot processors cool has evolved dramatically from the days of monstrous heat sinks. While most choices available today are large air cooling heat sinks, there has been steady development of affordable water-cooling solutions as well. Not long ago, only truly brave souls would dare build complex arrangements of pumps, tubes, radiators and cooling blocks for their PC’s. Now, companies like CoolIT have made it simple for anyone to use this type of cooling.
With the release of the Domino A.L.C., CoolIT has once again given us a product that’s inexpensive to buy, and also easy to install. While the more expensive Freezone units use TEC (Thermo Electric Cooling) devices to boost performance, the Domino does not. The design of this new piece is also all new and even includes electronic controls for fan and pump control to further push the envelope of performance.
After testing the PURE a while back and being somewhat less-than-impressed, I was anxious to see what has been brought to the table in terms of performance here. The price is right, coming in around $79.99US directly from CoolIT, meaning it is competing mostly against high-end air cooling solutions. The cheapest competitor from any other company I could find is the Asetek LCLC, which comes in at $95US. All that being said, it’s time to take a deeper look into the performance and design of the Domino A.L.C..
Closer Look
Nestled safely inside a plastic clamshell, we get out first look. Everything is securely wrapped and there’s hardware included for all AM2, LGA775 and even LGA1366 processors. I was somewhat surprised to not see the usual Styrofoam encasement, but if you ask me, the clear plastic will easily do as good of a job protecting the parts in shipment, if not better.
Spread out for your pleasure, you can see the various hardware used for mounting. Also notice the 3-pin motherboard-style power connector, which as being the only power connector, makes installation that much easier. After installing, you should be sure to check your motherboard’s BIOS settings to ensure the connector chosen is giving full power to the plug at all times.
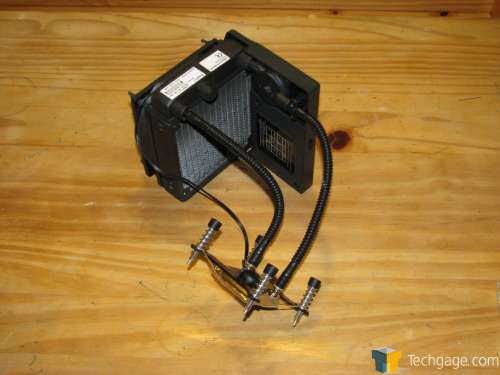
Here is a better look at the backside of the unit. The compact pump is mounted snugly behind the control panel and radiator. The hoses are not quite as flexible as I like to see but I feel that with tubing this size, you should have thicker walls to help prevent kinking anyways.
A shot of the backside shows us the footprint required for installation. The 120mm fan is not much smaller than the radiator itself, meaning you won’t need a case the size of the Grand Canyon. The fan is also a standard offering, 25mm in depth.
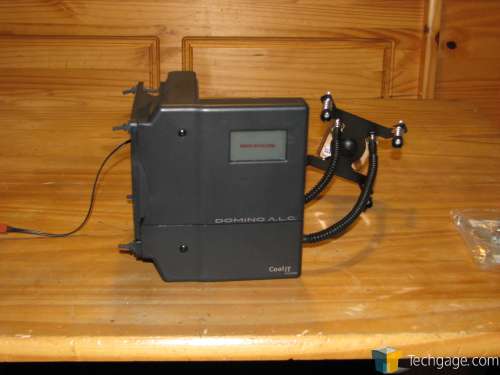
The heart of this system is here in the control panel. The shipping protection label is still overlaid on the LCD screen in this photo as well. Again the smallish overall size is welcome since there is usually not a whole lot of room for installing such items internally. If your case has a large fan on the side panel it may need to be removed for clearance.
The CPU water block comes ready to install with a layer of thermal compound already applied. You can also notice the second set of mounting holes on the bracket that allow for different CPU sockets. The build quality of the block is very good, and its surface is smooth and scratch-free as well.
For physically mounting to your chassis, CoolIT has chosen to use rubber pull-through grommets. All that is required for a secure mount is to line up the fan mounting holes with the nipples in order to pull them through with your fingers. A quick pull and everything is quite firmly attached. I also like the fact you get some vibration isolation with this install method as well.
For the most part, the Domino is a great-looking cooler, and the fact that it promises liquid cooling and silence, along with a reasonable price makes it look that much sharper. Time to put it to the test though, so onward to the next page!
Support our efforts! With ad revenue at an all-time low for written websites, we're relying more than ever on reader support to help us continue putting so much effort into this type of content. You can support us by becoming a Patron, or by using our Amazon shopping affiliate links listed through our articles. Thanks for your support!


