- Qualcomm Launches Snapdragon 4 Gen 2 Mobile Platform
- AMD Launches Ryzen PRO 7000 Series Mobile & Desktop Platform
- Intel Launches Sleek Single-Slot Arc Pro A60 Workstation Graphics Card
- NVIDIA Announces Latest Ada Lovelace Additions: GeForce RTX 4060 Ti & RTX 4060
- Maxon Redshift With AMD Radeon GPU Rendering Support Now Available
Enabling and Testing SSD TRIM Support Under Linux

Owning an SSD that supports TRIM is great, but while Windows users have the benefit of having TRIM enabled for them, Linux users need to take the manual route – at least, at this point in time. In this article, we tackle the simple process of doing so, and also show how to verify that TRIM is indeed working as it should be.
Page 1 – Introduction
With the launch of Windows 7 in the fall of 2009, adopters were treated to many useful new features. But for SSD users, there was one that mattered more than the others: TRIM support. Being a full-time Linux user, I couldn’t help but feel a bit left out. So I had to investigate, and see just what it took to enjoy the benefits of TRIM under my preferred OS.
For those unaware, TRIM is an ATA command that solid-state drives can take advantage of in order to prolong its fast performance as time passes on. SSDs that don’t support TRIM have an inherent fault of slowing down over long periods of time (months, or years depending on the level of usage). With TRIM, however, affected blocks are wiped clean after a file deletion, resulting in performance that matches the drive’s original specs as much as possible.
In the months that followed the Windows 7 launch, it seemed as though exploiting TRIM under Linux was impossible, despite official support being found in the kernel beginning in December 2008. Since that time, though, things have been improved quite a bit. We’ve gone from TRIM being impossible to exploit, to it being an arduous chore to exploit, to having automatic support that’s simple to enable.

For those wanting to enable TRIM support, it’s recommended that the most up-to-date kernel (at least 2.6.33) is used, and also the ext4 file system. While other file systems might be supported (I’d love to hear about them if so), ext4 is a great choice and is likely what you’re already using.
Enabling TRIM Support
While Windows 7 users have the benefit of having TRIM enabled by default, as long as a supported SSD is present, I don’t believe any current Linux distribution does the same. Yes, the process does require the command-line, but don’t fret – even a novice user can handle this!
Enabling TRIM is as simple as adding the word ‘discard’ next to the proper drive in your /etc/fstab file, but to pull that off, we’ll need to find the proper /dev/sdX or UUID value for it. Depending on the Linux distro being used, it could be one or the other. To get started, open a command-line (terminal) and type in ‘cat /etc/fstab’. You’ll see a result like this:
/dev/sda5 /boot ext2 noauto,noatime 1 2
/dev/sda7 / ext4 noatime,discard 0 1
/dev/sda6 none swap sw 0 0
/dev/sr0 /mnt/cdrom auto noauto,user 0 0
UUID=04D40DB9D40DADCC /mnt/storage ntfs-3g defaults,rw,owner,uid=1000,gid=100
UUID=347240AF7240781E /mnt/storagetwo ntfs-3g defaults,rw,owner,uid=1000,gid=100
UUID=11f92990-b2e0-4a7c-a9b7-98d1b0bb4df5 /mnt/storagethree ext4 noatime,discard 0 1
I have bolded two entries in the fstab above that have TRIM (‘discard’) enabled; one using the /dev/sdX differentiator, and the other using a UUID. The OS drive I’m using is /dev/sda, and its root partition is /dev/sda7 – hence, that’s the entry in the /etc/fstab that should have ‘discard’ next to it. The drive I am using for testing is UUID=11f92990-b2e0-4a7c-a9b7-98d1b0bb4df5, and again, ‘discard’ is placed next to it as well. Most distros will not mix and match drive identifiers like this; I am just doing it for the sake of the example.
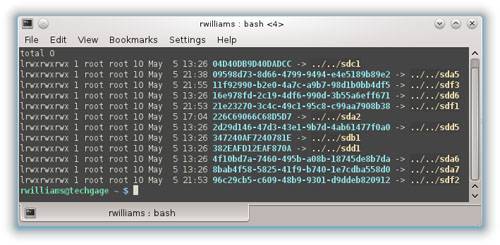
If you have more than one ext4 partition on your SSD, you can feel free to add ‘discard’ to each one of the related entries. If your distro uses only UUIDs to differentiate the drives, and you’re not sure which of those correspond to your SSD, you can open up a command-line and type in ‘ ls -l /dev/disk/by-uuid/ ‘ which will tell you which UUIDs belong to which drive and partition.
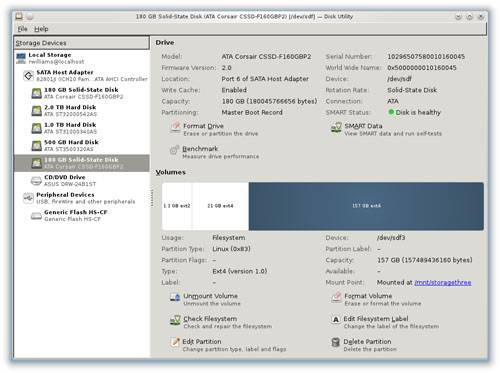
You can then use a tool such as “Disk Utility” or “GParted” to discover which /dev/sdX entry is the correct partition, and then use that gained knowledge to understand which entry in the /etc/fstab to add ‘discard’ to.
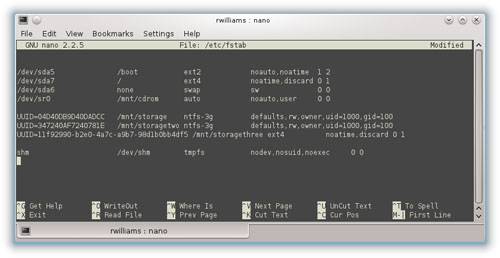
To edit the /etc/fstab file in order to add ‘discard’ to one of the entries, a command-line will again be needed, along with root (su) or sudo. In distributions that support sudo, you can type in ‘ sudo nano -w /etc/fstab ‘ and then type in your password; if sudo support doesn’t exist, enter root with ‘ su ‘ and then type in ‘ nano -w /etc/fstab ‘.
Here, use the arrow keys to move the ‘cursor’ to the proper location, and then, as seen in the picture, make sure that the word ‘discard’, without quotes, is among the other options for the drive. The only thing you are doing here is adding ‘discard’ – please do not change other values unless you understand what the result will be. Once done, hit Ctrl + X to quit, then “y” + “Enter” to save. Changes will not be immediate, as the drive needs to be remounted, in most cases requiring a reboot. After rebooting, you can open another command-line and type in ‘mount’, where you’ll see a result like this:
/dev/sda7 on / type ext4 (rw,noatime,discard,commit=0)
If ‘discard’ is listed next to the drive, it’s enabled. On the next page, we’ll take a quick look at how to find out if TRIM is working as it should be, using hdparm.
Support our efforts! With ad revenue at an all-time low for written websites, we're relying more than ever on reader support to help us continue putting so much effort into this type of content. You can support us by becoming a Patron, or by using our Amazon shopping affiliate links listed through our articles. Thanks for your support!


