- Qualcomm Launches Snapdragon 4 Gen 2 Mobile Platform
- AMD Launches Ryzen PRO 7000 Series Mobile & Desktop Platform
- Intel Launches Sleek Single-Slot Arc Pro A60 Workstation Graphics Card
- NVIDIA Announces Latest Ada Lovelace Additions: GeForce RTX 4060 Ti & RTX 4060
- Maxon Redshift With AMD Radeon GPU Rendering Support Now Available
Enabling and Testing SSD TRIM Support Under Linux

Owning an SSD that supports TRIM is great, but while Windows users have the benefit of having TRIM enabled for them, Linux users need to take the manual route – at least, at this point in time. In this article, we tackle the simple process of doing so, and also show how to verify that TRIM is indeed working as it should be.
Page 2 – Checking for TRIM Success; Final Thoughts
If the SSD in question does in fact support TRIM, and ‘discard’ is properly added to the /etc/fstab file, then it can be assumed that TRIM is in fact working. But for assurance, there’s a simple test that can be performed, though it does require a little more effort in the command-line than enabling TRIM in the first place did.
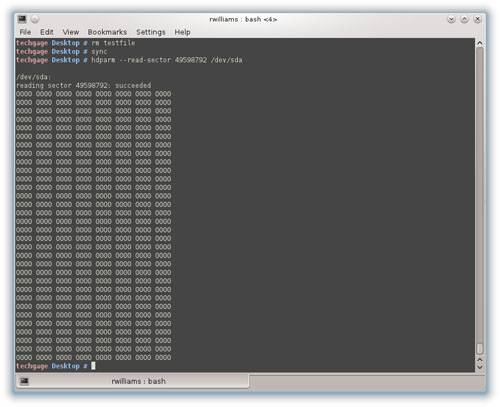
Because TRIM purges all data found in affected ‘sectors’ after a file is deleted, the result should be sectors that read a bunch of 0s, not some sort of data. On a non-TRIM drive, data found in a sector would remain the same even after the file is deleted, which is the reason performance can find itself degraded over time. With TRIM purging out the data properly, any new writes to the drive will target clean, like-new sectors.
For testing, we’ll have to create a small file on the affected SSD partition, as we’ll be deleting it to see if TRIM in fact worked. After opening up a command-line, enter su or sudo mode (the latter using ‘ sudo -s ‘). Then, create a small file:
techgage Desktop # seq 1 1000 > testfile
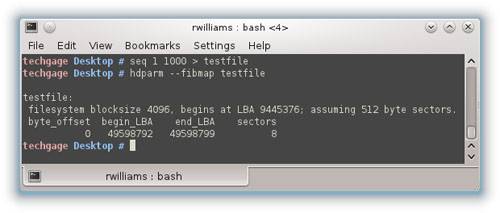
That command creates a simple text file with numbers ranging from 1 to 1000, and in total, it weighs in at about 4KB (a typical sector size). With that file created, it’s time to find out which sector(s) on the drive it’s using:
techgage Desktop # hdparm –fibmap testfile
You will see this sort of result:
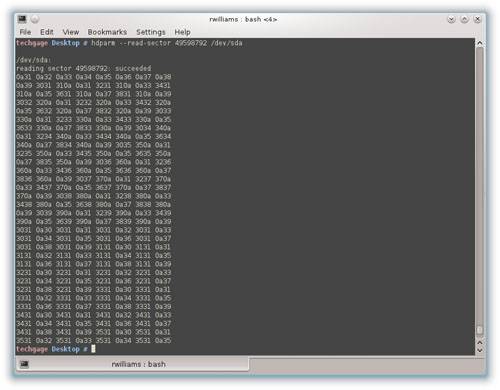
Take note of the first ‘begin_LBA’ value, which in this case is 49598792. That’s the beginning sector for the file, and one we can read from for this test. With the sector number in hand, we can check for its contents using these commands:
techgage Desktop # sync
techgage Desktop # hdparm –read-sector 49598792 /dev/sda
(If your drive is not /dev/sda, replace it with the correct value.)
The ‘sync’ command must be run prior to the hdparm one for the sake of flushing out the file system buffer, and once run, the hdparm command will show all of the contents of the given sector in hexadecimal format. Time to delete the file, and then run the same commands as before:
techgage Desktop # rm testfile
techgage Desktop # sync
techgage Desktop # hdparm –read-sector 49598792 /dev/sda
That’s just what we wanted to see… nothing! If all 0s appear, then TRIM worked, but if the same data as before is still there, be sure that the “sync’ command was in fact run, as it should be in order to flush out the buffer and give you accurate information.
Final Thoughts
It took a little while after Windows 7’s launch for robust support of TRIM to hit Linux, but it’s here, and as you can see, enabling and testing for it couldn’t be much simpler. Had I known that enabling it was as simple as adding ‘discard’ to the /etc/fstab file, I would have upgraded to an SSD months ago! And since we’re able to use hdparm to actually check to see that TRIM is in fact working, there’s no doubt left in our minds that once setup, TRIM will keep our SSDs in tip-top shape.
Although a rather simple article, I wanted to get the method out there and explain in as easy terms as possible how to get things done. If any of this guide proved a little confusing, or more information would be desired, please feel free to post in our related thread below, and we’ll consider updating the article.
Discuss this article in our forums!
Have a comment you wish to make on this article? Recommendations? Criticism? Feel free to head over to our related thread and put your words to our virtual paper! There is no requirement to register in order to respond to these threads, but it sure doesn’t hurt!
Support our efforts! With ad revenue at an all-time low for written websites, we're relying more than ever on reader support to help us continue putting so much effort into this type of content. You can support us by becoming a Patron, or by using our Amazon shopping affiliate links listed through our articles. Thanks for your support!


