- Qualcomm Launches Snapdragon 4 Gen 2 Mobile Platform
- AMD Launches Ryzen PRO 7000 Series Mobile & Desktop Platform
- Intel Launches Sleek Single-Slot Arc Pro A60 Workstation Graphics Card
- NVIDIA Announces Latest Ada Lovelace Additions: GeForce RTX 4060 Ti & RTX 4060
- Maxon Redshift With AMD Radeon GPU Rendering Support Now Available
Enabling Auto-Logon and the Administrator Account in Vista & 7

Have you ever wanted to create an automatic logon for your Windows PC but couldn’t find the option to do so? Or, on the disruptive side, have you ever found yourself without administrative access? We have… far too many times, and have decided to produce an article that offers up a slew of different ways to take care of both tasks.
Page 2 – Enabling a Windows Vista / 7 Administrator Account; Final Thoughts
As I mentioned in the intro, there are multiple things that can happen that result in you being without either administrative access or an Administrator account, and when it happens, there are few things quite as frustrating. In my most recent experience from last weekend, my primary user account which once was in the Administrator category somehow found itself reincarnated as a Guest account, which is something I can’t even explain.
If you’re PC is setup with multiple user accounts, only one user should remain an Administrator, as it’s the only user group that’s able to install applications and other things system-wide. If other accounts are set to “Standard”, it greatly decreases the possibility of someone installing something they shouldn’t, and will help keep the PC safer.
But that’s not what we’re here to talk about. Rather, we’re going to evaluate a couple of ways to enable the Administrator account in case you somehow found yourself without access to it. For some, fixing this will be incredibly simple. For others, like me last weekend, it will require some extra work. Let’s start off with the easiest of solutions.
Enabling the Administrator Account in Windows Vista & 7 – Method #1
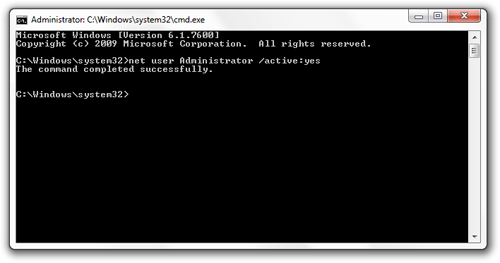
If you’re fortunate enough to have Administrator permissions, then this option is going to work well and take mere seconds. You first need to launch a command prompt with Administrator access, and that requires right-clicking the menu entry (Start > All Programs > Accessories > Command Prompt) and clicking “Run as Administrator”. Or as a shortcut, you can type in “cmd” into the search bar in the Start Menu and hit Ctrl + Shift + Enter.
Once the command prompt is loaded, it’s important to note whether or not it says “Administrator” in the toolbar. If it doesn’t, then that means that the Administrator account is disabled on your PC, and that you’re going to have to go through some loops to get it enabled. But before settling on that, be sure to try running the command prompt as Administrator multiple times so that you can settle on the fact that it is indeed disabled.
If you’re good to go, though, all it takes is this simple command to enable the Administrator account: “net user Administrator /active:yes”, without quotes.
If everything went as it’s supposed to, you’ll see the message “The command completed successfully.”. If not, the result might be “Access is denied.”, and as mentioned before, that will require a bit more work on your part.
Enabling the Administrator Account in Windows Vista & 7 – Method #2
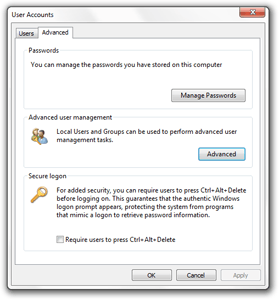
The second method of activating the Administrator account uses the same start as tip #1 for enabling the auto-logon. You need to go to your “run” line (Ctrl + R) and then type in “control userpasswords2”, and then enter. Once you do that, a “User Accounts” pop-up will show, and from there, you need to click on the “Advanced” tab up top.
From here, you need to click the “Advanced” box inside of the “Advanced user management” section, which will launch the users and groups manager for Windows.
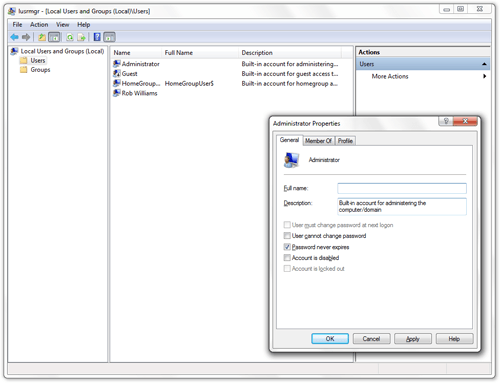
You then need to click on the “Users” folder and then double-click Administrator from the list. You’ll need to uncheck the “Account is disabled” option, and then apply the change. After a reboot, you should be good to go. But, if you’re not, the third and final recommendation we have is pretty-well guaranteed to solve the problem.
Enabling the Administrator Account in Windows Vista & 7 – Method #3
If neither of the previous options succeeded in enabling the Administrator account, you need to bring out what I like to call the “big guns”, which is in effect just the Windows Vista or 7 install disc. What you’ll be doing is going into repair mode and then performing a registry hack in order to force the enabling of the Administrator account, and in all likeliness, this is an option that can’t fail.
After you boot up with the install DVD, you’ll have to proceed through one screen that asks for your language and keyboard layout of choice, and past that, you’ll have the option to “Repair your computer”. Click that and then select your proper Windows install from the pop-up.
Afterward, Windows may or may not try to fix the OS on its own, but regardless of what it might be doing, it’s not looking for the same issue we are, so try to get through it so that you arrive at the full repair menu. If during this scanning process Windows seems to go into an endless cycle of repairing your computer, try to let it remain for as long as you can handle, because even though there’s no progress bar, it does eventually settle on the fact that it can’t fix your PC and will let you proceed.
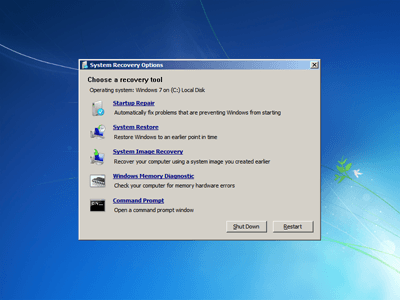
Once you’re at the “System Recovery Options” screen, click on the Command Prompt option.
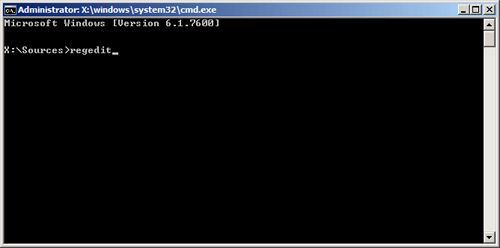
With the command prompt launched, type in “regedit” without quotes and hit enter.
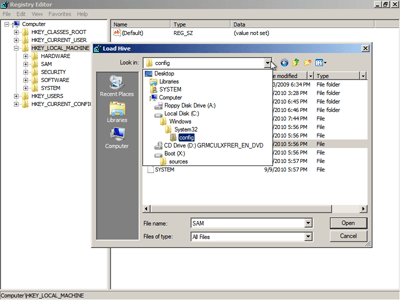
At this point, the registry editor will load. I recommend maximizing it to fill the screen since it will be a lot easier to navigate. When ready, click on the “HKEY_LOCAL_MACHINE” folder in the left pane, and then use the “Load Hive” option under the “File” menu. You’ll then be prompted to load a Hive from your real Windows install (a hive is your local registry split up into different files).
I am not sure if the location will be the same for everyone, but in all of my installs, it has been:
C:WindowsSystem32config
If you have multiple hard drives, it may not be C: you need to navigate, so just choose whichever drive has your Windows install. Once in the appropriate folder, double-click the “SAM” file. After, type in any name you want – as long as it’s not “SAM”. In my case, I just typed in “SAM_Temp”.
From here, you’ll have a newly-created folder with the name you just typed in, and now you need to navigate it to the “Names” folder, which in my case was:
HKEY_LOCAL_MACHINE
> SAM_Temp
> Domains
> Account
> Users
> Names
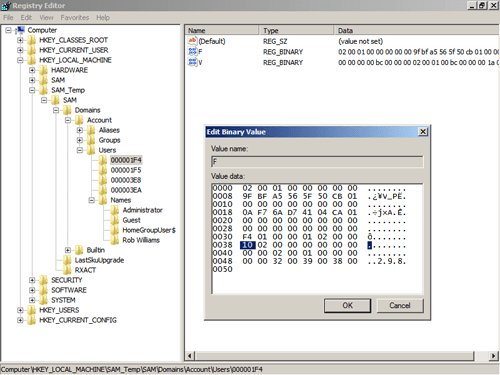
The first thing you want to do is click on the “Administrator” folder under the “Names” folder, and note the hexadecimal “Type” value. In this case and in all other cases I’ve seen, it’s 0x1f4, and in the top of the “Users” folder, you’ll note that there is a folder to match it (000001F4). That means that we need to click on that folder in order to get our dirty deed done.
In this folder, there is a string called “F”, and it contains various settings in hexadecimal format. When double-clicked, you can see all of these, and it’s line 0038 that you want to pay attention to. In our example, you’ll note that the first two digits are 10, and that’s what it should be if you want to enable the account. The default could be 11 or 12, or something like it, but regardless, it needs to be 10.
This is the part where you need to be careful, so before editing, I highly recommend highlighting those two digits and making sure that the blue highlight is only selecting those two digits. When you have it perfect, simply type in 10. Once done, click “OK”.
At this point, your job is almost done. You need to click on the “SAM_Temp” folder (or whatever you named it), and then go to the “File” menu again and click “Unload Hive”. It will ask you if you are sure, and once done, you can close the registry editor and command prompt and then click the “Restart” button. Once back into Windows, you should have a completely functional Administrator account, and regained access over your PC.
Final Thoughts
Hopefully by now you will have a fully-functional auto-logon and Administrator account, and if not, please hop into our forums and let us know what’s up and we’ll see if there are other solutions. I believe we’ve covered most of the bases though, and if none of these solutions work out to your favor, then you might have an even stranger situation on your hands than I’ve ever had.
I should also stress one thing regarding the auto-logon idea, and that’s to think carefully about whether or not you truly need an automatic logon on your PC. Quite simply, it opens a gaping security hole. But, if you don’t use passwords anyway, then there’s really nothing lost, but only convenience gained.
Personally, even on my Linux install I have an automatic logon, but I do have a passworded root account to assure nothing could truly get broken. In the Windows case, it’s wise to use a Standard account for regular duties, and then just hop onto the Administrator account to tweak or install software on the system.
With that all said, good luck in getting your system back in tip-top shape if you find yourself in either of these situations, and hopefully you won’t remain in them for long with the help of our suggestions.
Discuss this article in our forums!
Have a comment you wish to make on this article? Recommendations? Criticism? Feel free to head over to our related thread and put your words to our virtual paper! There is no requirement to register in order to respond to these threads, but it sure doesn’t hurt!
Support our efforts! With ad revenue at an all-time low for written websites, we're relying more than ever on reader support to help us continue putting so much effort into this type of content. You can support us by becoming a Patron, or by using our Amazon shopping affiliate links listed through our articles. Thanks for your support!


