- Qualcomm Launches Snapdragon 4 Gen 2 Mobile Platform
- AMD Launches Ryzen PRO 7000 Series Mobile & Desktop Platform
- Intel Launches Sleek Single-Slot Arc Pro A60 Workstation Graphics Card
- NVIDIA Announces Latest Ada Lovelace Additions: GeForce RTX 4060 Ti & RTX 4060
- Maxon Redshift With AMD Radeon GPU Rendering Support Now Available
Social & RSS Feeds
Latest Videos


Latest News
Mastering rsync and Bash to Backup Your Linux Desktop or Server

by Rob Williams on October 4, 2013 in Software
Keeping good backups of your data is important; don’t be the sucker who loses important files and has to deal with it afterwards! In this in-depth guide, you’ll learn about using rsync and lftp to transfer files, writing your own scripts and automating them, and backing up to external storage, a NAS, and a remote server without passwords.
Page 2 – Mounting External Storage Under Linux & Creating Persistent Mounts
On this page, we will be tackling the basics of mounting your external storage device. This could be a flash-based device or an external hard-drive, such as one in an enclosure. If you know the basics of disk mounting, then you can bypass this section entirely.
Note: Is the storage device in question operational once it’s plugged into the PC? You can skip on down to the “Editing fstab for Persistent Mounts” section. If you have the file system support you need but your distro doesn’t automatically mount your storage device, you should head instead to the “Creating a Folder and Mounting External Storage to It” section.
Checking for File System Support: The easiest way to see if your distro currently supports the file system you need is to open up a terminal, enter su (or sudo), and then type in cat /proc/filesystems, as seen below:
techgage rwilliams # cat /proc/filesystems
ext2
ext3
ext4
nodev ramfs
vfat
nodev nfs
nodev nfs4
nodev cifs
nodev fuse
Note that certain file systems (eg: exFAT and NTFS with write capabilities) require FUSE (Filesystem in Userspace) support to function (if ‘fuse’ is listed in your /proc/filesystems query as seen above, you’re golden). If FUSE or some other file system isn’t configured for your current kernel, you’ll need to tackle that by recompiling your kernel.
Adding File System Support to Your Kernel: The process of configuring and compiling a kernel under Linux isn’t for the faint of heart, and it’s a subject that would require its own article to explain. If you do need to take this route, and aren’t familiar with updating a kernel, you’ll need to refer to your distro’s documentation.
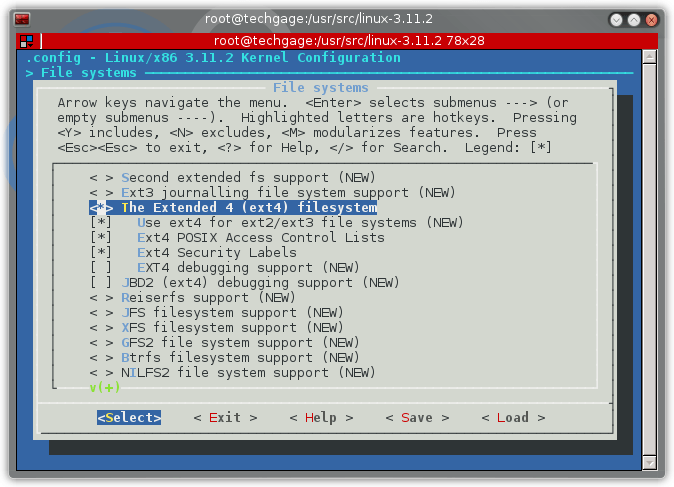
FUSE can be found under the “File systems” section, typically near the bottom, and is called “FUSE (Filesystem in Userspace) support”. FAT, if it somehow isn’t configured (it’s a kernel default), can be found inside of the “DOS/FAT/NT Filesystems” sub-section.
Creating a Folder and Mounting External Storage to It
Most distros make things easy by automatically mounting your external storage once it’s plugged in, but there’s a potential downside to that: It might create a filepath that differs from time to time (especially if you have two drives plugged in that share a label; eg: “Backups”). Thus, the remainder of this page is dedicated to making sure you’re mounting the drive to the location you want, while also making sure that it’s mounted there every single time you plug it in, regardless of what other storage is connected (even those with a duplicate label).
First things first: Figuring out the drive letter for your external drive. Each storage device plugged in receives a drive letter; IDE will be /dev/hdX; SATA will be /dev/sdX. If your primary hard drive or SSD is of the SATA variety, it will receive the /dev/sda drive-letter. A second similar drive would be /dev/sdb, and so forth. If your system has only two SATA drives installed, and you plug in external storage, it will take on the form of /dev/sdc. To help with the drive letter identification process, a GUI tool like GParted could be called-upon, as it provides important information such as partitions, storage space used, and et cetera.
With this knowledge in hand, mounting a drive should be a simple matter of (assuming it’s a FAT32 drive):
techgage@localhost ~ $ su (or sudo -s)
Password:
localhost techgage # mkdir /mnt/thumb
localhost techgage # mount -t vfat /dev/sdc1 /mnt/thumb
The ‘mkdir’ command creates a folder under /mnt, and while I called mine ‘thumb’, it can be named anything you want; it’s usually best to make it something relevant, however, such as ‘storage’ or ‘exthdd’.
If the external device (or internal, for that matter) happens to be NTFS, it can be mounted using ntfs-3g:
techgage@localhost ~ $ su (or sudo -s)
Password:
localhost techgage # mkdir /mnt/ntfs
localhost techgage # mount -t ntfs-3g /dev/sdc2 /mnt/ntfs
If when attempting to mount using ntfs-3g, it doesn’t work, you’ll need to verify that the required driver is installed. One way to do this is to open up a terminal, enter su (or sudo -s) and then type in ‘mount’ without quotes and then hit . This will show you all of the file systems that your distro supports which aren’t built into the kernel. If ntfs-3g isn’t listed, you will have to search your distro’s repository for it (eg: : Under Gentoo, I had to install it by running emerge ntfs3g as root).
Editing fstab for Persistent Mounts
To make sure a removable storage device mounts to the exact same location each time it’s plugged in, the /etc/fstab file will need to be edited. This is the file that the OS refers to when a new storage device is detected, and without a manual entry, it could be mounted to an unexpected location, rendering a backup script ineffective.
The first step: Establish the storage device’s UUID (unique identifier). After plugging the device in, you can either use GParted’s “Information” option to find the UUID of a partition, or run ls -l /dev/disk/by-uuid/ to find it quicker (by looking for the known /dev/sdX value).
After running that latter command, I could see “6634EE1034EDE2D3 -> ../../sdd1”, which I knew for a fact was the correct drive. So, editing /etc/fstab, I added this line:
UUID=6634EE1034EDE2D3 /mnt/exthdd ntfs-3g defaults,locale=en_US,utf8 0 0
This makes sure that each time I plug the drive in, it mounts to the exact same location (in this case: /mnt/exthdd) each and every time. No more wondering!

Support our efforts! With ad revenue at an all-time low for written websites, we're relying more than ever on reader support to help us continue putting so much effort into this type of content. You can support us by becoming a Patron, or by using our Amazon shopping affiliate links listed through our articles. Thanks for your support!

Rob Williams
Rob founded Techgage in 2005 to be an 'Advocate of the consumer', focusing on fair reviews and keeping people apprised of news in the tech world. Catering to both enthusiasts and businesses alike; from desktop gaming to professional workstations, and all the supporting software.


