- Qualcomm Launches Snapdragon 4 Gen 2 Mobile Platform
- AMD Launches Ryzen PRO 7000 Series Mobile & Desktop Platform
- Intel Launches Sleek Single-Slot Arc Pro A60 Workstation Graphics Card
- NVIDIA Announces Latest Ada Lovelace Additions: GeForce RTX 4060 Ti & RTX 4060
- Maxon Redshift With AMD Radeon GPU Rendering Support Now Available
Social & RSS Feeds
Latest Videos


Latest News
Using Samba to Share Your Linux Folders with Another PC or Virtual Machine
by Rob Williams on April 15, 2014 in Software
Creating a network share on Linux is quite a bit different than on Windows, but that doesn’t mean that it requires a degree from Tux U. In this article, we take a look at installing and configuring Samba, creating some shares, and then accessing those shares across a variety of platforms.
Page 1 – Introduction, Configuring Samba & Creating Shares
One of the most popular questions long-time Linux users have been asked is, “How do I create a network share that Windows can see?“, and it’s for good reason. Creating a network share in Linux is a simple enough affair, but your knowledge of pulling off the same trick in Redmond’s famed OS might not help too much.
The best solution for sharing Linux folders across a network is a piece of software that’s about as old as Linux itself: Samba. Despite the fact that the tool is designed to cater to Windows’ SMB protocol, it became a Linux stature long ago. Its tagline is “Opening Windows to a Wider World”, and it couldn’t be more apt for what it accomplishes.
Guides for installing and using Samba are a Dogecoin a dozen, so what I’m hoping to accomplish with this one is to make it simple. I’d also like to provide some unusual examples of what can be done with it, including what can be done from within a Windows virtual machine.

Linux shares mapped as network drives in Windows
Samba is a popular Linux tool, and chances are you already have it installed. To see if that’s the case, open up a terminal and test to see if its configuration folder exists:
ls -l /etc/samba
You can also travel to that folder from within a file manager, as it doesn’t require root or sudo to do so.
If a list of files gets printed back, you’re good to roll. Otherwise, you’ll have to install the tool.
Installing Samba will be a simple affair, but because the best method of doing so will differ from distro to distro, I highly encourage you to go to your distro’s website and search for a Samba guide. Personalized guides are the best guides; looking at the wrong one might cause you to skip a step that would have otherwise made the experience a lot better.
In rarer cases, installing Samba might not be enough. A required counterpart is the CIFS (Common Internet File System) kernel module, which in turn requires FUSE (Filesystem in Userspace) support. Chances are good that both of these will be taken care of when following a distro-specific Samba guide. If not, I’d recommend going to a search engine and querying “CIFS (Your Distro)” for more information.
Configuring Samba
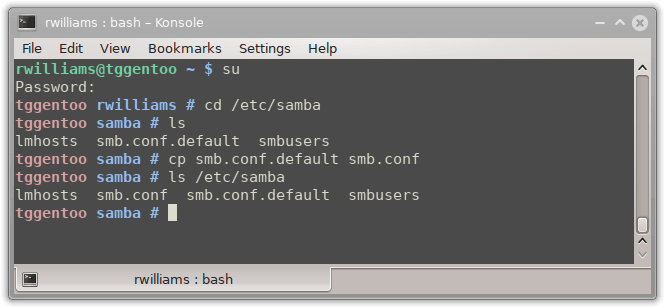
After Samba is installed, a default configuration file called smb.conf.default can be found in /etc/samba. This file needs to be copied to the same folder with the name of smb.conf, but before doing this, it’d be worth running the same ls -l /etc/samba command as above to see if your distro has that file there already. If it doesn’t exist, it’s as simple as entering sudo (or sudo -s to retain escalated privileges for the time-being, or su for systems without sudo) and making use of the default file:
cp /etc/samba/smb.conf.default /etc/samba/smb.conf
Here’s a real-world example:
Samba’s user configuration is driven from this smb.conf file, so it needs to be edited to create shares. There are a number of graphical tools for accomplishing this, but I recommend editing the file inside of the terminal, using ‘nano’ or ‘vim’. Normally, I try to avoid recommending the terminal to those who prefer GUI, but there’s nothing to be afraid of here – this is all plain text, and straight-forward.
Using nano: The Samba configuration file can be edited (as sudo, sudo -s, or su) with the command nano -w /etc/samba/smb.conf. nano works as a normal text editor, so delete and add away. Once done, hit Ctrl + X; when the save prompt comes up, push Y and then Enter.
In some cases, a share might be able to be created from within a file manager. In KDE, you can right-click a folder, go to its properties, and then its sharing tab:
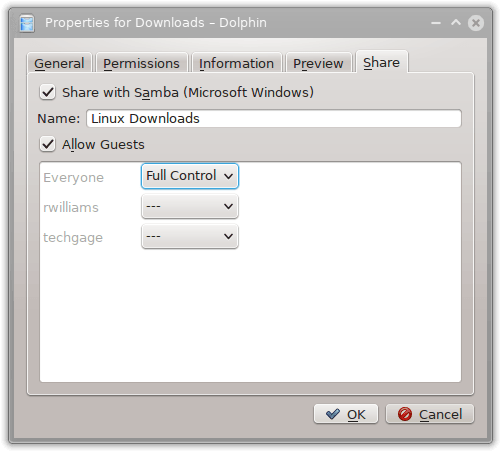
Configuring a Samba share in KDE
If a file manager sharing option isn’t available, and you’d still rather a GUI solution:
- Go to your OS’ control center, and look for sharing or networking options.
- Go to a search engine and type in, “(Your Distro) Samba GUI”.
- Open the smb.conf with a text editor as root (or sudo). Launch the app through the terminal.
The most complicated part about configuring Samba isn’t editing the smb.conf file, it’s understanding all of the options that are provided. Fortunately, the default configuration file includes a ton of examples, so I’d highly recommend perusing through those to get a grasp on things. I’d also recommend editing the workgroup = VALUE option near the top of the file (I use WORKGROUP).
After fiddling with the general configuration options up top, you can scroll to the bottom of the file and lay the groundwork for a new share:
[Share Name]
path = /home/username/Share
option = value
The [Share Name] is the name of the folder that will be viewable after entering the network hostname (eg: \\LINUXPC\Share Name). The path will be the Linux folder that will be accessible after entering this share. As for the options, there are many. As I mentioned above, the smb.conf file itself contains a number of examples; for all others, there’s a huge page over at the official website to take care of the rest. Let’s cover a couple of the more common ones, though.
guest ok = yes
— Guest accounts are OK to use the share; aka: no passwords.
guest only = yes
— Only guests may use the share.
writable = yes
— The share will allow files to be written to it.
read only = yes
— Files cannot be written to the share, just read.
force user = username
— Act as this user when accessing the share, even if a different user/pass is provided.
force group = groupname
— Act as this usergroup when accessing the share. username = username, username2, @groupname
— If the password matches one of these users, the share can be accessed.
valid users = username, username2, @groupname
— Like above, but requires users to enter their username.
Here are a couple of example shares I use:
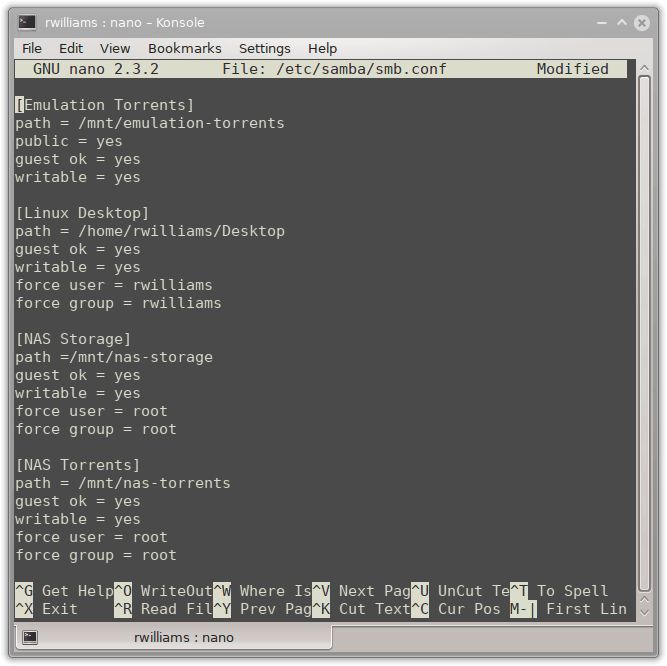
The “force user” and “force group” options are not go-to options, so I’d recommend trying to create a share without them first. In some cases, permission issues will prevent you from writing to certain folders, a situation I found myself in where my NAS mounts and desktop folder were concerned. If worse comes to worse, simply add these force options and retest.
Each time the smb.conf file is edited, Samba should be restarted to reflect the changes. On most distros, running this command as sudo (or su) should take care of it:
/etc/init.d/samba restart
For Ubuntu-based distros, the service command might need to be used. As sudo:
service smbd restart
If neither of these commands work, refer to your distro’s documentation.
With Samba all configured, let’s connect to our shares!

Support our efforts! With ad revenue at an all-time low for written websites, we're relying more than ever on reader support to help us continue putting so much effort into this type of content. You can support us by becoming a Patron, or by using our Amazon shopping affiliate links listed through our articles. Thanks for your support!

Rob Williams
Rob founded Techgage in 2005 to be an 'Advocate of the consumer', focusing on fair reviews and keeping people apprised of news in the tech world. Catering to both enthusiasts and businesses alike; from desktop gaming to professional workstations, and all the supporting software.


