- Qualcomm Launches Snapdragon 4 Gen 2 Mobile Platform
- AMD Launches Ryzen PRO 7000 Series Mobile & Desktop Platform
- Intel Launches Sleek Single-Slot Arc Pro A60 Workstation Graphics Card
- NVIDIA Announces Latest Ada Lovelace Additions: GeForce RTX 4060 Ti & RTX 4060
- Maxon Redshift With AMD Radeon GPU Rendering Support Now Available
Social & RSS Feeds
Latest Videos


Latest News
ASUS P5N-E SLI
by Rob Williams on December 27, 2006 in Motherboards
When the 680i chipset was launched last month, it proved to have exactly what the enthusiast was after. However, most of those boards range in the $250 area. ASUS has just released their new P5N-E SLI board which offers the 650i chipset. It’s a scaled down version of it’s bigger brother, but costs far less and still contains a huge punch for enthusiasts.
Page 1 – Introduction
|
|
Last months launch of NVIDIAs 600i series was a welcomed one by enthusiasts. It was finally a chance to step away from Intels proprietary chipset and to start taking advantage of what nForce is capable of. Of course, we can’t overlook the SATA and Audio issues that proved problematic for many. NVIDIA since released a hotfix that takes care of the SATA data corruption problem.
Pros and cons aside, any motherboard that uses the 680i chipset retails for around $250. Personally, I think this is well worth it for what the boards offer. But what if you got rid of a few small features? You wind up with a board like the ASUS P5N-E SLI, which uses the 650i chipset that costs far less.
Who’s the 650i marketed for? Those who want a solid board for a great price and doesn’t skimp on performance potential. After my week of testing with the board, I can admit that it’s a fantastic performer, regardless of the price range.
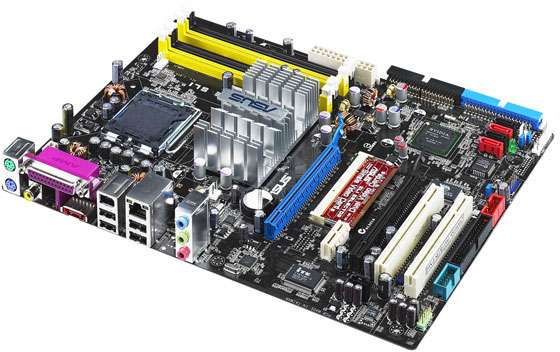
Closer Look
Before we get into the board layout and other snapshots, I’ll go into detail of what this board offers over the P5N32-E version and also the differences between the 680i and 650i chipsets themselves.
Although this board uses the 650i SLI chipset, there is also a 650i Ultra version available, which is not yet seen on any retail boards. The primary difference between the two is that the latter does not support SLI, as the title suggests. Other than that, the other difference is the name.
With regards to the 680i vs. 650i bout, the 680i offers more peripheral support in general. Using the 650i SLI chipset, the board developer can either implement a single 16x PCI-E slot, or dual 8x PCI-E slots, which gives us the SLI capabilities. The 680i on the other hand, offers two 16x PCI-E slots in addition to an 8x PCI-E slot, which can be used for physics cards, whether it be another NVIDIA card or the PhysX from AGEIA.
The 680i also offers EPP support, while the 650i does not. I personally find this very odd, however I still believe EPP is a waste of time all around. Learning to overclock on your own will give you far more satisfaction and better performance in the end.
Another notable difference is that while the 680i can allow up to 6 S-ATA ports, the 650i only offers 4. Instead, while the 680i offers support for only two IDE drives, the 650i offers support for four. This personally doesn’t make a difference for me, as I use a single S-ATA and single IDE, but it may be a deciding factor for those who have large RAID setups or a bunch of drives.
Personally, the thing I noticed faster than anything was the fact that the 650i chipset allows for only one Gigabit ethernet connection. So, if you are on a wired connection and connect to another computer via cable, it won’t be happening here without installing your own nic card. Occasionally, board manufacturers can throw an additional chipset on board, such as a Marvell, to enable an additional NIC port. That wasn’t done here, because it probably won’t affect that many people. This is a “budget” board, also.
The box for the board is smaller than most other I’ve seen. This is simply because it doesn’t include that many extras, such as a board like the M2N32-SLI does. It’s a pretty barebones board, built to satisfy the enthusiast. So, it only includes what it needs. As you can see, my delivery guy may have tried to use the box as a soccer ball.

What you see in the picture is what you get. Two IDE cables, 2 S-ATA cables, motherboard guard, SLI Bridge, PCI USB connector, manual and Q-Connector. The Q-Connector is designed for those people who don’t enjoy squinting and playing around in a small area when plugging the ATX cables. You first plug them into the Q-Connector, and that way you will have a single connector to plug in just like you would with the USB connector.

I should also mention that the chipset software includes beta Vista drivers. Despite this fact, the autorun will not function properly in Vista, so you will need to fish around the folders and find the correct drivers.
|
|

Support our efforts! With ad revenue at an all-time low for written websites, we're relying more than ever on reader support to help us continue putting so much effort into this type of content. You can support us by becoming a Patron, or by using our Amazon shopping affiliate links listed through our articles. Thanks for your support!

Rob Williams
Rob founded Techgage in 2005 to be an 'Advocate of the consumer', focusing on fair reviews and keeping people apprised of news in the tech world. Catering to both enthusiasts and businesses alike; from desktop gaming to professional workstations, and all the supporting software.


