- Qualcomm Launches Snapdragon 4 Gen 2 Mobile Platform
- AMD Launches Ryzen PRO 7000 Series Mobile & Desktop Platform
- Intel Launches Sleek Single-Slot Arc Pro A60 Workstation Graphics Card
- NVIDIA Announces Latest Ada Lovelace Additions: GeForce RTX 4060 Ti & RTX 4060
- Maxon Redshift With AMD Radeon GPU Rendering Support Now Available
Social & RSS Feeds
Latest Videos


Latest News
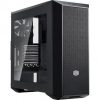
A Blank Slate For Extreme Customization On A Budget – A Review Of The Cooler Master MasterBox 5
by Tom Roeder on July 7, 2016 in Cases & PSUs
It is really an exciting time to be case shopping. Never before has the consumer had such a selection, with so many features, and so much flexibility for customization. Years ago if you wanted customization, your choices were extremely, frustratingly limited. Today we are looking at a case that trumpets “Make It Yours”, enter the Cooler Master MasterBox 5.
A case should really be the most thoughtful investment in your PC build. Thanks to widely accepted standards of ATX design, the basic format of cases is here to stay for the most part. If you are like me, every two or three years you are making changes to your system, so it only makes sense to carefully select your case, as you want it to last for years to come, and have the flexibility to meet your needs.
I have been tinkering with PCs for almost 3 decades now, and the evolution of PC cases has been very exciting, especially recently. For years, many case makers seemed to ignore the consumer’s need for cable management, fan mounting, sound deadening, air filtration and so on. Not to mention GPUs now that are almost the length of a Pringles can. The market for gaming cases is vast, full of models that look like they were designed by a team of graphic designers that work for the Syfy channel; others that are sleek and muted, designed to look like they could belong in a datacenter.
Today we are taking a look at a case that promises ultimate customization, immense water cooling options, at a price and build quality you would come to expect from a company like Cooler Master, with the MasterBox 5. What makes this case different from others, that deserves a second look from the discriminating consumer? Let’s take an in-depth look at this case and find out.
Key Features:
- Multiple places to hide away an SSD, either across the motherboard tray, along the bottom shelf, or on the backside out of sight thanks to modular design
- 3 ½” cage to store one or two HDDs neatly, and right behind a fan to give your drives long life
- Support for E-ATX, ATX, Micro-ATX or Mini ITX motherboards
- Comes with two 120mm chassis fans with room for several more
- Supports liquid cooling radiators from 120mm up to 360mm, and even a place for mounting a reservoir with optional mounting brackets
- Well appointed with various cable management possibilities thanks to various openings in the chassis as well as 25mm cable space all around, and even 35mm behind the motherboard tray
- Supports GPUs up to 410mm in length (for reference, the NVIDIA GTX 1080 is only 266.7mm long)
A Visual Tour of the MasterBox 5

Cooler Master has followed an aesthetic here that I favor, and that is less is more. The lines on the MasterBox 5 are basic, clean, muted. The front is unassuming, no openings for optical drives, or anything for that matter. The front is a mesh, with a finer window screen-type material behind it to capture dust, and the Cooler Master logo towards the bottom. At the top we find a tactile button for the power, 3.5 mm microphone and headphone jacks and a reset button on the right.

To the left of the power button, we find two USB 3.0 slots, and nothing more. I personally favor at least having the option of adding a 5.25 optical drive in the front of a tower, but I have to admit that clean lines with no openings on the front is a really slick look. Plus with USB 3.0, performance is no longer a concern with using external drives, making the internal mounted optical drive even more legacy as time goes by. So keep that in mind when shopping for this chassis: no front mounted drives, period.
The left hand side of the case sports a generous display window that is clear plastic. You won’t find any crazy designs here, just basic and clean, well-done aesthetics.

The right hand panel is just that, a panel. No window for the backside of the motherboard (not sure why you would want one?). It removes in the same fashion as the left panel, with thumbscrews. Both of the panels easily remove, just slide them back once the screws are removed. The panels easily remove and fit well, no rattles or fan buzzing whatsoever. One missed opportunity I saw here was to add some sound deadening material to the back panel. No doubt Cooler Master omitted this to keep costs down for the MasterBox 5, but if you wanted to add it yourself, it would not be a difficult task.
The back of the tower is pretty basic as well, pretty standard stuff there. There is the IO opening, a 120mm stock fan, PCI slots, and the PSU opening.

On the underside of the chassis, we find a fantastic feature: very tall feet, and a removable dust filter for the intake for the PSU.

What the tall feet give you over other cases is clearance. If you have carpet with a tall nap, it is easy for the bottom air intake for the PSU to become restricted, but not with these tall feet. Well played, Cooler Master.

The inside is painted the same as the outside, a matte or eggshell finish, very clean-looking. At the bottom we find a cover for the PSU, and to the right of that we find the 3.5” HDD caddy. This is removable if you choose, or if you need the space for a that 420mm radiator.

Still inside the chassis, we find holes everywhere you might need them for cable management, and plenty of generously deep channels to tuck them away.

Up at the top, we find one of the places to mount an SSD. This mount can be moved to the back of the motherboard if you choose, for a very hidden, clean look. The front is easily removable, and where we find another stock 120mm fan. You can add another 120 or 140mm chassis fan here if you choose. The MasterBox 5 comes with some standard hardware, fan mounting plastic fasteners if you choose, and a power adapter for extra fan(s).
The Build
This case for me, is a new home for my sandbox, currently running Fedora 23 Workstation, which I have plans on running a virtualization platform, and tinkering around with. For this purpose, this is really a throw together of whatever parts I have lying around, so nothing too exciting hardware-wise here. The motherboard is an MSI 970A-G46, the processor is an AMD FX-8350 with a giant Cooler Master Hyper 212 EVO, and 20GB of DDR3 RAM for good measure. The GPU is an old PNY GeForce GT 430, an older Antec PSU, and a couple of WD 500GB Caviar Blues for a RAID 1 setup… as I mentioned, throw together stuff, mostly.
First step was to snap in the IO shield; it fit nicely, no problems here. Next was to install the motherboard standoffs, which Cooler Master did include, and even a tool to adapt them to a Phillips screwdriver to make our lives easier. Next was to pop the motherboard in, which I did with ease; this isn’t my first rodeo.

Next I installed the PSU, and the GPU. The GPU fits nicely into the slot, and I really enjoyed having the cover over the PSU, really hides the owl’s nest of wiring since my PSU is older and non-modular.
Then I installed the hard drives. I found installing these into the caddies was a little tricky, but nothing too major. I then inserted them into the trays, where they fit nicely, and the locking arm gives you a satisfying click to let you know you did everything right.
Next I installed a 140mm chassis fan in the front of the chassis just above the stock 120mm fan. I used a Fractal Design fan that I had lying around, and secured it with the plastic fasteners that came with the case; easy peasy. These worked well, and I love the tool-less design; such a simple thing, but it makes things easier on us!
Next, I wired everything up. I found this to be very easily done, thanks to all the routing holes and generously wide wire trays. Because of the non-modular design of my older PSU, I was not able to take advantage of the cable management for the AUX power for the CPU; the wires were just barely too short, so I had to do it the old school way and run it across the front of the motherboard (this is a fault with the old PSU rather than chassis). This brings me to another smart design for this case, as there is a hole in the top of the PSU cover just for this very scenario. You could also use this if your PSU, or add-on USB 3.0 card requires additional power input.
Finally, I wired all of the front connectors. This was pretty standard fare. The wires were long enough to route them neatly and still make the connections to the motherboard.

Once all of this was done, I brought the case to my office and fired it up. By some miracle, the motherboard posted on the first try (haha) and I was up and running in no time. The case is somewhat quiet, but could be quieter. Keep in mind that I did add an extra fan, but its sound contribution is almost non-existent. You also have to remember that there is no sound deadening material, but this could be added in easy enough. I didn’t detect any vibrations, buzzes, or any other noises from this case, very solid indeed.
All in all, I found the Cooler Master MasterBox 5 case to be very, very nice. You have to remember the price point of this case, currently $69.99 from Cooler Master’s website or via Amazon. You would seriously be hard pressed to find a nicer case at this price point. The build quality is excellent, and it was very easy, and pleasurable to work in. As I mentioned, I would like some sound deadening material, but this is by no means a deal breaker.
Pros
- Excellent build quality.
- Simple, handsome styling.
- Lots of cable management options.
- Large window on the side.
- Good dust filtration.
- Fantastic value.
Cons
- No sound deadening material.
- No option for an internal optical drive (this isn’t necessarily a con).

Support our efforts! With ad revenue at an all-time low for written websites, we're relying more than ever on reader support to help us continue putting so much effort into this type of content. You can support us by becoming a Patron, or by using our Amazon shopping affiliate links listed through our articles. Thanks for your support!