- Qualcomm Launches Snapdragon 4 Gen 2 Mobile Platform
- AMD Launches Ryzen PRO 7000 Series Mobile & Desktop Platform
- Intel Launches Sleek Single-Slot Arc Pro A60 Workstation Graphics Card
- NVIDIA Announces Latest Ada Lovelace Additions: GeForce RTX 4060 Ti & RTX 4060
- Maxon Redshift With AMD Radeon GPU Rendering Support Now Available
A Look At Adobe Photoshop Lightroom CC

The latest revision to Photoshop Lightroom, called CC (or 6), is a typical Adobe release. That’s to say, there are some real steps forward, as well as some exciting features, but it seems we can never be without a frustrating misfire or two. The latest release is a definite improvement, but there’s still a lot of room to grow.
Page 1 – Introduction, A Core Workout, HD ARGGGGH
Just last week, Adobe dropped the curtain on the official release of Lightroom 6/CC, putting the final master into our hands to play around with. As with looks at the software’s previous updates, I will not head into a full review of Lightroom’s capabilities (instead, if you need to familiarize yourself with the basic premise, I urge you to read my original treatise from a few versions back here), but instead give some insight into its newest changes.
To eliminate any confusion, LR6 is the standalone version of Lightroom Creative Cloud… essentially the same product. The upgrade touts an impressive new feature list. Some of these features are ones that photographers have been clamoring for, for ages; a couple of them are more for the masses; and there is the always-present Adobe trumpeting of a “WTF?” improvement cooked up for nobody really knows who.
This time, the photographers get photograph merging for HDR and panoramas, which we’ll look at in detail (it’s probably the core reason a pro or prosumer would upgrade). The improvement for the Facebook-loving masses (or just those with huge image catalogs) is facial recognition (again, discussed in detail in this review). The “WTF?” moment rounds out our major improvements with new and improved video slideshows. Sorry, guys, I do not think it possible for me to care less about this, as video slideshows are of the devil to begin with and only used to subject poor family members to the torture of vacation pictures. Now you can bore your family to the beat of up to 10 songs (that is wayyyyy too long) with pictures changing in time with the music. Great.
One additional feature that hasn’t really been talked about but is well worth an honorable mention is that there is FINALLY a masking option for gradients! This comes in through the “Filter” brush, which can be used to exclude areas from color gradients and washes. It doesn’t deserve a group of its own below (and is the only real tweak to the develop module I could find) but it deserves a shout-out. Here, here to masking!
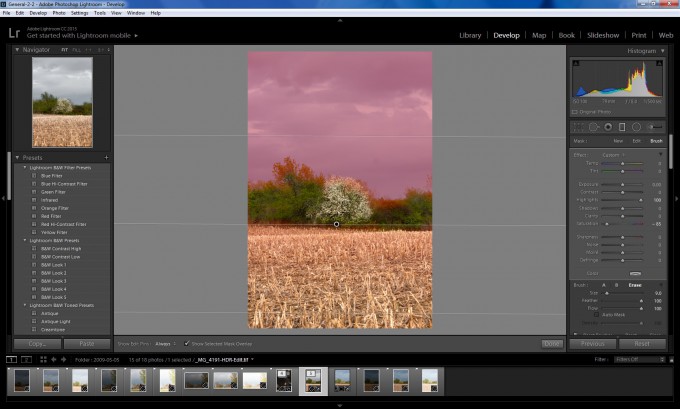
You can now mask out parts of images when applying gradients!
A Core Workout
Before we get deep into the touchy-feely features, let’s talk about a couple substantial improvements in the core of the software itself. The first of these is an overall speedup of the software, which was sorely needed. I’ve noted that each revision gets a little more “bloated” and slower at doing the same task versus its previous generation – Adobe apparently took the complaints from LR5 to heart and worked on some very sorely needed optimization. All of the press documentation talks about it being “up to 10x faster,” and maybe SOME part of the software runs that much better, but overall I’d say it’s more like 2-3x. It’s certainly enough to feel snappier, especially compared to the bloat of LR5, so I won’t complain.
The other core improvement is that LR6/CC has its support for the Lightroom mobile clients “baked in” instead of tacked on. This is great for… well, I’m still looking for who the hell would really need this, as every pro photog that would need to edit on the go has a laptop, and the iPhone/iPad (and finally, Android!) versions of LR are still a long way from being prime-time usable. That being said, there is a lot of room for this to grow, and I’m glad to see the backend being bolted into place at such a deep level. It’s not obtrusive for those who don’t need or want it, but it’s easily accessed for those who do. The LR6 standalone will not have real access to the mobile platform, it’s worth noting, as you need your CC subscription to download/activate the mobile version of the software.
One of my biggest gripes about the mobile push is that I’m still not a fan of Adobe’s model overall. Only “Smart previews” (high-res JPGs) of images get uploaded to the cloud to be accessed from mobile platform; no files can be synced directly to the device. Images also cannot be uploaded through the device from an outside camera to feed back to your desktop, which kills one of the greatest benefits to having LR directly on your tablet… using it as a sync point on the go. You would still need to take your camera home, import to your desktop catalog, and THEN access the images through the mobile platform.
If this were instead designed (whether as default or as an option) as a client/server relationship with a storage device of your choosing (whether it be your home server, Dropbox, Adobe Cloud, Azure, etc), I think it would be a lot more useful. As it stands, however, you’re left with yet another cloud account with yet another company infamous for poor security standards guarding all of your pictures, with a ton of limitations. Overall, I’ll take a pass and keep my stuff on my home system.
HD ARGGGGH
I’ve been hoping for better integration to third-party software like Photomatix HDR for a while. If I’m honest, though, I’d prefer overall that Adobe just purchased Photomatix outright and built the company’s wonderful HDR processing directly into LR so that I didn’t need a third-party program. Imagine my excitement when I saw that LR6 would contain a new “Merge to HDR” feature!
Every review I have glanced at during my experience has been dripping with lavish praise for Adobe’s new implementation. After all, HDR has been around for a long while now and even smartphones attempt a somewhat ham-fisted implementation of it… to finally have it right in your core photo software is a welcome feature indeed!
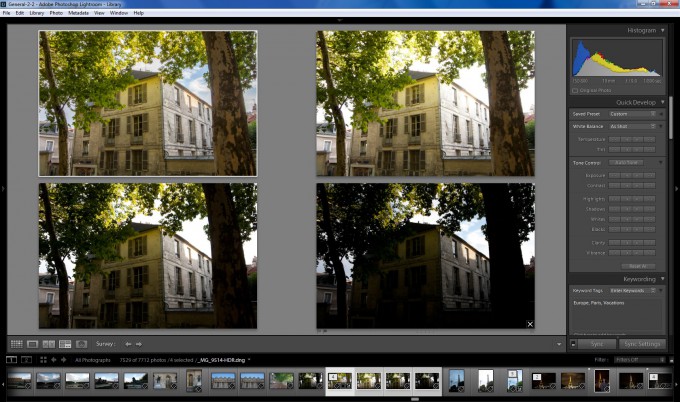
The HDR image in the upper left has a lot of highlight data restored.
Except… it sucks.
Let’s talk for a minute about what HDR is, just in case anyone needs a refresher. HDR stands for “High Dynamic Range” and it is done by taking the same picture shot at different exposures (usually 3 minimum, shot at least 1 stop apart) and blending them together pixel-by-pixel to capture color detail that would have been lost in the highlights or shadows. It is not just a simple average of the shots (which is called exposure blending instead of HDR) – it should contain all of that additional color data brought out by the highs of the low and the lows of the high, and produce a resultant file (usually a new RAW or 32b TIFF file) with that extra depth crammed into every pixel. I will give credit where due – Lightroom 6 seems to do this part just fine.
When we think of HDR, though, we really aren’t usually thinking of that. We’re thinking of the tonemapping that goes on top of it. That post processing is done by a series of very powerful algorithms to condense that huge amount of data back into a visible spectrum for screen or print (8-16b). Tonemapping can do anything from create the overly contrasted/saturated and halo-riddled image to the nearly perfect uniformly lit scene that makes you wonder if it was a plastic model. Many argue that the entire HDR “effect” is at its best when the tonemapping provides a subtle but distinct contrast bump to bring the image detail and lighting more in-line with how the human eye would see it, though I would argue that it’s at its best when it’s in the artist’s hands to choose how they wish to use it (even if I find the end result garish and want to cry).
It is this concept that brings me to the main problem with the LR6 implementation: there are no user settings, because there is no tonemapping. There is nothing beyond generating the HDR raw and not even anything that then identifies the resultant file as such (so you’d better tag your work!). You can click a button to adjust for ghosting caused by movement between frames, and there’s a checkbox for autotone adjustment that just moves a few sliders in develop mode that you could do yourself on the middle image. No tonemapping. No following process to work with that new image. Nothing at all.
Now, I know Lightroom isn’t a full HDR package… but it’s certainly designed for workflow and if HDR is going to be a part of that workflow, then tonemapping is too. It’s like building the frame of a house and then completely forgetting to put up walls or a roof. Most people who do a lot with HDR stick to one or two general “looks” for their images… it would be easy to make some presets (or, heaven forbid, let users make their own!) to tonemap the resultant image. The reason people think of tonemapping when they think of HDR is because an HDR image is pretty much useless without it. An unmapped image will look like, essentially, the middle image of the set.
After HDR creation, Photomatix has all sorts of sliders depending on the tonemapping algorithm chosen (there are many to choose from) resulting in nearly infinite final versions from the same input. Photoshop, though less robust, also has a few (four, I believe) algorithms and a couple of options in each one. In Lightroom? You get no options and only one raw output, and you’d better know what to do with it from there. The develop choices in Lightroom will not usually help you do much with this image, so you’ll be pulling it out to Photoshop anyway, which could have easily merged the files for you in the first place (with more options). And since Photomatix has far more options than even Photoshop does, you’re likely to still want that instead if it’s an option to you.
The best you’re going to get from within Lightroom is pretty much what the auto-tone comes up with, and I found that I can simply adjust the sliders on my middle image to come up with something so close to the Lightroom-generated HDR image that I can’t even tell the difference, despite the fact of using five RAW files to render it.
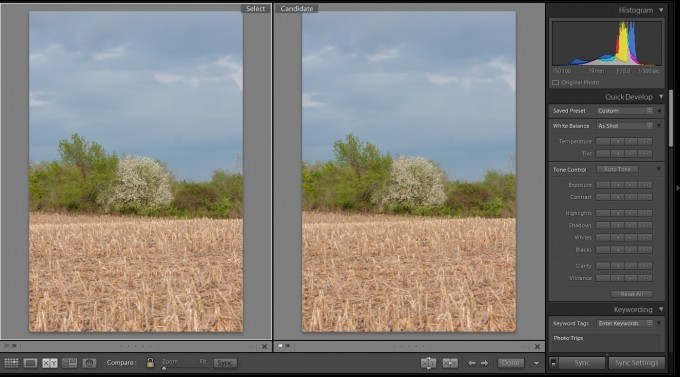
Can you see the difference? One is HDR, one is the middle image of the set with the same tone options applied.
Now, before I fire too many shots at this, I will say that with some extended use and playing more with the tone options in the Develop tab, I was able to get a bit more out of it than I was at first. However, the software will simply never provide a consistent experience – on some of my images, the HDR/Autotone plus a little extra help in Develop mode did a whole lot for the picture, all inside of Ligthroom. On several other images, I couldn’t get a better picture from it no matter what I did in Lightroom, but a quick trip into PS for some tonemapping gave some radical quality changes. I’ve given an example of each type of image here, but I can’t really tell you why one does well and one doesn’t.
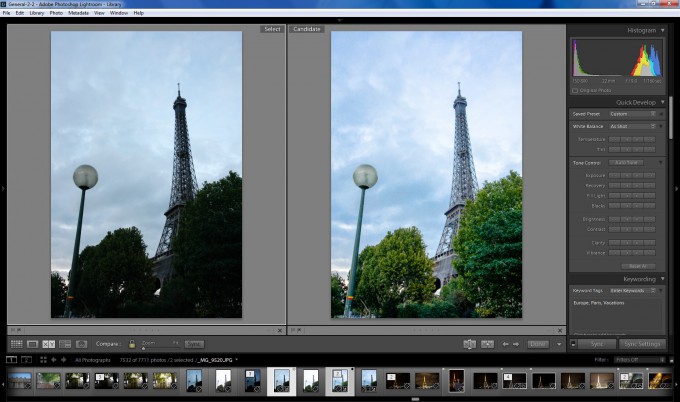
This image benefitted greatly from Lightroom’s HDR treatment, processed entirely inside LR.
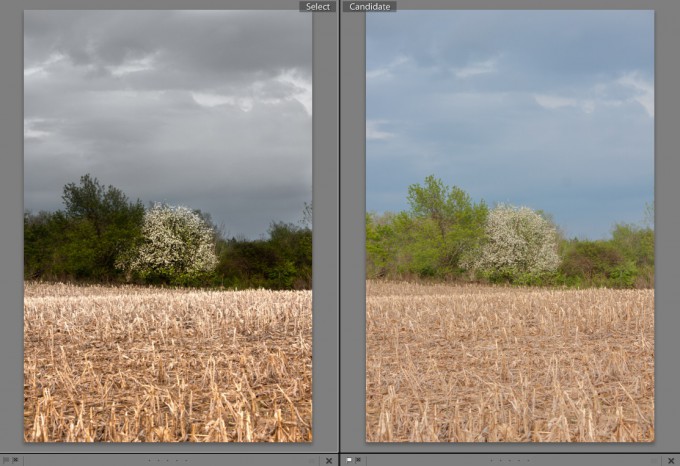
However, this image required a trip into Photoshop to get to the left-hand version. Lightroom’s version is on the right.
This wouldn’t be quite as bad except that you will actually have quite a bit of time tied up in seeing whether the HDR merge is even going to be worth your while. It takes what feels like forever. On a six-core machine with 32 gigs of ram, it took about 30 seconds to do the HDR merge. That may not seem like much, but Photomatix did the same merge in about half the time with much better options both before and afterward. And if I compare apples to apples for an END product on one of the images it didn’t help on, then moving the sliders on the middle image to replicate the HDR’s autotone took almost no time at all (thanks to that speed increase in the core of the software!).
To me, the lack of options should at least produce some consistency. The tremendously varied quality of result makes no sense to me, and the inability to really work with the image that gets produced is just baffling. Really, Adobe… I want to love it. I really, really do. Talk to Nix, talk to Photomatix… talk to somebody about how to do this better. It was the right call to try and include it, but it went oh so wrong when you left out the visible workhorse half of it.
Support our efforts! With ad revenue at an all-time low for written websites, we're relying more than ever on reader support to help us continue putting so much effort into this type of content. You can support us by becoming a Patron, or by using our Amazon shopping affiliate links listed through our articles. Thanks for your support!


