- Qualcomm Launches Snapdragon 4 Gen 2 Mobile Platform
- AMD Launches Ryzen PRO 7000 Series Mobile & Desktop Platform
- Intel Launches Sleek Single-Slot Arc Pro A60 Workstation Graphics Card
- NVIDIA Announces Latest Ada Lovelace Additions: GeForce RTX 4060 Ti & RTX 4060
- Maxon Redshift With AMD Radeon GPU Rendering Support Now Available
Social & RSS Feeds
Latest Videos


Latest News
A Look at Mac Hypervisors: Parallels Desktop 9 & VMware Fusion 6
by Greg King on December 13, 2013 in Software
Macs offer a number of benefits, but for many Windows users, it’s Apple’s top-rate design that helps seal the deal when pondering a new PC. But, a problem arises: What about those Windows apps? What if you don’t want to go the Boot Camp route? Fortunately, with Parallels Desktop 9 and VMware Fusion 6, two excellent alternatives exist.
Page 2 – Parallels Desktop 9
Controlling the majority of Mac desktop virtualization market, Parallels is the de facto leader when it comes to running an alternate operating system on your Mac. With the release of Desktop 9, the Parallels team turned their focus to better performance, added conveniences, and cloud services optimizations. With support for both OS X Mavericks (10.9) and Windows Blue (8.1), a promised 40% increase in disk performance, Thunderbolt and Firewire integration, and additional display support, Parallels Desktop 9 hopes to address the needs of today’s power users who find themselves at the mercy of Windows-only programs like I’ve found myself a countless number of times over the past year-and-a-half.
Admittedly new to Parallels Desktop, I was pleased by the simple and easy installation of the application. Like most OS X install packages, I simply downloaded the .dmg, double-click on it and it did the rest. That’s not to say that installing a program on a Windows machine is difficult, but on OS X, once you’re past the fact that it’s a little different, it’s incredibly easy.

Once Parallels Desktop 9 is installed, the creation of a new virtual machine is a simple process. You are given the option to install your operating system of choice from a DVD, as most of us have become used to over the years, directly from an ISO file or by importing an existing virtual machine from another virtualization product… say VMware Fusion. You can even migrate an existing Windows install from another PC using either a Parallels USB cable, your own network, or an external storage device. This method is dependent upon the Parallels Transporter Agent (a free download from Parallels.com).

After you have chosen your guest OS – in this case, Windows – you are then given the option to choose how you would like to interact with it. For those that prefer to keep a separated and windowed feel, you have the option to run your virtual machine “Like a PC”. This will run the guest OS in its own window but still allow you to drag and drop files amongst OS X and the VM. If you are more in the mood for a seamless integration of Windows, you can select to run Windows “Like a Mac.” This does away with the traditional Windows desktop and integrates the programs and utilities that come with Windows into the OS X experience. There will be a better example of this a little later.
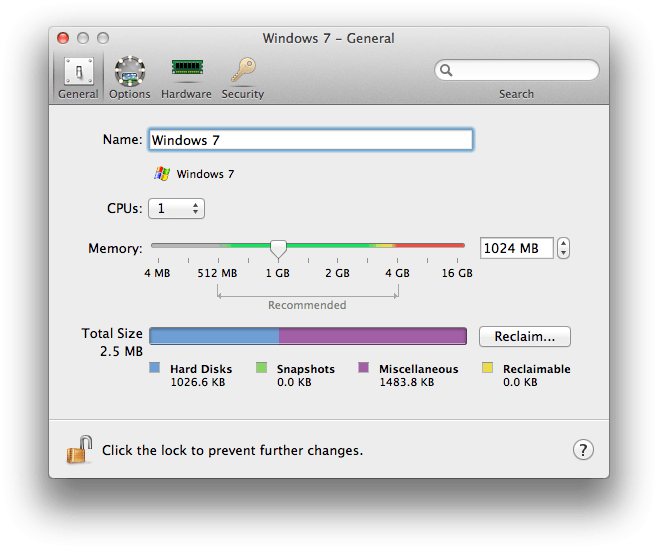
As with any virtual machine, it will require a certain amount of system resources. This means CPUs, system memory and hard drive space. One has to obviously be mindful of the impact that these settings can potentially make on their computing experience, and as such, attention needs to be paid to the resources given to the virtual machine. For example, if the host OS (OS X) and the guest OS (Windows) have to compete for system memory, virtual memory will come into play. This, like in Windows, will decrease the performance of your environment as it is forced to store data on slow disk, rather than in much faster RAM.

For our Windows 7 install, we chose the “Like a Mac” option. This provides a more seamless experience of running Windows on top of OS X. This places the Parallels icon in the menu bar, and by clicking on it, we can interface with the virtual machine. From here we can access the Start menu, swap between the “Like a PC” and “Like a Mac” modes (called Coherence), access the Windows OS devices and link to the Parallels’ convenience store. At the convenience store, users can find applications such as anti-virus, book-keeping, and CD/DVD authoring software. Think of it as an app store within the Parallels universe.

From the dock, users can bring up the Start menu. In this manner, nested directories pop out as they would on a traditional Windows workstation. For just programs, a folder is created and placed in the dock, and once expanded, it acts just like “All Programs” but from the Mac dock. This is a perfect example of the seamlessness of Coherence.

When Windows boxes are opened, they appear on the OS X desktop just as they would on a Windows box. They look and act like they would on a Windows machine. The minimize, maximize, and close buttons are in the upper right hand of the window, completely opposite of where the similar set of buttons are found in OS X. This is something that I promise you will get used to in due time.

If, for whatever reason, you need to issue a series of key strokes that contain keys that aren’t found on the standard Mac keyboard, you can do so by going to Devices > Keyboard and then choosing which combo you need to run. Knowing this going into your Parallels experience can save a bit of time and headache.

While I didn’t see the need to capture any screen grabs of within Windows 8, I wanted to point out that when setting up your “Windows Experience” you are given an option to have Win8 appear and act like Windows 7. By doing so, you boot directly to the desktop, foregoing the Metro start screen, and by installing a pair of applications (Start8 and ModernMix), you are promised a “fully functional” Start menu. Before Mavericks, when we booted directly to the Windows 8 Start screen, it consumed the entire screen, and rendered my two standalone monitors useless as they were set to simply unusable gray screens. Mavericks however, resolved this issue.

Speaking of Windows 8 in full screen mode, here it is with the Start8 start button installed. This is done automatically during installation and makes the move from Windows 7 that much easier. You do have the option to jump to the Windows 8 Metro menu; it’s pinned at the top of the Start menu. Just like 7, you have “All Programs” and the full list of commonly accessed areas in the Start menu.
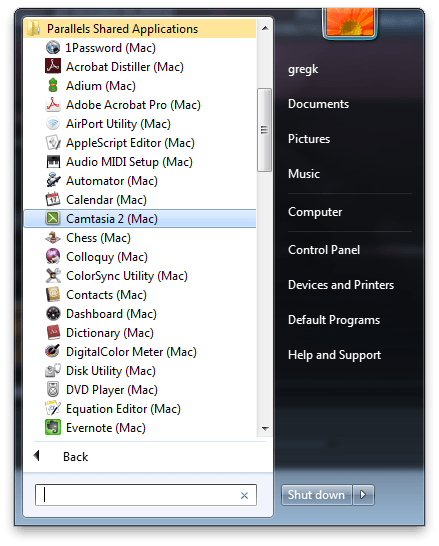
Finally, within the Windows Start menu, listed are all of the installed Mac applications. This is convenient as it provides a centralized location to access all of your Windows and OS X apps.
Those are the basics of Parallels Desktop 9. Our experience with the product, from start to finish, was a positive one. My experience with previous versions has been limited to seeing it run on others’ Macs. My first real hands-on experience with Parallels Desktop started two months ago, so there cannot be any comparisons drawn between the past and present. That being said, there were a few expectations that I had going into this article. I expected Parallels to simply work. It did just that and with a considerable amount of polish.
Let’s move onto VMware’s latest offering, Fusion 6.

Support our efforts! With ad revenue at an all-time low for written websites, we're relying more than ever on reader support to help us continue putting so much effort into this type of content. You can support us by becoming a Patron, or by using our Amazon shopping affiliate links listed through our articles. Thanks for your support!