- Qualcomm Launches Snapdragon 4 Gen 2 Mobile Platform
- AMD Launches Ryzen PRO 7000 Series Mobile & Desktop Platform
- Intel Launches Sleek Single-Slot Arc Pro A60 Workstation Graphics Card
- NVIDIA Announces Latest Ada Lovelace Additions: GeForce RTX 4060 Ti & RTX 4060
- Maxon Redshift With AMD Radeon GPU Rendering Support Now Available
Social & RSS Feeds
Latest Videos


Latest News
A Look at Mac Hypervisors: Parallels Desktop 9 & VMware Fusion 6
by Greg King on December 13, 2013 in Software
Macs offer a number of benefits, but for many Windows users, it’s Apple’s top-rate design that helps seal the deal when pondering a new PC. But, a problem arises: What about those Windows apps? What if you don’t want to go the Boot Camp route? Fortunately, with Parallels Desktop 9 and VMware Fusion 6, two excellent alternatives exist.
Page 3 – VMware Fusion 6
With the exception of the random outing with Sun’s useful and very free VirtualBox, my only real experience up until recently has been with VMware’s Workstation for Windows and ESX for the enterprise. As a proud holder of a VCP5 certification, my understanding of VMware’s enterprise product has served me quite well over the past few years.
When it came time to write up an article on virtualization on the Mac, Fusion was an obvious choice. Brand recognition alone is enough for most people when they are looking for a software solution and in this case, VMware has a solid reputation. I have used Fusion, as previously stated, for the past year and a half and as an everyday product, it has been rock solid.
Just like Parallels, you are given the option to either install Windows from an .iso file or by alternate means. You have the ability to import your Windows install from another PC, meaning either a physical to virtual, or virtual to virtual, solution. This is achieved through the VMware developed tool, VMware Converter, which is a free download and allows the migration of another install of Windows to run as a virtual machine on your Mac. If neither of these common methods of setup fit into your needs, there are other means of installation as well.

If you so desire, you can setup OS X to run as a guest operating system on your Mac. While the use cases for a solution like this are rare, there are those that will likely find this very handy. You can do this by installing OS X from the “invisible” recovery partition on your hard drive. If you have another virtual machine, possibly from VirtualBox or even Parallels, you can direct the Fusion installer to the location of that virtual machine and it will take over from there, setting up your VM to run within Fusion.
The only issue with that is that it requires the same amount of disk space that your virtual machine currently is using as it’s going to be its own, standalone VM, not one that can be started and stopped with either program using the same VM file or files. If you happen to use Boot Camp, you can set that Windows install to run as a virtual machine as well. For all those out there that run Boot Camp, this is an ideal solution as it will allow you to continue to run your Windows programs, only side-by-side with your Mac apps.
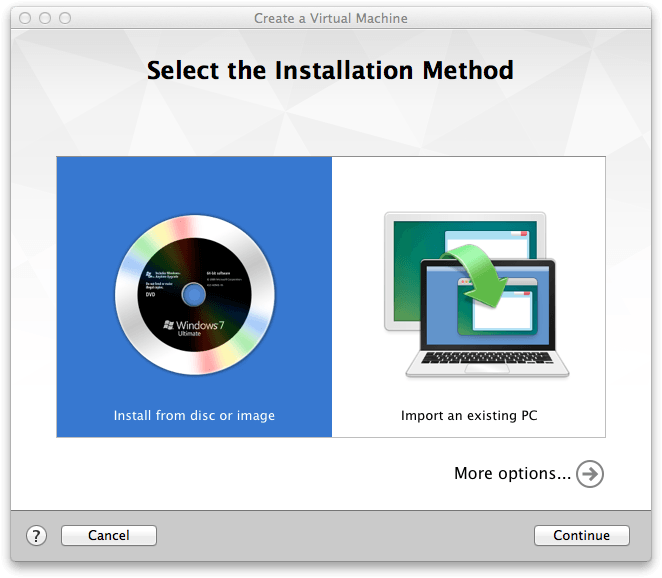
The last option is to create a custom virtual machine, and boy is it deep.

If you choose to create a customized virtual machine, you are presented with an overwhelming list of operating systems that you can run in your Fusion environment. For Windows, you can go back all the way to Windows 3.1 if you need to, though older operating systems may or may not play nicely when virtualized. With these older installs, “your mileage may vary” is an adequate phrase to use.
You can virtualize many versions of OS X, all the way back to 10.5. Selecting Linux allows you to run most all popular distros and even if your flavor of choice isn’t listed, if it runs at least the 2.2.x kernel, you should be able to virtualize it. Say you want to test the waters with ESX, you can virtualize that too. Also available for selection is Novell NetWare, Solaris, MS-DOS and even FreeBSD. What these selections primarily do, at least on the surface, is set the default specs for your virtual machine. Selecting MS-DOS for example will default to a 2GB virtual hard drive whereas something like OS X 10.9 defaults to a larger 40GB.

Getting back to a standard build, Windows 7 in this case, the new virtual machine “wizard” will step you through the process of setting up the guest OS. There is an easy installation option that will inject the fields you fill out into the install. These options include account name, password and product key. You have the ability to customize your install but if you are just looking to get a build of Windows setup as quickly as possible, this option is your ticket to just that.

Like Parallels, you are given the option on how you wish to interact with the virtual machine. You can have Windows sit side-by-side your OS X apps, or, if you prefer, run in full screen or windowed mode. This gives you the ability interact with the virtual machine more like you would if you were using remote desktop, but with the ability to drag and drop files between operating systems. One nice thing you can do when running in full screen is run your VM in its own desktop. This will set the virtual machine to consume the entire screen, but allow you to switch back and forth between Windows and OS X by a four finger gesture to the left or the right. It should be pointed out that you can do this as well within Parallels.
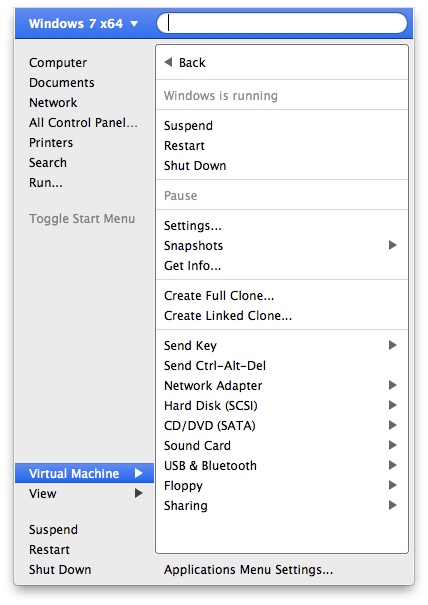
To access the Windows Start menu, or at least the functionality normally contained within, you must browse up to the OS X menu bar. By clicking on the VMware Fusion icon, a box drops down containing most everything found in the Start menu, as well as much more. From here you have the ability to interact with the virtual machine’s power state, take snapshots, send key combinations and edit the VM’s devices.
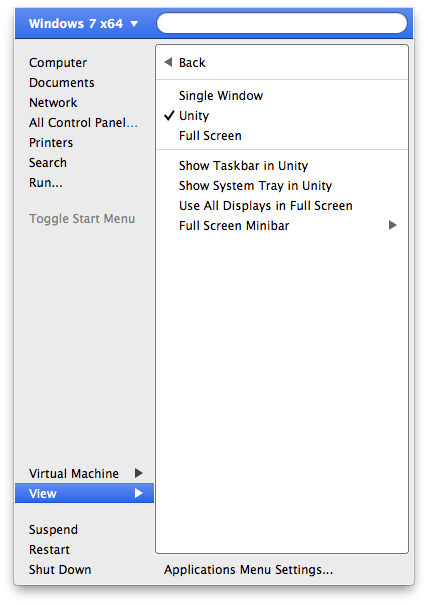
By expanding the View section, you can change how the VM works with your OS X desktop. You can move between Unity and full screen, as well as leverage any additional monitors that might be connected to your Mac.

Support our efforts! With ad revenue at an all-time low for written websites, we're relying more than ever on reader support to help us continue putting so much effort into this type of content. You can support us by becoming a Patron, or by using our Amazon shopping affiliate links listed through our articles. Thanks for your support!