- Qualcomm Launches Snapdragon 4 Gen 2 Mobile Platform
- AMD Launches Ryzen PRO 7000 Series Mobile & Desktop Platform
- Intel Launches Sleek Single-Slot Arc Pro A60 Workstation Graphics Card
- NVIDIA Announces Latest Ada Lovelace Additions: GeForce RTX 4060 Ti & RTX 4060
- Maxon Redshift With AMD Radeon GPU Rendering Support Now Available
Social & RSS Feeds
Latest Videos


Latest News
An In-Depth Look at openSUSE 11.3
by Rob Williams on August 2, 2010 in Software
Since it’s been quite a while since I last took openSUSE for a spin, I couldn’t resist downloading the 11.3 release that came out in mid-July. To see how the distro fares today, I installed it onto my home PC and used it for just over a week. So, read on for an in-depth look at what’s new and notable, and also for my experiences.
Page 2 – Installation
If you’re interested in giving openSUSE a go for yourself, you’ll need to head on over to the download page and grab a version that best suits you. For the sake of this review, I downloaded the full-blown 4.7GB DVD image (via BitTorrent), but for those who are looking for a slimmer download, there are GNOME and KDE LiveCD’s available, each weighing in at around ~700MB.
If you want to install openSUSE by way of a thumb drive, it is possible, but it’s not something I’ve had a great deal of success with in the past. But, if you have patience, there are many how-to’s found around the Web that will help you get on the right path, including one right on openSUSE’s own website.
After booting up with whichever method you chose, you will arrive at a typical boot-loader screen. From here, you can test the media for defects (smart thing to do if you haven’t used the disc in a while), and also perform a memory test with the help of Memtest86+ 4.0. There’s also a “Firmware Test” which scans various parts of your PC to make sure things are in check.


The other options are straight-forward. You will be able to boot straight to the hard drive, or even rescue your system in case of something going horribly wrong. After choosing the installation option, you’ll soon find yourself at a very clean and simple installer intro screen:

The next handful of screens are straight-forward, but I’ll explain them briefly. After clicking “Next” on the above screen, openSUSE will probe your computer’s hardware, and then you can choose to create a new installation (unless you happen to have an older version of openSUSE installed).


The next option is timezone configuration, which couldn’t be much easier. You can either select your particular region and timezone from the drop-downs, or click your location on the map. You don’t need to stress over being precise, because as you click anywhere on the map, it will zoom in, so that you can easily click your exact location. Finally, before we get into the good stuff, you can choose to make either GNOME or KDE your default desktop. If you’re unsure of which to choose, stick with KDE, as it’s long been preferred by SUSE users.
If you click the “Other” option, you will be able to choose between Xfce, LXDE, Minimal X Window and text mode.


One of the biggest fears of Windows users who decide to try Linux, or even Linux users who don’t want to overwrite their current distro, is having an installer mess up their entire PC. I’ve had it happen in the past, and it’s not fun. Thankfully, things are much improved today, and after seeing how YaST handles things, I have to say that it looks like all of your installed OSes are in safe hands.
From the get-go, you need to choose whether you prefer to have an LVM based system, or a partition-based system, and for the sake of remaining simple, the default option is going to be your best bet. At the top of this first page, you can see the partition layout that YaST proposes. In my particular case, I had an already clean SSD in the system, so it picked up on it immediately and chose to use it. If I had all partitions used, YaST can either resize what looks to be the best and use that, or if you are up to it, you can configure your own.


As you can probably tell by the top-right screenshot, YaST’s partitioner is impressive to look at and use. When first entering this page, you can see all of the partitions on the system in an easy-to-understand manner, and from here, you can choose to configure any that you need. If you want to set up a RAID, there’s a sub-section for that as well.
Something I like most about YaST’s partitioner is that it gives you a flowchart look at your devices and mounts. In the bottom-left shot, we can see that YaST is going to automatically mount the available Windows partition to /windows/C, while my home partition for openSUSE will of course be set to /home. If you wish to use a different filesystem than ext4, you can also change that to ext2, ext3, Reiser or XFS. Again, default is best for most people.


A moment ago, I mentioned the device graph, and here is what mine looked like:
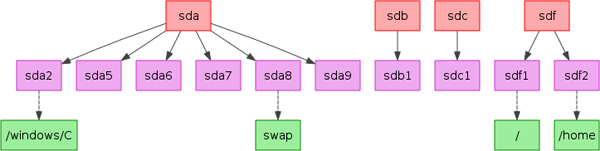
I don’t know about you, but I think an overview look like this is cool. What’s also interesting, is that YaST picked up on the swap partition from my other Linux install, so to save hard drive space, it automatically chose to use it instead.
We’re at the home stretch here. After giving the OK to your partition setup, you need to create a user, and then decide whether you want to have an automatic login or not. For most people, that’s preferred, but for those who are looking to keep their PC as secure as possible, that option should be unchecked. Once done, you’ll find yourself at the “Installation Settings” screen, which gives an overview look of every aspect of the installation.


From here, you can go back and change anything you might need to, or configure some things that are by default already chosen for you. YaST preconfigures the boot-loader for other OSes that might be installed, and in my case, it picked up on my Gentoo and Windows install just fine. Though not pictured, if you wanted to enable SSH on your machine, you could also configure that here, and the same goes for the firewall.
I couldn’t resist checking out the software configuration, and sure enough… robust, just as I expected. If you chose GNOME or KDE earlier in the installation, but want both installed, you can take care of that here, along with the option of installing additional desktop environments and software. There wasn’t too much extra I installed here, but I did choose to include some extra networking capabilities and development software.

At this point, the installation on your part is done. All you need to do is continue along, and allow YaST to partition the hard drives, install a boot-loader and then copy over all of the required files and settings. While you wait, you are treated to a slideshow that tells you a bit about the distro, and at the same time, you can click on the “Details” tab to see what’s going on behind the scenes, or “Release Notes” to read up on what’s new with 11.3.


Throughout my 11.3 testing, I installed openSUSE a total of four times, and each of those went off without a hitch. I appreciated the fact that there was a smart partitioner being used, because it made installation all the more simple. To add to it, the installation overall was fast (I didn’t time it due to doing other things at the time). I’m wholly confident in the fact that openSUSE’s installer is one of the best out there. It’s robust, simple and effective.

Support our efforts! With ad revenue at an all-time low for written websites, we're relying more than ever on reader support to help us continue putting so much effort into this type of content. You can support us by becoming a Patron, or by using our Amazon shopping affiliate links listed through our articles. Thanks for your support!

Rob Williams
Rob founded Techgage in 2005 to be an 'Advocate of the consumer', focusing on fair reviews and keeping people apprised of news in the tech world. Catering to both enthusiasts and businesses alike; from desktop gaming to professional workstations, and all the supporting software.


