- Qualcomm Launches Snapdragon 4 Gen 2 Mobile Platform
- AMD Launches Ryzen PRO 7000 Series Mobile & Desktop Platform
- Intel Launches Sleek Single-Slot Arc Pro A60 Workstation Graphics Card
- NVIDIA Announces Latest Ada Lovelace Additions: GeForce RTX 4060 Ti & RTX 4060
- Maxon Redshift With AMD Radeon GPU Rendering Support Now Available
Antec Skeleton Open Air Case
With such a large choice of PC cases available for purchase, finding one that perfectly suits your tastes can be difficult. Antec is one company that doesn’t mind taking a chance with products, and the Skeleton is the result of that. This open-air chassis is one of the most unique on the market, so we’ve put it to the test to see if it’s worth the $150 price tag.
Page 1 – Introduction
Antec has become well-known for their innovative case designs over the years, and they’ve proven to have shown a true advantage in both performance and physical appearance. The Skeleton is no exception! Although it’s unorthodox, an open-air design allows for easy access, improved ventilation, and a great view of system components that a standard case simply can’t provide.
As PC chassis’ have developed over the years, they have gotten more and more eccentric, in shape, size, and extravagance. Performance has also come to be a top priority in the design of modern PC cases. In all aspects, the Antec Skeleton has certainly taken a step in the right direction. However, be warned, this chassis looks like nothing you’ve ever seen at a computer show, or even this world. Don’t be alarmed though, it won’t hurt you…
I’ve been having to do a lot of explaining to friends and family who see me with my Skeleton. Some have called it ugly, others think it’s really cool. I am of the latter clan, and feel that the Skeleton not only looks great, but performs well, and brings convenience to a new level. Starting with the physical appearance of the Skeleton seems to make the most sense, since it’s got such an eerie structure.
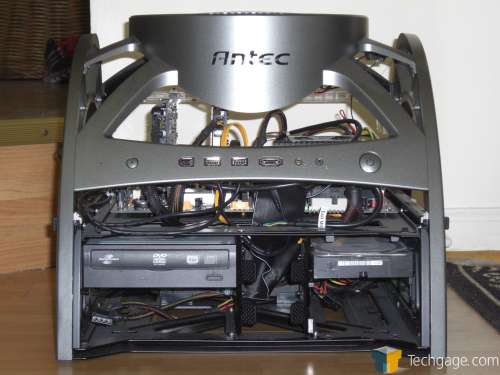
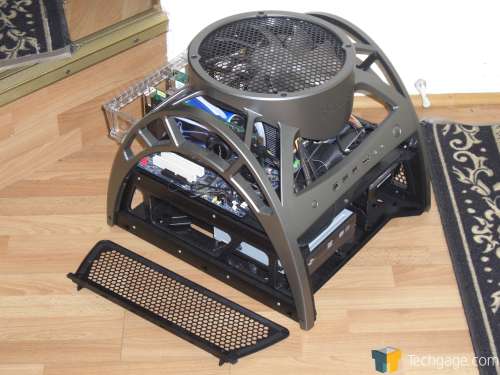
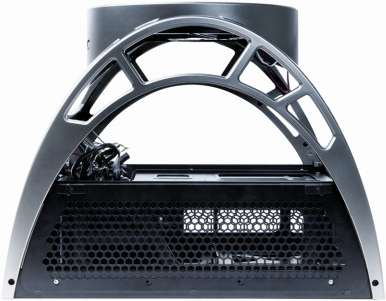
Two arcs on either side make up a spider-like scaffold structure, which everything is attached to. The arches and fan frame are made of a very solid plastic, painted a matte-gray, a color similar to a modern fighter jet. Cut into the fan frame, some fairly conservative and professional “Antec” branding is seen. At the very top, a 250mm fan provides more than enough airflow.
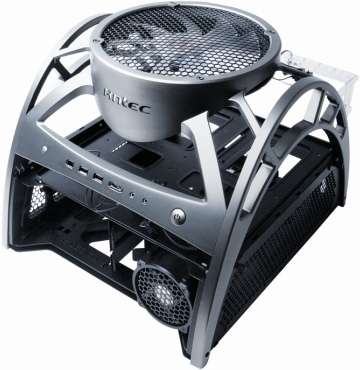
The 250mm “Big Boy” fan is one of Antec’s multi-color TriCool-styled fans, where the user can select a “Low,” “Medium,” or “High,” rotational speed. At the “High” setting, the fan produced nearly no noise, with the noise mostly coming from the friction of the air moving over components and the large grate covering the top of the fan. The “whoosh” associated with air friction is actually fairly soothing, and blocks out a lot of external noise.
Commercial “white noise” generators rely of the same principle, but the 250mm has it built right it and Antec doesn’t even know it. The Big Boy on “High” moves a helluva lot of air. I mean it. When the three-position TriCool switch is clicked to “High,” the Skeleton becomes a wind tunnel. I personally preferred the “Medium” and “Low” settings, which produce nearly no noise whatsoever, and still provided adequate airflow.
The “Big Boy” on Antec’s Skeleton is no regular 250mm TriCool fan. The fan has a series of LEDs built into it, giving the Skeleton some color. What color? Whatever you want! As the fan spins, it goes through a series of color-changes, some of which are incredibly beautiful. In fact, with the white noise produced by the fan on “High,” and the changing colors, a hypnotic experience is created. It’s fairly easy to fall into a trance, with the soothing “whoosh” and slowly changing colors.
Next to the TriCool three-position switch, a toggle-button is found. This controls what solid color the fan glows, or allowing the fan to cycle through colors. The solid colors the fan has shown me include red, green, and blue. Definitely a very cool, desirable feature. I left my Big Boy on the “Color Transition” mode.
Antec has always made cases with exceptional airflow characteristics. The Skeleton, with 250mm Big Boy fan, definitely holds to the tradition of excellence. Since the sides of the case are, um…. non-existent, and the front panel is so minimal, the Antec Skeleton is quite literally a gazebo for your computer parts. Any heat from the motherboard is almost immediately convected into the environment, leaving the case never more than 5 degrees Fahrenheit above room temperature.
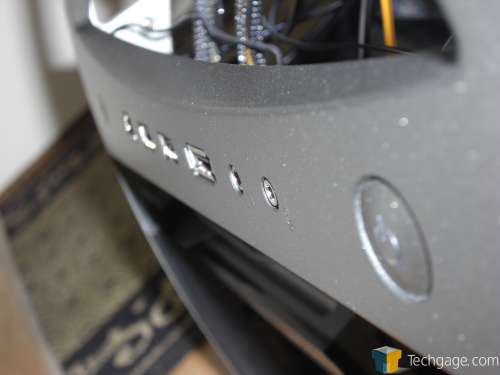
The front, erm… “panel” is really just a bar going across the two aforementioned arches, (which also make great handles!) On the far right, a considerably large power button is found, slightly countersunk into the panel, but still convex. Also noted is the power LED, which is in the button itself, and glows blue.
Continuing leftward from the power button and LED, there is a headphone port and microphone port, neither of which is indicated with the standard ugly red and green plastic rings. Instead they are surrounded by attractive shiny metal, and the functions of each are indicated on the panel in the form of raised symbols next to the ports. Next is an e-SATA port, two USB 2.0, and a single FireWire-400 port. Last is the reset button, into which is embedded the system activity LED.
The inner two trays of the chassis slide out as one, once two thumbscrews are undone in the rear of the case. The thumbscrews are slightly larger in diameter, making them easier to turn. They also have some sort of spring within, since they pop out once you’ve turned them enough, but only to a degree. The thumbscrews actually never leave the chassis, since they are locked on, but allow the inner trays to slide out.
The top floor of the two-tiered Skeleton has space for an ATX motherboard, as well as all the components of your build. To keep add-in cards in place, there is a see-through plastic bracket on the back of the chassis. I found that even with the trays slid out completely, I had to remove the bracket before I was able to put any cards in. Once the cards are in, however, you don’t need to worry about airflow or space for the cards; it’s almost in excess in the Skeleton. However, taller CPU coolers, like the Tuniq Tower, will not fit, because of the dome-like structure of the chassis.
The second tier of the Antec Skeleton holds just about everything else. This means the power supply, tennis courts, hard drive(s), swimming pool, and optical drive(s). The power supply is given a slide-out tray, to aid in assembly, since it has to be mounted sideways to avoid cables having to snake out the back of the case.
However, the sideways-mount of the PSU leaves the socket for the power cable in an awkward place, slightly inside the case, a bit close to the side of the chassis. In response to this, Antec made the two “hexagrated” sides of chassis removable, by sliding the tabs inward and pulling out on the panels. This also helps in securing the optical drives and hard drives. Securing the drives is optional, since a partial locking mechanism holds the drives in, until the thumbtabs are pressed.
Support our efforts! With ad revenue at an all-time low for written websites, we're relying more than ever on reader support to help us continue putting so much effort into this type of content. You can support us by becoming a Patron, or by using our Amazon shopping affiliate links listed through our articles. Thanks for your support!


