- Qualcomm Launches Snapdragon 4 Gen 2 Mobile Platform
- AMD Launches Ryzen PRO 7000 Series Mobile & Desktop Platform
- Intel Launches Sleek Single-Slot Arc Pro A60 Workstation Graphics Card
- NVIDIA Announces Latest Ada Lovelace Additions: GeForce RTX 4060 Ti & RTX 4060
- Maxon Redshift With AMD Radeon GPU Rendering Support Now Available
Social & RSS Feeds
Latest Videos


Latest News
Arctic Cooling Silentium T2
by Rob Williams on May 29, 2006 in Cases & PSUs
Hate loud computer noise? Arctic Cooling has an all-in-one solution that already has the proper fan layout and directional airflow you need. However, it also has it’s fair share of problems. Does the bad outweigh the good, in this ‘case’?
Page 3 – Installation
The first thing I wanted to do was remove the hard drive enclosure, so that I could install the the hard drive before anything else. One thing I quickly noticed about the case is the lack of instructions. There are none whatsoever. You will have to go to the website in order for instructions, but I didn’t bother. Considering this is such a unique case, I was playing it by ear. Removing the enclosure was not simple.. I was trying to get it out by removing the rubber bands, but that wasn’t happening. A few minutes and a bloody thumb later, I finally got the enclosure removed.
Looking back now though, it was stupid to take the enclosure out to begin with. Removing the front piece off the enclosure should allow you to easily install the hard drive without any issues. Why I didn’t consider this at the time.. I have no idea. However, that plastic covering on the enclosure was also giving me problems. It would not easily come off, and I ended up accidentally breaking the tabs on each side before it would eventually come off. After this pain [literally], I decided to not bother with the enclosure anymore. If you were in the same situation as me and removed the enclosure from the case, or even broke the rubber bands, AC was kind enough to include new bands in the package.


When the time came to install the motherboard, I realized I was in for some fun. There is _not_ a lot of room to move around in there.. at all. After removing the cables from the cable holder in the case, it does allow you more room to move around, but not much. Happily though, the pre-installed motherboard mounts were in the correct position, so all I had to do was set the board in and screw it tight. This is where I learned my second lesson of the day. Never, and I mean never, try to shift around your motherboard into place by holding onto the cooler… when it’s a 9500. Band-Aid had a good customer this day.
Installing the CD-Rom and hard drive contrasted the rest of the installation, because it was very easy. The front panel can pull right off by pulling a few tabs. Once it’s off, you can install the two green brackets on your CD-Roms and then push it into place. Because I decided against the HDD enclosure, I planned on installing the HDD in the floppy bay. If you install a hard drive here like I did, it will not be seen when you open the front panel. You are installing below the area where the floppies would be installed. So you do not have to worry about seeing the drive every time you want to put in a CD-Rom.


Once everything was into place, the front panel was put back on. After a few minor installation extras, such as the motherboard power switch, power cables and all that good stuff, I was ready to go.
Overall, I can’t say I was impressed by the installation. Granted, at first I made it harder than it had to be, but in the end, it just wouldn’t have been an easy install for anyone. Pulling off the front panel to install a drive, even a hard drive in the floppy area, is odd. The NZXT Lexa for instance, allows you to install it just by opening the drive bay door. That just makes things easier. One problem I really disliked was having to go through many boxes to find a PCI-E adapter. Without question, PCI-E adapters should be on _any_ new power supply, without question.
 |
Arctic Cooling designed the case in a very specific manner, so that air will enter properly, and leave swiftly. All four of the included fans are used for exporting warm air from the case, while fresh air comes into the case on it’s own, from the back and underneath. Because the installed power supply is open ended on both ends, it allows the warm air to escape quickly.
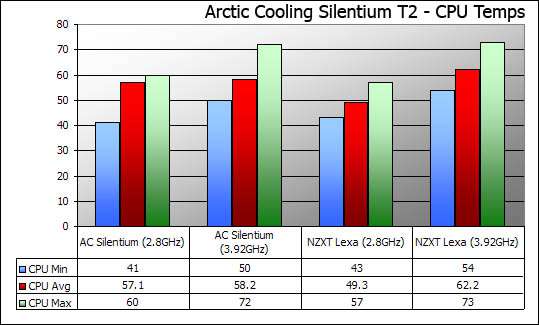
To test the case out, I mainly focused on CPU and motherboard temps. To do this, I ran an instance of Prime95 Small FFT on each CPU core along with PC Mark 05 looped for a 3 hour period. I recorded all temps using Lavalys Everest 2.80, which does a good job of spitting out such results to a simple HTML file.
During all testing, the ambient room temp was a constant 80°F (27°C).
- Test System
- CPU: Pentium D 820 @ 2.8GHz & 3.92GHz
- Motherboard: ASUS P5WD2-E Premium w/ 401 BIOS
- Memory: Corsair 2GB PC2-6400 PRO
- Video: BFG 6800GT OC 256MB PCI-E
- Sound: Realtek HD Audio
- Storage: WD 200GB 7200 8MB
- Odds and Ends: D-Link WiFi PCI Card
- Etcetera: Windows x64 Professional SP1, NVIDIA 81.98 Drivers
Compared to the Lexa case, the Silentium did a fair job of keeping everything fairly cool. What’s interesting though, are the higher temps overall at 2.8GHz. The average temps for both 2.8GHz and 3.92GHz were pretty much the same. It looks as though it’s warm to begin with, but increasing the clock speed didn’t really raise it much higher. Either way, it still beat out the Lexa by 4°C on average.
The Silentium proves better Motherboard temps as well, taking a full 4°C off the max.

The big question is, Is the Silentium T2 quiet? Generally, this will depend on other components in your computer, especially the CPU cooler. With all other noise in the room off, the computer was definitely noticeable, but it was less noisy than my watercooled system. It’s hard to describe just how noisy it is, but it’s certainly quieter than others out there, but not by a large margin.
The Zalman 9500AT and Evercool RH-VHC GPU cooler add to the noise, and without them the case could prove even quiet. The included four fans are very quiet though. So if you have other quiet fans to keep your components cool, it could prove to be a very, very quiet system.
|
|

Support our efforts! With ad revenue at an all-time low for written websites, we're relying more than ever on reader support to help us continue putting so much effort into this type of content. You can support us by becoming a Patron, or by using our Amazon shopping affiliate links listed through our articles. Thanks for your support!

Rob Williams
Rob founded Techgage in 2005 to be an 'Advocate of the consumer', focusing on fair reviews and keeping people apprised of news in the tech world. Catering to both enthusiasts and businesses alike; from desktop gaming to professional workstations, and all the supporting software.


