- Qualcomm Launches Snapdragon 4 Gen 2 Mobile Platform
- AMD Launches Ryzen PRO 7000 Series Mobile & Desktop Platform
- Intel Launches Sleek Single-Slot Arc Pro A60 Workstation Graphics Card
- NVIDIA Announces Latest Ada Lovelace Additions: GeForce RTX 4060 Ti & RTX 4060
- Maxon Redshift With AMD Radeon GPU Rendering Support Now Available
Social & RSS Feeds
Latest Videos


Latest News
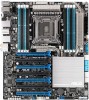
ASUS P9X79-E WS Workstation Motherboard Review
by Rob Williams on October 23, 2013 in Motherboards
If a workstation build is in the cards, or you’re looking to build the baddest multi-GPU gaming rig around, the X79 platform remains the one to consider. But what motherboard could possibly fill the “ultimate” void, one that’s able to handle a lot of stress, or for that matter, 7 graphics cards? Look no further than ASUS’ P9X79-E WS.
Page 3 – A Look at the EFI
An archive including all of these screenshots and more can be snatched here (.ZIP, 27 images @ 3.6MB).
It’s always been the case that with a new processor generation, we see improved BIOSes come out from the likes of ASUS, GIGABYTE, MSI and so forth. But when EFI hit the scene, things really got interesting. No longer were these vendors simply adding options to the low-level environment, but now they had to worry about aesthetics and ease-of-use, too.
Out of the gate, it’s hard to deny that ASUS had the best EFI solution going – nothing could touch it. Compared to solutions from other vendors, it was easier-to-use, behaved smarter, and looked good. It felt like all of the other companies got a different memo than ASUS – theirs apparently said that the intent of the EFI was to just look cool.
With the Z87 generation in particular, a lot of vendors have begun to catch up to ASUS in this regard, especially GIGABYTE. ASUS wasn’t ignorant of the fact that its EFI implementations were well-liked, so it’s no surprise that the company decided to keep it simple with Z87 and simply enhance, rather than rewrite.
Why a Z87 mention here? Because after ASUS’ Z87 series launched, the company ported the updated EFI with most features in-tact to this board. This forced me to retake all of the snapshots, but I ain’t even mad. That’s quality support, right there.
For this review, I’m not going to exhaust everything ASUS’ EFI offers, as I’d rather focus on what’s new. If you’re interested in delving into the EFI as a whole, almost the entirety of what I covered in my P9X79 PRO review can be applied to here. If anything, certain functions have likely only been improved.
Before diving into what’s new, though, I’d like to take a moment to tackle ease-of-use, which is an area where ASUS has excelled with its EFI. Simply put, the entire EFI interface can be navigated using only a keyboard, which is hugely appreciated. GIGABYTE’s last-gen EFIs encouraged mouse-use, but the feeling of a mouse inside of an EFI is much different to how it feels inside of your native OS due to the differing resolution, so really, the keyboard should remain the ultimate focus. Just because you can use the mouse doesn’t mean you should base an EFI design around it.
Other little perks exist with ASUS’ EFIs that I enjoy as well, such as shortcuts that allow you to reach a common part of the EFI quickly; and then there’s a start screen of sorts that very well may not force you to go into the advanced portion of the EFI at all. On Z87 and this X79 board in particular, EZ Mode has been improved, and if you’re familiar with ASUS’ previous offerings, you may notice the differences right away:

EZ Mode Screen: Quick access to some key options
The most noticeable change here has to be the addition of DRAM information, which quickly shows you the frequency, timings and voltage of each stick of installed RAM, and allows you to apply an XMP profile if that happens to be your goal. This saves you the time of having to go into the advanced mode to seek out the tweaking section to deal with the same thing.
Also new is the ability to select a fan profile for your CPU fan(s) and the back chassis fan. But wait, there’s more: Click that little down arrow to the top-right of this field, and you can adjust every fan connected to the motherboard.
Finally, the “SATA Information” option at the bottom gives you a quick overview of which storage devices you have installed, and in which port each is plugged into. This is a great shortcut for those who run into storage detection issues (eg: it’s easy to see if the PC is actually detecting it, or if the OS is just being douchey).
Moving on, the “Main” screen, which hasn’t changed since last-gen, but does look cleaner.

Main Screen: Overview of your PC’s configuration
The “My Favorites” screen is brand-new though, and it’s certainly one of the more convenient features offered. Regardless of an option the EFI offers, if it happens to be one you use often, you can select it and then hit F4 to add it to this screen. That way, as soon as you boot up and go into the advanced mode, you’ll be able to get back to it right away.

My Favorites Screen: Store your favorite EFI functions here
“Quick Note” is a pop-up feature that’s been added to aid those who want to – you guessed it – keep quick notes on things. If a certain overclock didn’t go too well for you, for example, you could make a note of it here so that you know not to try that configuration again. Unfortunately, both the Quick Note and My Favorites features reset themselves after an EFI upgrade. While ASUS could technically negate that issue, there’s a fine line when it comes to deciding how to optimally using the available EFI space that’s available.

Quick Note: Write thoughts on life, or keep track notes on that overclock
One of the cooler features added to ASUS’ latest EFI is the change log. Regardless of what option you change while in the EFI, as soon as you save and exit, you’ll be greeted with a screen like the one seen below.

Change Log: A summary of all the changes you made
Earlier, I mentioned that while in the EZ Mode screen, you’d be able to quickly get SATA information with the shortcut at the bottom. Well, you can see much of the same now inside the “Advanced” setting of the EFI.

SATA Configuration: See which drives are plugged, and where
Overall, the EFI here is what we’ve come to expect from ASUS, which is a very good thing. While the company is beginning to get some real competition now, I feel its EFI implementation looks better than the rest, and it’s little features like those mentioned on this page that makes the overall experience even better.
We’ve covered hardware and EFI… what’s next? Oh, right: software.

Support our efforts! With ad revenue at an all-time low for written websites, we're relying more than ever on reader support to help us continue putting so much effort into this type of content. You can support us by becoming a Patron, or by using our Amazon shopping affiliate links listed through our articles. Thanks for your support!

Rob Williams
Rob founded Techgage in 2005 to be an 'Advocate of the consumer', focusing on fair reviews and keeping people apprised of news in the tech world. Catering to both enthusiasts and businesses alike; from desktop gaming to professional workstations, and all the supporting software.


