- Qualcomm Launches Snapdragon 4 Gen 2 Mobile Platform
- AMD Launches Ryzen PRO 7000 Series Mobile & Desktop Platform
- Intel Launches Sleek Single-Slot Arc Pro A60 Workstation Graphics Card
- NVIDIA Announces Latest Ada Lovelace Additions: GeForce RTX 4060 Ti & RTX 4060
- Maxon Redshift With AMD Radeon GPU Rendering Support Now Available
Social & RSS Feeds
Latest Videos


Latest News
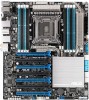
ASUS P9X79-E WS Workstation Motherboard Review
by Rob Williams on October 23, 2013 in Motherboards
If a workstation build is in the cards, or you’re looking to build the baddest multi-GPU gaming rig around, the X79 platform remains the one to consider. But what motherboard could possibly fill the “ultimate” void, one that’s able to handle a lot of stress, or for that matter, 7 graphics cards? Look no further than ASUS’ P9X79-E WS.
Page 4 – Features: TurboV EVO, DIGI+ & EPU
Something that’s hard to deny is that ASUS takes its software solutions a little more seriously than the others – in some cases, a lot more seriously. However, that is beginning to change, and one must wonder if that wouldn’t be the case had ASUS not spearheaded the movement of delivering worthwhile software with your hardware.
The highlight of ASUS’ software is Ai Suite, which for X79 remains at the last-gen II version. The most notable difference between the two is that III offers realtime fan monitoring via software – not a major loss, but a loss nonetheless (the fan support is still rich here though, as we’ll see).
The software here is identical to a previous X79 ASUS board we took a look at, so for the sake of ease and common sense, this page and the next will largely be a verbatim transfer from that evaluation.

Once opened, Ai Suite II looks modest – it’s a simple bar with a couple of options. It’s not until you begin to explore any of these options that the program expands and allows you to go right to town tweaking.

Over the course of this page and next, we’ll be taking a look at all of the notable features that this app offers. However, it’s important to note that what’s made possible with Ai Suite II is due mostly to on-board components, and as such, all of these options can also be tweaked in the EFI.
TurboV EVO / TPU
As has become common over the years, ASUS allows you access to every overclocking option from within Windows. The perks here are obvious – there’s the added convenience and the added ease. Personally, I still prefer to conduct all of my overclocking in the EFI since I hate applying a setting that crashes the OS, but it’s nice to have both options. And it’s great if you’re not much of an overclocker but wouldn’t mind a little boost. That’s where the “Auto Tuning” option comes into play, as seen in the following screenshot.

There are two levels of intensity offered here, though even “Extreme” is likely to be considered 100% stable, since ASUS is not in the business to crash people’s computers. In a quick test with that Extreme option, the board overclocked our Core i7-4960X to 4.3GHz – up from 3.6GHz stock. That’s a decent overclock given we’re dealing with such a beefy CPU.
For manual tweaking, you can move on over to the “Manual” section. If you used the Auto Tuning option first, the applied settings will remain here, so that you can simply continue tweaking to take things a bit further.

You might have noticed that this software lacks something the EFI offers: the ability to click on a value and type in a new one (this has been fixed in Ai Suite III). But unlike the EFI, it’s much faster to increase values using the Windows application (in terms of fluidity from start to finish), so it’s not too much of a problem. In addition, it’s doubtful that too many people are going to be applying a mammoth overclock right from the start with this tool, but rather take the first step in the EFI, then boot into Windows in order to continue tweaking. So that you don’t have to load up Task Manager or some other CPU monitoring app, you can see to the right of the screen above the usage for each core – another nice touch.
DIGI+ Power Control
Next up, a feature that’s not for the faint of heart: DIGI+ Power Control. This is a feature that ASUS takes great pride in for a couple of reasons. For starters, and to our knowledge, it was the first vendor out the door with a digital design, and second, the company feels that its solution remains the best out there. We (not surprisingly) lack the testing equipment that can range in the hundreds of thousands of dollars to test each solution appropriately, but that doesn’t prevent us from being able to appreciate their designs.
The reason that a digital design is so important is that analog inherently lacks precision – you may choose a certain voltage in the BIOS/EFI, but variance is bound to occur. By contrast, digital offers an unparalleled level of precision. Further, an analog design suffers a weak software to hardware translation layer, as it requires an OS driver to function – digital does not.

This all said, while it’s clear that DIGI+ Power Control could provide a nice benefit to overclockers, it can also be used by those who simply want to tweak their PC to be as power-efficient as possible, even if the goal is to retain stock CPU values. As alluded to above, though, this feature is not going to be for everyone – it definitely requires some knowledge of the various power functions on a motherboard.
ASUS’ particular design involves dual hardware ICs (TPU for overclocking and EPU for power-efficiency) on the motherboard that tie into the CPU’s PWM and VRM, along with the DRAM’s VRM. ASUS’ boards that support a CPU equipped with an iGPU gain DIGI+ support for that as well. The overall goal of this implementation is to offer the utmost accuracy, along with enabling the perk of allowing the user the same tweaking options via the EFI or inside of the OS.
One feature in particular that stands-out here is CPU Power Phase Control. By default, motherboards ramp up the usage of power phases based on the current CPU load. However, for overclockers or tweakers, that might not be the most efficient design, given the board might use more or less phases than they’d prefer.

That’s where the further three options here come in; Optimal, Extreme and Manual. The latter is used by those who want to limit the number of phases that will be used, although that will result in a complete lack of power-efficiency if not used and understood properly. Extreme pegs 100% of the power phases at 100%, 100% of the time (that’s a lot of 100%s), perfect for overclockers that peg their CPU clock speed to the same value 100% of the time (that’s the last 100% for a while).
What about the overclockers that want to retain their C-states and other innate power options available on their CPU? That’s where “Optimal” comes in. This, like “Standard”, will ramp up the power phases when required, but rather than be controlled by CPU commands, it’s controlled by the DIGI+ controller which accurately measures the CPU load. At idle, one phase is likely to be used, while 2-4 could be used during regular use, and the full 8 (or whatever the maximum is) when the CPU is really burning away on a project.
Personally, most of these options, I wouldn’t touch, but Power Phase Control, I certainly would if I were overclocking – and maybe even if not. “Optimal” sounds like a good sweet spot.
EPU
Where the TPU-backed TurboV EVO is designed to give overclockers the best-possible experience in pushing their hardware to the next level, EPU has opposing goals in mind – it caters to those looking to make their PC as energy-efficient as possible (I’ll avoid going into how this is a little ironic for an X79 motherboard). Naturally, because TPU and EPU’s goals contrast with each other, only one can be used at any given time.

From this screen, users can choose to either run their PC in high-performance mode, which spreads its strengths around almost evenly, or Max. Power Saving, which aims to reduce performance, noise and power, and increase energy saved. The tool also gives you a status on how much CO2 emission you’ve failed to produce on account of using the power-saving mode. “Auto” would run the PC settings at normal.
Also helpful here is the “Sensor” tab up above, which you can see here. Generally speaking, it’s not hard to find sensor read-outs in Ai Suite II, but they’re especially convenient here since you can immediately see some of the differences caused by the different modes.

Support our efforts! With ad revenue at an all-time low for written websites, we're relying more than ever on reader support to help us continue putting so much effort into this type of content. You can support us by becoming a Patron, or by using our Amazon shopping affiliate links listed through our articles. Thanks for your support!

Rob Williams
Rob founded Techgage in 2005 to be an 'Advocate of the consumer', focusing on fair reviews and keeping people apprised of news in the tech world. Catering to both enthusiasts and businesses alike; from desktop gaming to professional workstations, and all the supporting software.


