- Qualcomm Launches Snapdragon 4 Gen 2 Mobile Platform
- AMD Launches Ryzen PRO 7000 Series Mobile & Desktop Platform
- Intel Launches Sleek Single-Slot Arc Pro A60 Workstation Graphics Card
- NVIDIA Announces Latest Ada Lovelace Additions: GeForce RTX 4060 Ti & RTX 4060
- Maxon Redshift With AMD Radeon GPU Rendering Support Now Available
ASUS P9X79 PRO Motherboard Review

Intel’s X79 platform may seem a little dated by this point, but it in fact remains the best choice for those needing to build the biggest, baddest PCs around – especially with Ivy Bridge-E likely 9+ months away. Complementing X79’s goals perfectly is ASUS’ P9X79 PRO, a motherboard that offers a rich feature-set in both hardware and software.
Page 1 – Introduction, Specifications & Hardware Tour
Although Intel’s X79 platform was released-to-market about a year-and-a-half ago, it remains the go-to choice for builders who need the beefiest PC possible. We’re talking the most capable processors, the craziest GPU configurations, the fastest memory, the most storage, and the richest connectivity options. It’s for this reason that few X79 boards have sold for under $200, and it’s also the driving-force behind a board like ASUS’ P9X79 PRO.
ASUS is obviously no stranger to the motherboard scene. It’s been crafting what I feel are the most competitive boards out there for quite some time, from both a features and design stand-point.
With its P9X79 PRO, ASUS caters to those who are looking for the ultimate in flexibility with their motherboard. We can see that evidenced here with 8x internal SATA ports, 10x USB ports at the back, capabilities for 4 GPUs, and more. At about ~$320, this PRO board packs in a ton of features, but for those who need even more, there’s DELUXE. For its ~$380 price-tag, the DELUXE adds a second LAN port, 2 additional external USB 3.0 ports, 2 additional internal USB 3.0 ports, a wireless adapter and a couple of extra accessories. Of course – things work in the opposite direction as well. Does the PRO offer too much? There are lesser P9X79 models that could be considered.
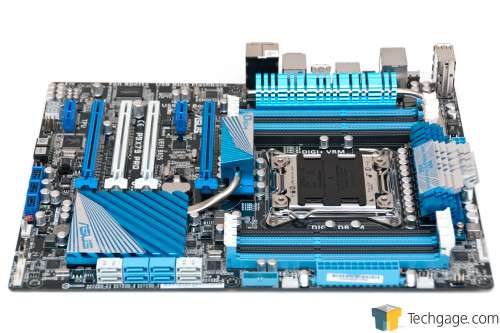
At first glance, ASUS’ P9X79 PRO is quite an attractive board, and layout-wise, I’ve yet to conjure up a complaint. I admit that I’ve been testing this board for a number of months, so I’ve gained quite a bit of experience with it. It’s not uncommon for a user to begin to discover small niggles with their hardware after a couple of months of using it, but the P9X79 PRO placed me in an interesting situation where I began to discover more cool things as time went on. I’ll be covering most of those in this review – but not all, because I can’t dedicate half a month to writing a single motherboard review.
Though it can’t be seen that well in the photo above, one of the biggest perks this board offers is the inclusion of six fan headers. We’d expect at least five for a board of this price-range, but six remains a nice surprise when it does happen. Better-still, all six of them are 4-pin (PWM Enabled), meaning each can be manually controlled by the user. Finally, their placements are also thoughtfully chosen-upon – two on the right, one at the bottom, two at the top and one directly below the left DIMM array. If you’re not using a memory cooler, the top-right of the board should easily accommodate three nearby fans, while your back chassis fan can reach down to below the DIMM slot.
For a quick look at what the P9X79 PRO offers, the table below should help.
| ASUS P9X79 PRO | |
| Architecture | Intel X79 (LGA2011) |
| Form-Factor | ATX (12″ x 9.6″) |
| Memory | Up to 8x8GB DDR3-2400 |
| Multi-GPU | 3-way NVIDIA SLI 4-way AMD CrossFireX |
| Expansion | 4x PCIe 3.0 x16 (Dual x16 or x16+x8+x8+x8) 1x PCIe 3.0 2x PCIe 2.0 x1 |
| Storage | 2x SATA 6Gbit/s (Intel) 4x SATA 3Gbit/s (Intel) 2x SATA 6Gbit/s (Marvell 9128) 2x eSATA 6Gbit/s (ASMedia ASM1061) |
| Network | 1x Gigabit Ethernet (Intel 82579V) |
| Wireless | Bluetooth 2.1+EDR |
| Audio | 8-Channel Realtek ALC898 Input/Output + S/PDIF |
| USB | 6x USB 3.0 (ASMedia) 6x USB 2.0 Internal (Intel) 6x USB 2.0 External (Intel) |
| Back I/O | 1x Bluetooth, 2x eSATA 6Gbit/s, 1x 1Gbit/s LAN, 4x USB 3.0, 6x USB 2.0, 1x Optical S/PDIF, 6x Audio Jacks, BIOS Flashback |
| Features | ASUS DIGI+ Power Control, ASUS TurboV EVO, ASUS EPU, ASUS BT GO!, Ai Suite II, ASUS SSD Caching, USB 3.0 Boost, ASUS Q-Design |
For the sake of not being redundant, I won’t discuss the table directly, but instead tackle all of the components as we come across them with the help of our photos below.
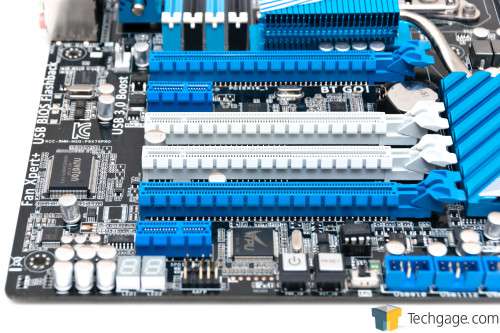
Speaking of, let’s kick things off with a look at some slots. Should you be so inclined, you’ll be able to run 3x NVIDIA GeForce cards in SLI or 4x AMD Radeon HD cards in CrossFireX; for 2x GPUs, the PCIe configuration will remain at x16+x16, but at 3+ GPUs, that changes to x16+x8+x8(+x8). Being a higher-end board, it’s no surprise to see legacy PCI slots non-existent. In their place, dual PCIe x1 slots.
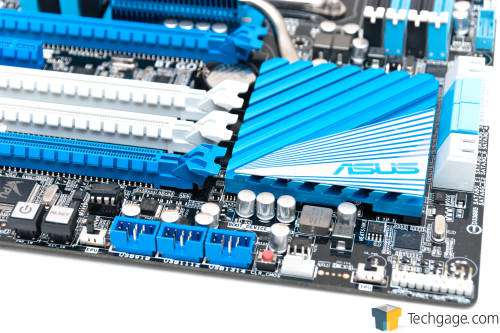
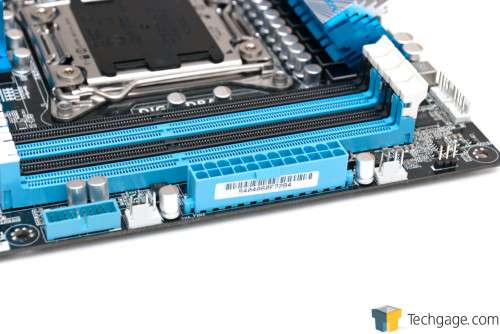
In the above shot, and along the bottom of the board, we can see an LED EFI status read-out, on-board power and reset buttons, the on-board EPU switch (we’ll talk about this later) and also 3x internal USB 2.0 headers. The below shot continues our trek, revealing a CMOS clear button, the lone bottom 4-pin fan header, the TPU on-board switch along with the ATX chassis connectors.
I don’t often talk at length about chassis front panel headers (power and reset buttons, and activity LEDs), but ASUS’ decision to place them at the absolute bottom-right corner stood out to me – in a good way. That’s exactly where I want them, because that’s the closest place to where the connectors will actually stem from. I can’t imagine a chassis design that would favor the headers to be placed anywhere else, so I’d love to see this more often
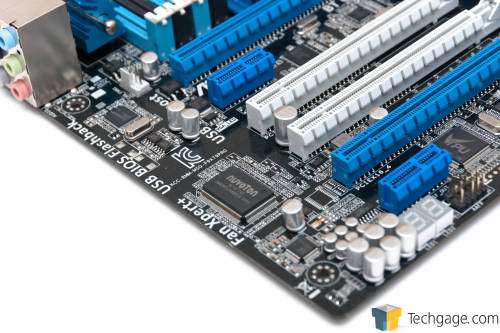
Back towards the left side of the board, we can get a better view of some chips found here (namely, TPU and the Nuvoton sensors chip), along with a better view of where the only fan header on the left side of the board is placed.
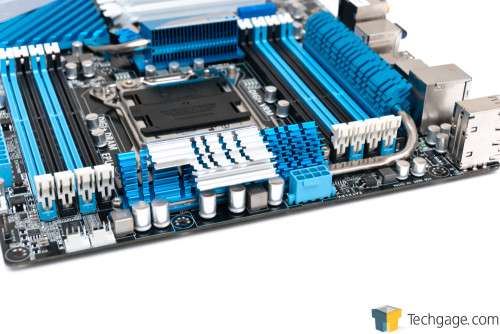
Forgoing a look at the 8x SATA ports (you do all know what those look like, right?), let’s tackle the top-right of the board. Here, we can see a total of four fan headers (two on the side, two at the top), along with the lone internal USB 3.0 header. The first half of the DIMM equation is also seen here.
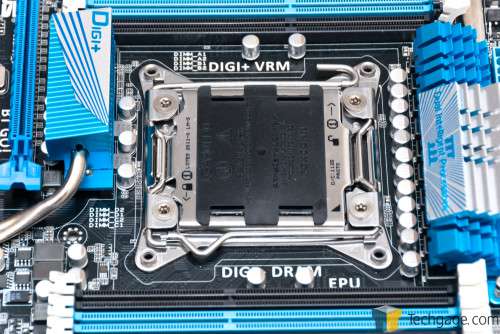
The LGA2011 socket is so beefy, it’s almost ridiculous – LGA1155 looks like a squirt in comparison. Though things appear a bit tight around this area, installing even the largest coolers shouldn’t be a problem. However, because the DIMM slots are this close, you’ll definitely want to install your memory before installing the board – unless you happen to have modules with normal heat-spreaders.
In my particular case, I had to install the RAM ahead of time because the radiator/fan combo from our Corsair H70 CPU cooler blocked that area. While you can install small modules in that instance, it’s not a lot of fun.
Admittedly, the next shot features an angle we don’t often include, but it’s one I plan to begin remembering to photograph. All-too-often, the top of a motherboard will have some flaw that none of us notice until we actually install it (offense #1: a hard-to-reach 8-pin connector). Fortunately for ASUS, everything checks-out here. Even the 8-pin connector is easily-accessible.
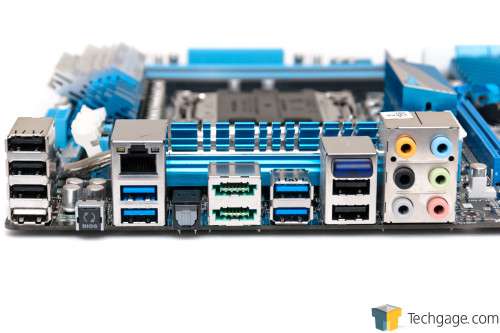
The back I/O panel helps proves this board’s connectivity prowess, with a total of 10 USB ports (four of which are 3.0), a single LAN port, full audio jacks (including optical S/PDIF), dual eSATA 6Gbit/s ports and the non-removable Bluetooth dongle. Oh – and let’s not forget the EFI flashback button, one that allows you to flash the EFI without even turning the machine on – heck, you don’t even need to have a CPU installed. I took advantage of this during testing and it worked just as advertised. For those interested in a bit more info, I recommend checking out ASUS’ official landing page.
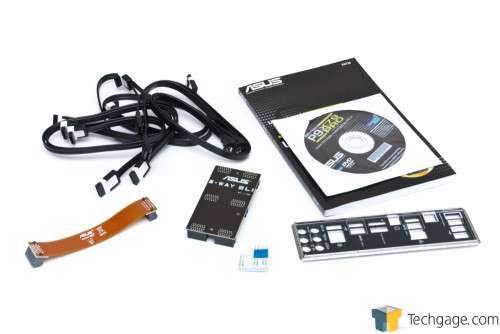
The P9X79 PRO doesn’t include quite the same number of accessories that its bigger brother DELUXE does, but it’s still competent. Included are six SATA cables, SLI bridges (2-way and 3-way), the Q-Connector (for ease of plugging in the ATX chassis connectors), the back panel and of course, the manual and driver CD.
As I mentioned earlier, I’ve been testing the P9X79 PRO off and on for quite a number of months, and so far, I have found little to complain about. Overall, I feel ASUS did a fantastic job in the construction of this board – it’s easy to build a PC with and offers a ton of flexibility. Does the EFI match up? There’s only one way to find out (hint, go to the next page).
Support our efforts! With ad revenue at an all-time low for written websites, we're relying more than ever on reader support to help us continue putting so much effort into this type of content. You can support us by becoming a Patron, or by using our Amazon shopping affiliate links listed through our articles. Thanks for your support!


