- Qualcomm Launches Snapdragon 4 Gen 2 Mobile Platform
- AMD Launches Ryzen PRO 7000 Series Mobile & Desktop Platform
- Intel Launches Sleek Single-Slot Arc Pro A60 Workstation Graphics Card
- NVIDIA Announces Latest Ada Lovelace Additions: GeForce RTX 4060 Ti & RTX 4060
- Maxon Redshift With AMD Radeon GPU Rendering Support Now Available
Social & RSS Feeds
Latest Videos


Latest News
ASUS GeForce EN9800GT Matrix
by Rob Williams on November 21, 2008 in Graphics & Displays
Picking out a new graphics card is easier to do now than ever, as there seems to be a model to cover every single price-range, and not just from one single GPU manufacturer, either. Today’s card is one that represents the ~$125 price spot and is designed as a step-up from the 9600 GT, with ASUS applying their usual TLC to help add even more appeal.
Page 10 – Overclocking, Temperatures
Before tackling our overclocking results, let’s first clear up what we consider to be a real overclock and how we go about achieving it. If you’ve read our processor reviews, you might already be aware that I personally don’t care for an unstable overclock. It might look good on paper, but if it’s not stable, then it won’t be used. Very few people purchase a new GPU for the sole purpose of finding the maximum overclock, which is why we focus on finding what’s stable and usable.
To find the max stable overclock on an NVIDIA card, we use the latest available version of RivaTuner, which allows us to reach heights that are no way stable – a good thing.
Once we find what we feel could be a stable overclock, the card is put through the stress of dealing with 3DMark Vantage’s “Extreme” test, looped three times. Although previous versions of 3DMark offered the ability to loop the test infinitely, Vantage for some reason doesn’t. It’s too bad, as it would be the ideal GPU-stress test.
If no artifacts or performance issues arise, we continue to test the card in multiple games from our test suite, at their maximum available resolutions and settings that the card is capable of handling. If no issues arise during our real-world gameplay, we can consider the overclock to be stable and then proceed with testing.
Overclocking ASUS’ GeForce 9800 GT 512MB Matrix
One of ASUS’ selling points on this card is their ‘iTracker’ software, which is essentially a tuning application that lets you increase temperature thresholds, clocks and even voltages. The overall design is very clunky, but once you use it for a few minutes and understand where things are located and how to increase the clocks, it’s easier to deal with. I’m not that impressed by the actual GUI, either, but that’s a personal opinion and may vary from person to person. They are definitely targeting the gamer, and that’s understandable.
![]()
One part of the clunkiness is that it’s difficult to set your own values. Once you finally figure out how you’re able to increase them, it’s almost impossible to get them to exactly where you’d like them. The slider bars go left to right and not change the value by 1, but rather 3 or 5, or around there. So, it’s impossible as far as I can tell to get the slider to sit right on certain numbers. The GPU voltage for example, I wanted to set to 1300 (1.30v), but it would either hit 1298 or 1303. Not a huge deal, but a little frustrating.
Overall though, the tool works, and it works well. I still prefer the ease-of-use with RivaTuner, but that tool doesn’t allow adjustments of voltages, whereas iTracker does. Increasing the voltages does help, but I really wouldn’t recommend anyone spending too much time with it.
That all said, while the default clocks on this card are 612MHz Core, 1500MHz Shader and 900MHz Memory, our max stable overclock was 720MHz Core, 1750MHz Shader and 900MHz Memory. The memory is easily the most difficult thing to overclock here, and it would even crash at 925MHz, so I didn’t bother tweaking it too much.
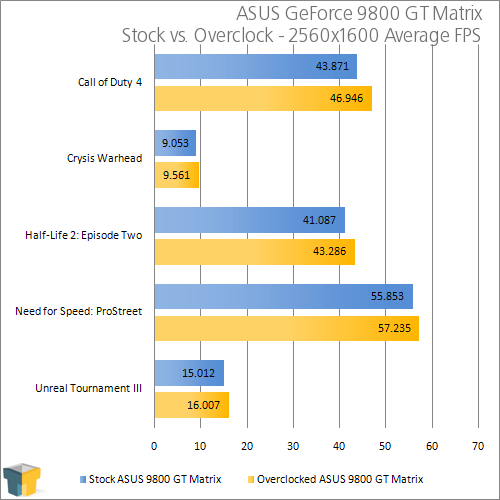
With the new clocks, performance is definitely increased, but not by a great margin. It begs the question of why overclocking this card would even be important, and the answer is simple… it isn’t. There is really no reason to worry about overclocking whatsoever. It will just heat the card up more and offer minimal gains.
GPU Temperatures
Regardless of whether or not you plan to overclock, having reasonable system temperatures is always welcomed. Not only will your machine be more reliable with cooler temps, it will likewise not add any unneeded heat to the room you are in (unless it happens to be wintertime and you keep the windows open, then it might be a good thing).
To test a GPU for idle and load temps, we do a couple things. First, with the test system turned off for at least a period of ten minutes, we measure the room temperature using a Type-K thermometer sensitive of up to 0.1°F. The result from this is placed beside the GPUs name in the graph below. Since we don’t test in a temperature-controlled environment, the room temp can vary by a few degrees, which is why we include the information here.
Once the room temp is captured, the test system is booted up and left idle for ten minutes, at which point GPU-Z is loaded up to grab the current GPU Core temperature. Then, a full run of 3DMark Vantage is run to help warm the card up, followed by another run of the same benchmark using the Extreme mode (1920×1200). Once the test is completed, we refer to the GPU-Z log file to find the maximum temperature hit. Please note that this is not an average. Even if the highest point was only hit once, it’s what we keep as a result.
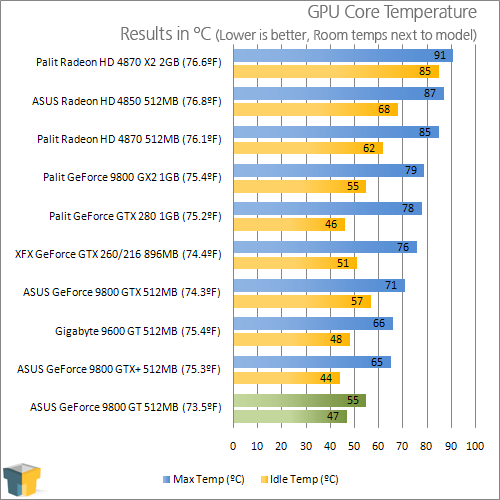
What’s nice to see is that the faster 9800 GT runs cooler than the 9600 GT, thanks to ASUS’ robust cooler. At full load, the card is definitely audible (not a huge whine, but still noticeable), but the temps were definitely kept in check.

Support our efforts! With ad revenue at an all-time low for written websites, we're relying more than ever on reader support to help us continue putting so much effort into this type of content. You can support us by becoming a Patron, or by using our Amazon shopping affiliate links listed through our articles. Thanks for your support!

Rob Williams
Rob founded Techgage in 2005 to be an 'Advocate of the consumer', focusing on fair reviews and keeping people apprised of news in the tech world. Catering to both enthusiasts and businesses alike; from desktop gaming to professional workstations, and all the supporting software.


