- Qualcomm Launches Snapdragon 4 Gen 2 Mobile Platform
- AMD Launches Ryzen PRO 7000 Series Mobile & Desktop Platform
- Intel Launches Sleek Single-Slot Arc Pro A60 Workstation Graphics Card
- NVIDIA Announces Latest Ada Lovelace Additions: GeForce RTX 4060 Ti & RTX 4060
- Maxon Redshift With AMD Radeon GPU Rendering Support Now Available
Social & RSS Feeds
Latest Videos


Latest News
ASUS Rampage II Extreme – The Definitive Overclocking Board?
by Rob Williams on December 1, 2008 in Motherboards
ASUS has long supported overclockers with their motherboards, but the Rampage II Extreme takes things to the next level. In addition to an even more robust BIOS than what we’re used to, we’re given the ability to put our multi-meters to good use with the help of easy-access board contacts. When all said and done though, is the RIIE really worth the $400 asking price?
Page 8 – Overclocking the ASUS Rampage II Extreme
Before tackling our overclocking results, let’s first clear up what we consider to be a real overclock and how we go about achieving it. If you regularly read our processor reviews, you may already be aware that I personally don’t care for an unstable overclock. It might look good on paper, but if it’s not stable, then it won’t be used. Very few people purchase a new piece of equipment for the sole purpose of finding the maximum overclock, which is why we focus on finding what’s stable and usable.
To help find the maximum stable overclock on any given motherboard, we focus on sticking to the simpler voltages, such as the ones for the Northbridge and CPU, and also the DIMM if it’s required. We try to work within safe limits, because anything too high is going to only kill your hardware faster. Luckily, all computer components nowadays are designed to handle some abuse, so you never need a lot of voltage to get anywhere.
With Core i7, more factors can come into play with overclocking, but we focus on increasing the Base Clock first and foremost, just like we focus on the Front-Side Bus on Core 2 motherboards. Our goal is to keep voltages are low as possible while reaching the highest stable overclock. Areas where we will increase voltage if needed is the CPU, Northbridge and QPI.
Overclocking ASUS’ Rampage II Extreme
When reviewing a new motherboard, there’s usually few surprises lurking under the covers, but the Rampage II Extreme gave the opposite experience. There is so much of interest on this board overclocking-wise, that I had to spend more time with it than I do with most boards. I’ll also pre-face this by saying that I’m in no way a professional overclocker, so any results I have here are going to be similar to what the layman could pull off. In that regard, I’m really under-selling what this board can do or handle.
On the first page, we talked briefly about the overclocking-related buttons and switches found at the right side of the board, and we’ll touch on them here in more detail. These buttons are self-explanatory for the most part, but the middle knob will allow you to take advantage of the TweakIt feature and switch between overclocking profiles while in Windows. It’s a feature that will likely see limited use, but it’s interesting nonetheless.

It’s the small beige connectors below the buttons that are arguably of most interest, though. At first, I thought these might have been some elaborate LED, but that’s not the case. Rather, ASUS includes two small cables (for the lack of a better word) that can be plugged into any one of these. On the other end of the small wires are points that can be attached to the end of your multi-meter. What this allows is real-time (and more accurate) readouts of the current voltage information.
Below each one of these is the label for the corresponding component. If you want to get a reading for the CPU voltage, for example, you’d connect the cable to the top-most port, and for DRAM, you’d use the bottom. It goes without saying that this feature will be for enthusiast overclockers only, but it’s an appreciated one. It rids the need to find the proper connect points on the board, and allows you to leave your soldering gun in your toolbox.
I tested the feature out, and overall I’m really impressed. Each figure I captured proved to be slightly higher in the real-world. The BIOS figures would undersell the voltage by a very small margin, but that’s nothing surprising. In the photo below, I was connected to the DRAM port, and while the BIOS reported 1.747V, the multi-meter reported a slightly higher 1.765V.

Again, this is a very limited-use feature, but it’s one I’m definitely pleased to see included. When performing extreme overclocks, it’s not unlike the BIOS to report slightly skewed voltage readouts, so this addition is going to be appreciated by anyone who takes overclocking very seriously.
That feature isn’t the only thing of interest here, however, as this became the first board (out of the four total) that has been able to hit a stable 200MHz Base Clock. The Rampage II Extreme didn’t stop there though, as we managed to push it to 210MHz and still retain full stability.
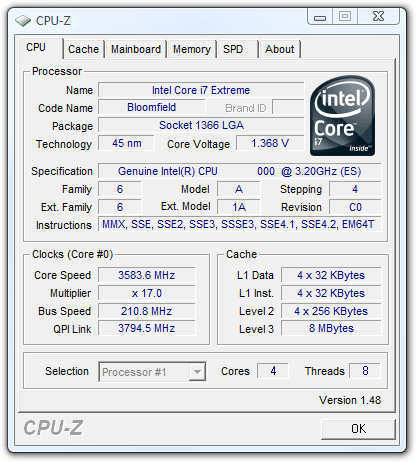
This overclock required an increase of voltage on the QPI/DRAM Core Voltage to 1.55V (stock is 1.2V), which is considered to be a “moderate” setting. Things get sketchy at 1.6625V, where the BIOS highlights the figure to red, to let us know that we’re entering a dangerous area. Overall though, 210MHz is a very impressive overclock, and beats the previous champion, the Gigabyte EX58-UD5, by an additional 20MHz.
I should note that for the most part, having such a high Base Clock means little, as it’s simply not needed. Like FSB, increasing the Base Clock (and Uncore and QPI clocks) will make very little, if any, difference in overall performance. What a higher BCLK does mean, though, is that locked processors will have a chance at a higher overclock. But even then, 200+ is going to have extremely limited use.
The math can tell all. Even with a Base Clock of 180MHz, which three of our boards was able to hit with ease, a 3.6GHz overclock on the i7 920 would be possible. That of course assumes that your i7 920 would even be capable of that overclock (ours happens to be 100% stable at that frequency). But beyond that, the chances of a stable overclock get dim, very quickly. Having a 190MHz BCLK would allow a 3.8GHz overclock, and it’s at that point that I feel you’ll experience diminishing returns.
That all aside, this board will have no problem hitting extreme clocks, so it’s completely up to your processor to handle the stress of whatever clock speed you’re hoping for. We haven’t been able to achieve 4.0GHz stable on any of our chips here due to temperatures (100°C is hit rather easily on air, with the help of our higher-than-normal ambient temperatures), but I have little doubt that it can be achieved on at least the i7 Extreme 965.

Support our efforts! With ad revenue at an all-time low for written websites, we're relying more than ever on reader support to help us continue putting so much effort into this type of content. You can support us by becoming a Patron, or by using our Amazon shopping affiliate links listed through our articles. Thanks for your support!

Rob Williams
Rob founded Techgage in 2005 to be an 'Advocate of the consumer', focusing on fair reviews and keeping people apprised of news in the tech world. Catering to both enthusiasts and businesses alike; from desktop gaming to professional workstations, and all the supporting software.


