- Qualcomm Launches Snapdragon 4 Gen 2 Mobile Platform
- AMD Launches Ryzen PRO 7000 Series Mobile & Desktop Platform
- Intel Launches Sleek Single-Slot Arc Pro A60 Workstation Graphics Card
- NVIDIA Announces Latest Ada Lovelace Additions: GeForce RTX 4060 Ti & RTX 4060
- Maxon Redshift With AMD Radeon GPU Rendering Support Now Available
Social & RSS Feeds
Latest Videos


Latest News
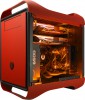
BitFenix Prodigy M Micro-Tower Chassis Review
by Ryan Perry on July 20, 2015 in Cases & PSUs
Whether space is at a premium, or you simply want something portable, BitFenix’s small form factor Prodigy M chassis might be exactly what you need. Whether it’s more for the features or the brilliant colours, it’s hard to walk by one without at least giving it a good once over, which is exactly what we’re going to do.
Page 1 – Introduction & Interior
After reviewing chassis for over 4 years, I’m still amazed at how pumped I get when there’s a box waiting on my doorstep. Even my 6-year-old son is calling me a geek, but hey, if she shoe fits…
Today I get to geek out with my very first BitFenix product, the Prodigy M, which is a larger version of the original mini-ITX-only Prodigy. With an inverted motherboard and unique interior layout, this steel, small form factor enclosure can now handle mini-ITX and micro-ATX motherboards, multiple hard drives, and large video cards.
Originally available in black or white, BitFenix has released four additional eye-popping colours such as vivid green, cobalt blue, and atomic orange. Our review starts with the front panel of the fire red version, where we see a 5.25″ drive bay at the top, the BitFenix logo towards the bottom, and a vented area that runs around the perimeter. The front, top, and bottom panels have been coated with a soft touch material as well.

With the motherboard flipped upside down, the left panel is solid, so we’ll head around to the back. In the top left is a vented opening, and five expansion slot covers on the right that feature a sliding retention system. Sitting next to the motherboard I/O opening is a 120mm exhaust fan, and finishing things off is the power connector in the lower right corner that delivers the juice to the front-mounted power supply by way of an internal extension cable.

BitFenix also has a windowed side panel that can be ordered separately, but the Prodigy M ships with a solid panel from the get go. Towards the front of this panel starting at the top are the power and reset buttons, microphone and headphone jacks, and a pair of USB 3.0 ports.

Up on the top panel is a large, removable vent cover. Sliding the latch at the back allows the cover to be removed where we see the mounting area for up to two optional 120mm fans.

Aside from the opening at the front for the power supply, the underside of the Prodigy M is largely vented and includes another 120mm fan, with the option to install second, or even a monster 230mm fan. There’s room to install a single 3.5″ drive next to the pre-installed fan, but it can be removed and a second drive installed. If fans aren’t being used in this location, the included magentic cover can be attached to help keep dust out of the system.

Ok, it’s time to get nekkid, and there’s a lot to cover. As mentioned earlier, the motherboard is inverted, so we start by removing the right panel instead of the left, and are immediately greeted by the mounting plate that allows for up to three 2.5″ drives on the outside, or two 3.5″ drives on the inside.

With the drive mounting plate out-of-the-way we see the very large cutout in the motherboard tray, and the bottom and rear exhaust fans. There’s also the power extension cable that runs along the back from the rear port to the power supply area at the front, where a removable mounting bracket is waiting.

A quick look at the inside of the right panel shows the cables for the power and reset buttons, and audio and USB ports. All but the cable for the USB ports can be removed, which should make it easier to connect to the motherboard. The plastic grill behind the cables acts as the mounting points for another pair of 2.5″ drives.

The Prodigy M comes with all of the usual screws to secure the system components, a small socket to help with installing the motherboard standoffs, a handful of cable ties, a USB adapter (which is something I still love to see included, but seldom is), a quick install guide, and the magnetic vent cover to keep the bottom vents sealed up tight when not in use.

Now that the easy stuff is finished, it’s time to get to work and see just what the BitFenix Prodigy M is capable of as we install our test system and round up some temperatures.

Support our efforts! With ad revenue at an all-time low for written websites, we're relying more than ever on reader support to help us continue putting so much effort into this type of content. You can support us by becoming a Patron, or by using our Amazon shopping affiliate links listed through our articles. Thanks for your support!