- Qualcomm Launches Snapdragon 4 Gen 2 Mobile Platform
- AMD Launches Ryzen PRO 7000 Series Mobile & Desktop Platform
- Intel Launches Sleek Single-Slot Arc Pro A60 Workstation Graphics Card
- NVIDIA Announces Latest Ada Lovelace Additions: GeForce RTX 4060 Ti & RTX 4060
- Maxon Redshift With AMD Radeon GPU Rendering Support Now Available
Social & RSS Feeds
Latest Videos


Latest News
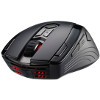
CM Storm Inferno Gaming Mouse
by Rob Williams on August 6, 2010 in Peripherals
When Cooler Master released its first “CM Storm” gaming mouse last fall, we were impressed. For a company not known for mice to come out with such a competitive product was great, and helped pave the way for the future. That future is here, in the form of the Inferno. Can it surpass the quality set by the Sentinel Advance?
Page 2 – Using the Software
Ten years ago, a gaming mouse was a gaming mouse, and if it fit the hand well, had a good layout, and enough buttons to get the job done right, then it sufficed. But today, in order for a gaming mouse to be called a “true” gaming mouse, it must support macros, scripts and for some people, be able to retain all of the settings inside the mouse itself.
Cooler Master’s Inferno hits all those goals on the mark, and like the Sentinel Advance we took a look at last year, the Inferno offers a wide-range of macro options and the ability to assign up to 24 on the mouse at any given time across three profiles, and then one on top of all that to be assigned to the Macro key for quick access.
Because the Inferno has built-in memory, you can set it up as you like and then take it to any PC you want, without installing the driver again. The only thing the driver CD is good for is to load up the configuration software, and since you need it to adjust anything on the mouse, you don’t want to lose it.
The first time you start the software, it will ask you if you are a casual or professional gamer, and then it sets your DPI levels appropriately. Afterward, you’ll find yourself at the rather attractive “Main Control” screen.

Here, you can control each of the five levels of DPI as you wish, both even on the X and Y axes if you are really that thorough. On the right side you can see all of the buttons, most of which can be altered on the three additional profiles. For the Rapid Fire button, there are three values to input, which in the screenshot are 3-3-1. I am unsure what the last two numbers represent, but the first one represents the number of times the left mouse button is in effect pushed.
On the following page, you can configure how your macros are going to be activated on the mouse. In my example, I had two macros set up, and in order to activate the first in-game, I had to first hit the Storm Tactics button and also the left mouse button, and for the second, I had to use the right mouse button.<

I am not a heavy macro user, so I didn’t test out this feature to a great extent, but I did enough to get a feel for how to create and execute them. Because there are three profiles total, you can see that in this screenshot, I chose to activate the PF#1 macros as I was using the first profile on the mouse. To keep things easy to remember, it’s wise to always assign the appropriate macro numbers to match your profile.
For a couple of reasons, I found the process of assigning a macro a bit (okay, “really”) tedious, and also a bit lacking. In the “Execution” menu, there are literally at least 60 different options, and you can only see five or six at a time. Now, picture scrolling through a list that large. It results in a microscopic scroll bar – one that’s difficult to use. Though it wouldn’t have been as good-looking, a regular windows drop-down would have been great, one that would display 15 or more options at once.
Also, you can create a macro with one or two keys. In my example above, I had Call of Duty: Modern Warfare 2 in mind. Though it seems odd at first, one neat macro I set up was to hit the Storm Tactics button followed by the left mouse button… this reloads my weapon. That macro allows me to essentially not have to lift my finger off the mouse at all, and saves me from moving my opposite hand away from WASD.
The other macro, which requires use of the right mouse button, summons my special weapon, whether it be a care package, sentry gun, predator missile or what-have-you. I do this in replace of hitting the “4” key, because I game in the dark and usually push 3 or 5 by accident. So, this is one more convenience feature.
Now, the buttons available in the drop-down range from 1 – 10 and represent various buttons on the mouse. The only one omitted is the Storm Tactics button as it’s required for triggering these macros. For some reason, the Forward and Backward buttons are not available in these lists, and it blows my mind as to why, as it would make setting macros up far easier. Instead, we are limited to keys that might not be the most accessible when in the heat of battle, whereas those extra thumb buttons would be.
To help make up for that, you can combine two buttons together to activate the macro, such as pushing the left and right mouse button at once. In an MMO I play (it should be mentioned that this mouse is officially designed for MMO’s, but I fail to see the difference), Lineage II, I had the left mouse button, when used in conjunction with the Storm Tactics key, activate a moderate potion, while I had the left and right mouse buttons activate a much more powerful one.
Overall, I’m impressed with the number of macros that can be set up, but not so much impressed by how tedious they are to add to this list. I spent almost two hours on it before I could figure it out. Fortunately, if Cooler Master ever deems it worthy, it could update this software and fix the issues I mentioned, unless for some reason the lack of the Forward and Back keys being available here is a hardware limitation, but that seems unlikely.

Support our efforts! With ad revenue at an all-time low for written websites, we're relying more than ever on reader support to help us continue putting so much effort into this type of content. You can support us by becoming a Patron, or by using our Amazon shopping affiliate links listed through our articles. Thanks for your support!

Rob Williams
Rob founded Techgage in 2005 to be an 'Advocate of the consumer', focusing on fair reviews and keeping people apprised of news in the tech world. Catering to both enthusiasts and businesses alike; from desktop gaming to professional workstations, and all the supporting software.


