- Qualcomm Launches Snapdragon 4 Gen 2 Mobile Platform
- AMD Launches Ryzen PRO 7000 Series Mobile & Desktop Platform
- Intel Launches Sleek Single-Slot Arc Pro A60 Workstation Graphics Card
- NVIDIA Announces Latest Ada Lovelace Additions: GeForce RTX 4060 Ti & RTX 4060
- Maxon Redshift With AMD Radeon GPU Rendering Support Now Available
Social & RSS Feeds
Latest Videos


Latest News
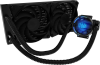
Cooler Master MasterLiquid Pro 240mm All in One Liquid CPU Cooler Review
by Ryan Perry on September 20, 2016 in Cooling
Most of us have heard the quote, “Necessity is the mother of invention.” It appears Cooler Master has taken it to heart with its MasterLiquid Pro 240 all-in-one liquid cooler. Read on as we cover the inventions that make this cooler an absolute necessity.
Page 1 – Introduction; A Look At The MasterLiquid Pro 240
It’s an exciting time for me, the CPU cooler guy. We have a new test rig all setup and we’re ready to see what the various manufacturers can do to keep it frosty.
From low profile air coolers, to monster 420mm custom setups, we’re now ready to push them as hard as possible so that you know exactly what to expect before spending your money. We’ll also be rebuilding our performance database to see how they stack up to each other.
Without further delay we’re giving the honor of “firstsies” to the new Cooler Master MasterLiquid Pro 240 all-in-one (AIO) liquid cooler.
At first glance, it looks like just about any other AIO available today, but a closer look will reveal some new tricks that make up the new “Flow Op” technology that Cooler Master says will propel the MasterLiquid 240 past the competition.

As always we’ll start with the business end of the cooler, the block and pump unit. For those who aren’t familiar with liquid cooling, custom kits usually have the pump and block separated, but with AIO systems, the pump is contained in the same housing with the block. This means that there’s less space required to install the cooler, but performance is typically a smidgen less due to the small space requirements.
On the top side of the unit is a see through, illuminated cover with the company’s logo etched into it. This glows blue when the system is powered on and makes for a fun bit of flair for those who want it. Power for the pump and lighting is provided by a 4-pin connector.

Flipping the block and pump unit over gives us a view of the copper block that directly contacts the CPU. The finish is impeccable and only the lightest machine marks are visible, however it’s the part that we can’t show you that’s caught our eye.
Cooler Master has chosen to go a system that pumps water onto the center of the block, which then flows out to the sides between very fine fins. It claims to increase cooling performance by 40% due to 657% more surface area, which is a very hefty claim.
What may not be obvious as well, is something that should be there, but isn’t. Can you guess? It’s that little splatter of thermal interface compound. CM chose not to pre-apply it, and instead provides a syringe of the stuff for you to do yourself.

The coolant is pumped to and from the block through a pair of rigid FEP hoses. Many manufacturers have switched over to more flexible rubber hoses, but according to the info provided by Cooler Master, the FEP hoses have a lower absorption rate and a longer lifespan.
The trade off is that the FEP hoses tend to be a bit stiffer, possibly making installation a little trickier for some. Another feature that comes highly touted is the square fin array that promises increased contact with the liquid channels in order to pull more heat away, while creating larger spaces between the fins.

Larger spaces between the fins means the fans require less static pressure to push the air through the tight spaces in the fin array, in turn allowing them to run a little slower, resulting in less noise without affecting performance.
Cooler Master has chosen a pair of its MasterFan Pro 120 Air Balance 120mm fans to handle active cooling duty. These fans spin up to 2,000 RPM, and push up to 66.7 CFM of air, at a maximum of 30 dBA. In addition to some solid specs, these fans also feature a 4-pin PWM connection, and rubber coated mounting points to help absorb vibrations (and thus, noise).

The accessory box is stuffed with the installation guide, combination Intel/AMD backplate, separate Intel and AMD mounting brackets that secure to the sides of the block and pump unit, a rubber dampener that sits between the fans and the radiator to further absorb vibrations, and a Y-cable that consolidates the two fan cables into a single, 4-pin PWM connection.

Also included was this jigsaw puzzle that awaited us after removing the bits mentioned above. While we can only imagine the bumps and tumbles that a sample must take during transit, it would be nice to see a few extra pieces of tape used to secure the hardware in the flip open plastic shell.

Installation
We’re happy to report that when it came time to install the MasterLiquid Pro, there we no surprises or compromises that needed to be made. Your mileage will vary of course, depending on the chassis and other components that are used, but in our full tower monstrosity, it was smooth sailing once we sorted out that jumbled mess of parts sitting in the box that we showed above.
Intel users can jump right in, but AMD users will need to remove the stock cooler mounts and backplate, which was the case with us. Once those were out of the way, the bolts are inserted through the correct holes in the backplate, and the handy black clips slid over the ends, effectively trapping them in place so they couldn’t move while working away.

Next we secured the correct brackets to the block and pump unit, which was made even easier thanks to a notch in the bracket that fit over a tab on the unit to keep it from sliding around.

We then turned our attention to the fans, which we placed over the rubber dampener and secured using thumbscrews, which made for tool-less installation.

To finish things off, we applied our favorite thermal goo to the CPU, secured the radiator to the chassis, put the backplate in place, and secured the block and pump unit to it. Installation time was about 30 minutes from start to finish, and was done with minimal use of tools to see if another of Cooler Master’s claims were true.
Aside from securing the mounting brackets to the block and pump unit, and securing the radiator to the chassis, everything else was done by hand. Being able to secure the fans to the radiator with thumbscrews was very convenient, but locking down the pump and block unit properly required a screw driver for that last few of turns.


With the cooler installed we were ready to first dial in our maximum stable overclock that will be used in all of our cooler testing going forward, and then begin performance testing for the MasterLiquid Pro 240, so head on over to the next page for the dirty details.

Support our efforts! With ad revenue at an all-time low for written websites, we're relying more than ever on reader support to help us continue putting so much effort into this type of content. You can support us by becoming a Patron, or by using our Amazon shopping affiliate links listed through our articles. Thanks for your support!