- Qualcomm Launches Snapdragon 4 Gen 2 Mobile Platform
- AMD Launches Ryzen PRO 7000 Series Mobile & Desktop Platform
- Intel Launches Sleek Single-Slot Arc Pro A60 Workstation Graphics Card
- NVIDIA Announces Latest Ada Lovelace Additions: GeForce RTX 4060 Ti & RTX 4060
- Maxon Redshift With AMD Radeon GPU Rendering Support Now Available
Social & RSS Feeds
Latest Videos


Latest News
Cooler Master Storm Sniper Mid-Tower
by William Kelley on April 8, 2009 in Cases & PSUs
Cooler Master is well-known for their creation of high-quality products, but things are taken to the next level with their new CM Storm brand. Their first product here is the mid-tower Sniper, and what a chassis this is! In addition to offering features specific to LAN gamers, the overall design, cooling ability and aesthetics make it well worth checking out.
Page 2 – Installation and Testing
For my testing I used a new program called OCCT 3.0. Not only does this simple program push the CPU to the brink of a meltdown through the use of LINPACK testing for Intel processors, it also turns up the juice on your GPU. It automatically maintains graphs of temperatures throughout your testing. I highly recommend you try it out on your own for your testing needs. I always run all my tests 3 times and take an average just to weed out any erroneous results. My ambient temperature is kept at a near constant 68°F (20°C) year round as my test bed PC is in my basement. There are no fans or heat vents in the area of the test platform.
I use a static overclock and settings for all my testing. Stock testing is done with all settings in the motherboards BIOS to Auto. Overclocked testing is done by turning the CPU multiplier to 11x and manually setting the Vcore to 1.275v as well as enabling line load option. This results in a processor frequency of 3.67GHz with 1.25v Vcore as reported by CPU-Z in Windows. The video card is by nature of being fanless does not over clock enough to change the results so it remains at stock speeds through all testing. This is by no means the absolute maximum clocks, they are just meant to add extra stress to the components to simulate a potential overclock obtainable by most people.
Our system for testing is as follows:
|
Component
|
Model
|
| Processor |
Intel Core 2 Extreme QX9650 – Quad-Core, 3.0GHz, 1.30v
|
| Motherboard |
ASUS P5Q PRO – P45-based
|
| Memory | |
| Graphics | |
| Audio |
On-Board Audio
|
| Storage |
Hitachi 160GB
|
| CPU Cooler | |
| Power Supply | |
| Et cetera |
The Sniper is a very easy case to work with. The install was smooth and went off without a hitch. All the sharp edges are rolled over so there were no finger-biters (phew). After a mere ten minutes, everything was installed and ready for cable routing.

We are given lots of room behind the motherboard tray to route wires and there are a few punched in cable tie holders as well. With a dozen or so zip ties I was able to effectively secure all my wiring and maintain a neat appearance. For those that are fanatical about wire maintenance, there may not be enough hiding areas for those extra wires.

This is where I found the first real flaw in the design. For some strange reason, they have chosen to use a 2-pin plug for the fan wiring that connects to the built in fan controller. Seeing as how there are almost no aftermarket fans come this way and that there is no included 2-pin to 3-pin adapters, I am puzzled as to why this was done. Without modifying your fan plugs there is no way to attach aftermarket fans to the fan controller.

I ran all tests with the fan controller in the minimum and maximum positions. While you may find an area in between that will suit your personal taste I thought my method would show you just how effective the controller is.
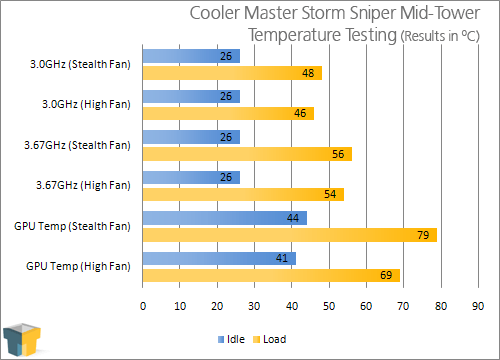
As you can see above, the fan controller is definitely effective. At the Stealth setting, the noise levels were dropped to a level that was about as quiet as could be for air cooling. There are 2 extra connectors to allow the attachment of more fans to the controller, but they are limited by the 2-pin plugs.

Support our efforts! With ad revenue at an all-time low for written websites, we're relying more than ever on reader support to help us continue putting so much effort into this type of content. You can support us by becoming a Patron, or by using our Amazon shopping affiliate links listed through our articles. Thanks for your support!