- Qualcomm Launches Snapdragon 4 Gen 2 Mobile Platform
- AMD Launches Ryzen PRO 7000 Series Mobile & Desktop Platform
- Intel Launches Sleek Single-Slot Arc Pro A60 Workstation Graphics Card
- NVIDIA Announces Latest Ada Lovelace Additions: GeForce RTX 4060 Ti & RTX 4060
- Maxon Redshift With AMD Radeon GPU Rendering Support Now Available
Social & RSS Feeds
Latest Videos


Latest News
Cooler Master V10 CPU Cooler
by William Kelley on March 18, 2009 in Cooling
Have a huge chassis? Need a huge CPU cooler? Well, Cooler Master has just what you need, in the form of the TEC-based V10. This thing is massive – its almost three CPU coolers in one – but it cools better than any other air cooler we’ve used in the past, and it even matches our previous (and much more expensive) water-cooling setup.
Page 2 – Installation & Testing, Final Thoughts
After attaching the necessary hardware to the cooler itself, installation onto the motherboard was simple enough. The case I used for testing, the CM HAF 932, had the rear of the motherboard tray open behind the CPU socket, so I did not need to remove the motherboard to install the V10. If you are new to installing heat sinks I would recommend you remove your motherboard anyways since it was above average difficulty to get things started and lined up.

Don’t let the photo above fool you on the sheer size of this monster. The HAF 932 is a very open and airy case. A close up shows you just how much real estate this guy is going to use up. It will extend to the edge of the motherboard and it is as tall as the tallest current 120m heat sinks. Make sure you have lots of space and measure the side panel fan for clearance twice before putting it back on.

For my testing I used a new program called OCCT 3.0. Not only does this simple program push the CPU to the brink of a meltdown through the use of LINPACK testing for AMD and Intel processors, it also turns up the juice on your GPU. It automatically maintains graphs of temperatures throughout your testing. I highly recommend you try it out on your own for your testing needs.
I always run all my tests 3 times and take an average just to weed out any erroneous results. My ambient temperature is kept at a near constant 20°C year round as my test bed PC is in my basement. There are no fans or heat vents in the area of my test platform.
I use a static overclock and settings for all my testing. Stock testing is done with all settings in the motherboard’s BIOS set to Auto. All fan control settings are turned off so that the fan header on the motherboard for the CPU receives full power. Overclocked testing is done by turning the CPU multiplier to 11x and manually setting the Vcore to 1.275v as well as enabling line load option. This results in a processor frequency of 3.67GHz with 1.25v Vcore as reported by CPU-Z.
|
Component
|
Model
|
| Processor |
Intel Core 2 Extreme QX9650 – Quad-Core, 3.0GHz, 1.30v
|
| Motherboard |
ASUS P5E3 Deluxe WiFi – X38-based
|
| Memory |
Kingston 2GB DDR3-1333
|
| Graphics | |
| Audio |
On-Board Audio
|
| Storage |
Seagate 7200.10 Barracuda 500GB
|
| Chassis | |
| Power Supply | |
| Et cetera |
For this particular review, I also felt it was necessary to push to the magical 4GHz level. To achieve this overclock required the CPU multi to be set to 12x and a boost in Vcore to 1.35v as reported by CPU-Z. I also had to up the Northbridge voltage to 1.2v. No other voltage adjustments were needed.
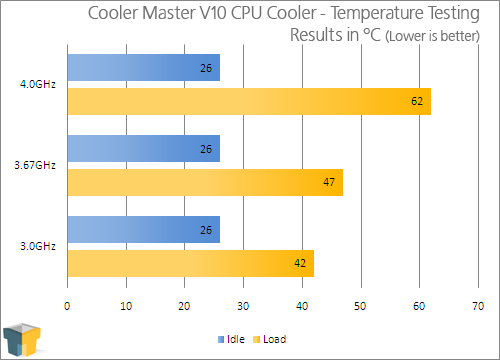
Fan noise was moderate as it was set to maximum. Changing the settings to quiet the fans did improve noise levels but it also hampered cooling ability. The TEC draws its power through a 4-Pin Molex connection so it receives the same amount of power no matter the method of fan control being used.
I was impressed with the results in the first 2 rounds of testing and I must say that the final push to 4GHz went better than expected. I have run this same exact test setup with a high-end $200+ custom water-cooling setup and ended up with nearly identical temperature results. While many sites used Prime95 for load testing, I feel that the use of Linpack testing really puts the spurs to the processor and pushes it to the upmost limits.
Final Thoughts
When all was said and done, the results did all the talking. Not only was I able to overclock effectively, I was able to push harder than ever before without resorting to more exotic and riskier methods of cooling. Having the ability to keep a Quad-Core processor under control at 4GHz is no easy feat, yet the V10 passed with flying colors. Noise levels were also well within reasonable limits.
At a price tag of $139.99US (Newegg.com), the V10 is within reason for a product with this amount of cooling capacity. Most high-end heat sinks will run you $70 and you still have to factor in high-flow fans which will push the total even higher and still fall short of the cooling power demonstrated here today. Even more exotic and more expensive forms of cooling are hard-pressed to keep up.
The one big downfall is the almost overwhelming size. It is no heavyweight thanks to the use of lightweight materials throughout but you are warned to make certain you have the space inside your case before stepping up to the plate. I also suggest paying close attention to where your motherboard’s 24-pin power connector is located as that is another possible interference zone.
I award the V10 a 9 out of 10 rating. There is nothing else in this price-range with this amount of cooling power. The only faults I found were minor and were of little consideration to the enthusiast that is going to purchase one.
- Pros
- Excellent build quality.
- Extremely effective.
- Wide application range.
- Good value for the performance.
- Cons
- Very large.
- Included thermal paste is enough only for one application.

Discuss this article in our forums!
Have a comment you wish to make on this article? Recommendations? Criticism? Feel free to head over to our related thread and put your words to our virtual paper! There is no requirement to register in order to respond to these threads, but it sure doesn’t hurt!

Support our efforts! With ad revenue at an all-time low for written websites, we're relying more than ever on reader support to help us continue putting so much effort into this type of content. You can support us by becoming a Patron, or by using our Amazon shopping affiliate links listed through our articles. Thanks for your support!