- Qualcomm Launches Snapdragon 4 Gen 2 Mobile Platform
- AMD Launches Ryzen PRO 7000 Series Mobile & Desktop Platform
- Intel Launches Sleek Single-Slot Arc Pro A60 Workstation Graphics Card
- NVIDIA Announces Latest Ada Lovelace Additions: GeForce RTX 4060 Ti & RTX 4060
- Maxon Redshift With AMD Radeon GPU Rendering Support Now Available
CoolIT Omni A.L.C. Self-Contained Liquid GPU Cooler

NVIDIA’s GeForce GTX 470 is one of the better GPU offerings on the market right now, but it’s also one of the hottest. It’s for that reason that after-market coolers exist, although few get quite as high-end as CoolIT’s Omni A.L.C. – and the ~$200 price tag proves it. Given that price, let’s take a look and see just what this thing is made of.
Page 2 – Installation
The first step to installing an after-market cooler to a graphics card is to first tear the original cooler off, and clean it up. Some coolers are easier to remove than others, and in the case of our particular model, an EVGA SuperClocked, the cooler was easy to pull off after the removal of what seemed like a hundred small screws.
Sometimes it’s easy to overlook some screws, though, so bear in mind that in addition to the screws on the back of the PCB, there is also one in the corner of the metal bracket, and also two more located right in the center of the bracket itself, in between the video ports.
Once the cooler is removed, you can clean the spent thermal paste off of the GPU core via a couple of different methods. Personally, I use some paper towel and wipe it all off (sometimes it might take more than one piece), and then I clean it up with some pure alcohol, making sure not to use too much.
The most difficult part of cleaning up a graphics card is the memory chips. On occasion I have used Q-Tips dipped in alcohol to get the job done, but if the chips are for the most part clean and free thick residue, which this card happened to be, I use my thumbs to clean everything up. It sounds like a strange method, but it works, and works well. Afterward, you could take the Q-Tip route if you wanted to make sure the chips are as clean as possible.
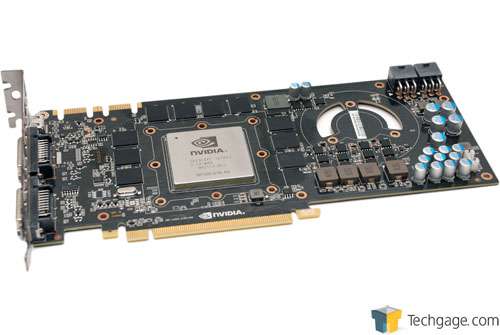
When finished, your GeForce GTX 470 should look like this:
I have to say that while NVIDIA’s recent GPUs tend to run rather hot, the core is much easier to clean thanks to its heatsinked design, akin to our CPUs.
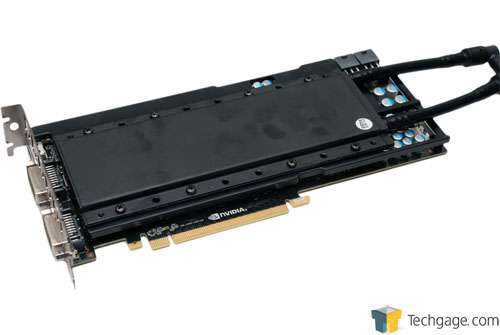
With all of the protective plastic removed from the block, the card attaches to it as seen in the photo below, You don’t have to fiddle with too much, as the screw holes line up perfectly. A bit strangely, CoolIT doesn’t include screws to hold this block in place, but instead relies on you to use the same screws that were removed from your previous cooler. It’s an odd choice, to say the least.
As you can also see, the block itself is a true finger-print magnet. You’ll be set if anyone ever steals your GPU and it’s recovered later!
It was at this point that I realized just how much I goofed with the installation. Because the test PC uses Corsair’s H50 CPU cooler, mounting the Omni became a problem, since both use the same fan location in the back of the chassis for the radiator. After cursing a bit at the PC, I grumbled the H50 right out of there, and replaced it with a stock Intel heatsink. “Stock” should be used loosely though, as it’s a rather robust offering (it comes included with the Core i7-980X Extreme Edition).
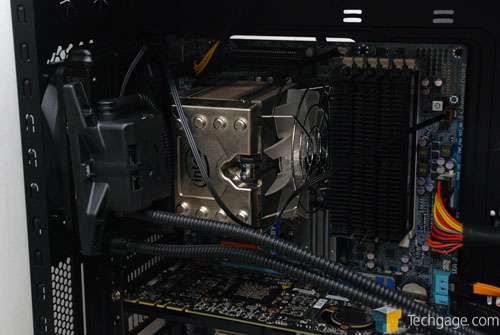
Despite swapping out the CPU cooler, I wasn’t exactly home free. Because the Omni is rather bulky, which is not at all uncommon for enthusiast parts, it literally prevented me from installing the radiator properly. The reason is due exclusively to the pump being located there, and had it not been there, the install would have been a cinch.
You can see the less-than-stellar install above. Because I didn’t have a thinner CPU cooler easily-accessible to install, my only choice at this point was to unscrew the pump from the unit and push it to the side. Fortunately, even though the pump was no longer attached to the radiator, it was still oriented perfectly, and the chassis door could still be used.
I don’t entirely disagree with CoolIT’s decision to put the pump right onto the radiator, because in truth, it’s a common-sense design. I’ve never seen a super-thin pump before, and in order to retain the slim design of the block itself, the pump has little leniency.
At the same time, its location is a rather major problem for most builds. As I mentioned, the Intel heatsink we’re using is bulky, but even so, had we used something like Noctua’s NH-U12P, that pump would still be touching the heatsink. And for all intents and purposes, that’s a thin cooler. The issue can be worked around using the procedure I used, but that’s far from ideal, and may not be an option for a lot of people. Our test PC is using a rather hefty chassis here (Cooler Master HAF X), and had the door been less lenient, I simply wouldn’t have been able to use it.
Support our efforts! With ad revenue at an all-time low for written websites, we're relying more than ever on reader support to help us continue putting so much effort into this type of content. You can support us by becoming a Patron, or by using our Amazon shopping affiliate links listed through our articles. Thanks for your support!


