- Qualcomm Launches Snapdragon 4 Gen 2 Mobile Platform
- AMD Launches Ryzen PRO 7000 Series Mobile & Desktop Platform
- Intel Launches Sleek Single-Slot Arc Pro A60 Workstation Graphics Card
- NVIDIA Announces Latest Ada Lovelace Additions: GeForce RTX 4060 Ti & RTX 4060
- Maxon Redshift With AMD Radeon GPU Rendering Support Now Available
Social & RSS Feeds
Latest Videos


Latest News
Corsair Carbide 400R Mid-Tower Chassis Review
by Ryan Perry on September 12, 2011 in Cases & PSUs
Corsair’s cases have long been considered to be some of the best, but at prices of $180+, many have had to sit out and hope for more modest offerings. With the Carbide series, those have arrived. The 400R mid-tower we’re looking at here retails for just under $100, so let’s see how it compares to Corsair’s other offerings.
Page 3 – Installation & Testing
When it came time to put our test system into the 400R, there was a very minor snag and one small thing to keep in mind while using it for a build. They were certainly nothing to write off the case over but are worth mentioning nonetheless.
The first was the installation of the power supply, which slid into place easy enough but the screw holes on one side didn’t line up correctly due to the odd layout on the mounting plate. It didn’t matter if the power supply was mounted fan up or fan down, and a product shot of a Corsair power supply and our Antec test unit were compared; both have the mounting holes in the same position.
A shot of the PSU mounting plate on a 650D was also compared to the 400R and they were found to be quite different with the 650D not running into any problems during installation. The screws did go into place but not as cleanly as usual and with more resistance than I would have liked, with one only contacting the plate along the top edge instead of being surrounded by metal.

There were no problems with the motherboard though. The center standoff worked like a holder that comes up through the mounting point just enough to keep it in place until the rest of the screws can be tightened. The H60 also slid into place without any problems.

Hard drive installation was cause for concern but not because they didn’t install correctly. The 3.5″ drive simply popped into the tray and a 2.5″ drive secured from the underside with screws once a bar was removed from the side that has the pegs used to hold the larger drives in place. The problem here is that the hard drive trays feel thin and brittle. They certainly aren’t the same quality found in other Corsair cases, so I’d advise against being too rough with them. Also, due to the high degree of flex in the trays I found that they jumped out of the bay every so often when removing them while empty.

Our big ol’ GPU was next and it slid into place to be secured with thumbscrews. The holes lined up perfectly so there was no strain on the card itself or the PCIe slot.

The optical drive also installed just as easily. All that was needed was a quick pull forward on the release latch to disengage the pins in the bay so the drive could be slid into place. Once there, it was held in place with a click.

Even without the large number of options found in other Corsair cases, cable management was very easy. All cables were long enough to reach the appropriate headers and the inclusion of a USB 3.0 to 2.0 adapter is also welcome. The bulk of the adapter does cause a bit of clutter but it’s a small price to pay in order to keep the front panel USB ports active.

So, here we have our test build in the latest Corsair case. Cables were able to be well hidden so airflow was not interrupted, and because all of the front panel cables are black, they blend in perfectly with the interior of the case.

On the backside of the motherboard tray, cable management is a dream. There’s a ton of room to route cables through the channel around the motherboard tray and, thanks to the raised side panel, even securing them to the tray was possible without causing the panel to bow outward.

Testing
All of our testing is performed in a near steady 20°C ambient environment with readings taken before and after with a standard room thermometer. AIDA64 Extreme Engineer is used for monitoring and recording all system temperatures throughout the testing process.
Windows is allowed to sit idle for 10 minutes after startup to ensure all services are loaded before recording the idle CPU and GPU temperatures. CPU load temperatures are generated by performing a 20 minute run of OCCT LINPACK using 90% of the available memory, while GPU load temperatures are generated by OCCT’s built in test, also for 20 minutes.
Stock CPU settings were obtained by setting the AI Tweaker option with the BIOS to Auto and the maximum stable overclock frequency of 4.0GHz was obtained after extensive testing to ensure stability. The final clocks for the GPU are 760MHz on the core and 1000MHz QDR (4000MHz relative) for the memory with the voltage increased to 1.087V using MSI’s Afterburner overclocking utility. As with the CPU overclock, testing was done prior to ensure full stability.


The components used for testing are:
|
Component
|
Techgage Test System
|
| Processor |
Intel Core i5-661 – Dual-Core (3.33GHz)
|
| Motherboard |
ASUS P7H55D-M EVO mATX – H55-based
|
| Memory |
Corsair Dominator 2x2GB DDR3-1600 7-8-7-20-2T
|
| Graphics |
EVGA GeForce GTX 470
|
| Audio |
On-Board Audio
|
| Storage |
Western Digital 2TB Green
|
| Power Supply |
Antec TP-750 Blue
|
| Chassis |
Cooler Master HAF 932 Advanced
Cooler Master Silencio 550 Corsair Carbide 400R Corsair Obsidian 650D Corsair SE White 600T NZXT H2 Rosewill Blackhawk Sentey Arvina Silverstone Raven RV03 Thermaltake Level 10 GT |
| CPU Cooling |
Corsair H60 (Exhaust Configuration)
|
| Et cetera |
Windows 7 Ultimate 64-bit
|
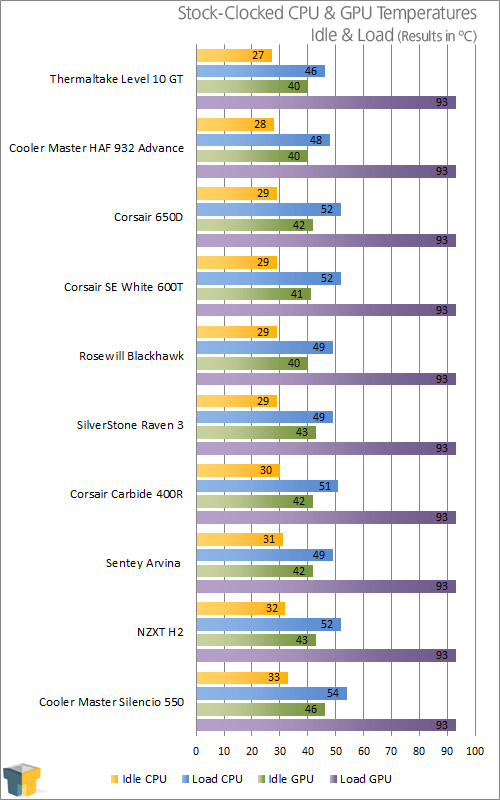
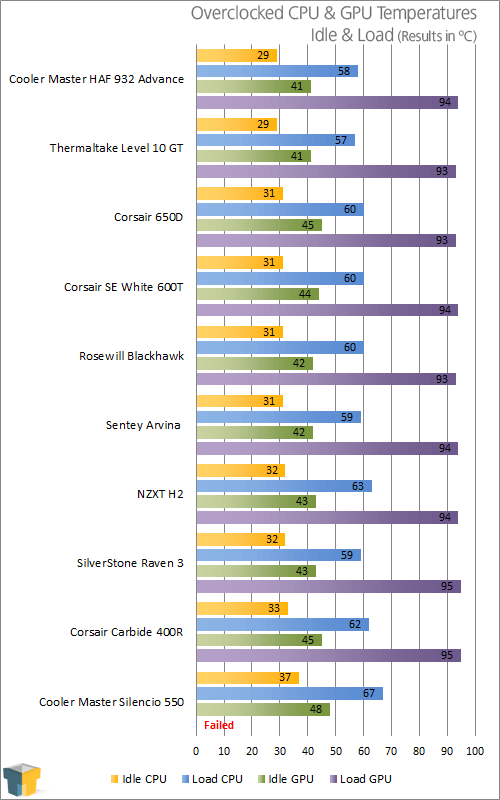
Despite the lower price, the 400R turned in some very nice numbers, and although it finished towards the back of the pack, it’s in good company and only trails the 650D and 600T by 2 degrees at the most while overclocked. The other Corsair cases feature better cooling solutions with 200mm fans in the front and top, so with additional fans installed in the top of the 400R the temperatures should pretty much line up. The downside is that this would translate into more money being spent, possibly negating the advantage of a lower priced case.
When powered on, the system is surprisingly quiet with all of the included fans being lost in the sound of the H60. And speaking of fans, including the option to turn the LEDs off is a big plus. I know a lot of people who have their system in their bedroom and don’t want to have a loud, glowing box keeping them awake.
With everything wrapped up I’d say that this is a pretty good first attempt at launching a case that is more affordable to those of us with thinner wallets.

Support our efforts! With ad revenue at an all-time low for written websites, we're relying more than ever on reader support to help us continue putting so much effort into this type of content. You can support us by becoming a Patron, or by using our Amazon shopping affiliate links listed through our articles. Thanks for your support!