- Qualcomm Launches Snapdragon 4 Gen 2 Mobile Platform
- AMD Launches Ryzen PRO 7000 Series Mobile & Desktop Platform
- Intel Launches Sleek Single-Slot Arc Pro A60 Workstation Graphics Card
- NVIDIA Announces Latest Ada Lovelace Additions: GeForce RTX 4060 Ti & RTX 4060
- Maxon Redshift With AMD Radeon GPU Rendering Support Now Available
D-Link DNS-323 NAS
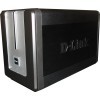
There’s something to be said for convenient, mappable network storage. NAS not only offers an affordable way to keep your data safe, but also a handy way to share all your "stuff". As our review states, this name branded BYOD NAS box delivers on all fronts.
Page 4 – Features and Test Results
As with most NAS devices, there are usually a few options that can be used if needed or safely ignored if so desired. In the case of the DNS-323, there are plenty of options to keep everyone but the pickiest/neediest of users happy. Since this unit is marketed towards those of us who do not need an enterprise level NAS device, in this review, we will cover everything that the DNS offers, but only go into detail on the most important features.
The web interface that D-Link provides is almost identical to the interface that we saw with the DIR-655 Draft N router. As with the packaging, the most noticeable difference is that the DNS menu is green where the router’s menu is orange. Appearances aside, the interface is divided into six different tabs. The first tab that you will see, and the one that loads one you are logged into the DNS is the setup tab. Here you can choose between 100 and 1000 LAN speeds or set it to automatically detect the network speeds. You can also view the LAN information and give the device a name, assign it to a workgroup and give it a description.
On the second tab, the advanced tab, we find the bulk of the administration settings. It’s here that we can setup user accounts and give those individual users storage quotas and file/folder accessibilities. This is quite useful if you are going to have many different users accessing the data stored on the NAS. You can allow certain users to access some folders while restricting them from seeing what is inside others. This also gives you the ability to keep everyone from filling up the drives with useless junk. In a work environment, this is quite useful as you can limit each client to a set amount of space that they can use as their personal storage.
It’s also in the advanced tab that a FTP server can be setup. This is helpful if you want to share files, large or small, with friends and family across the network or internet. Another use is to setup the DNS as an UPnP server. This allows you to share multimedia with compatible devices such as network media players.
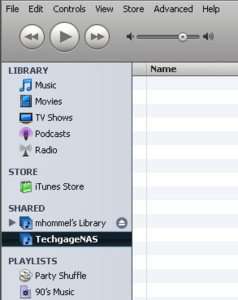
The big one that will interest most is the iTunes server. This is honestly one of the easiest pieces to setup. I hate to use a terrible cliché, but you simply set it and forget it. All that needs to be done is to enable the iTunes server build into the DNS-323 and any iTunes clients on the network will see the NAS and have the ability to connect to it should they fancy your song selection.
In a large office setting, clients who access your iTunes server can be controlled by setting up a server password. While your server will show up in their iTunes player, they will not be able to access the music on the NAS without knowing the password first. That way you can control who is listening and who isn’t. This is enjoyable when trying to aggravate co-workers.
The last feature found in the advanced tab is the built in DHCP server. If you have a small network and are either using a router without DHCP capabilities, or are not using a router at all, you can set the DNS-323 up to administer dynamic IP address as new users log onto the network containing the NAS. I cannot honestly see a scenario where this is needed but if you’re ever in dire need of a DHCP server, this little NAS can do it by God. Just make sure that you do not enable it if your router is already setup to hand out dynamic IPs. Then the two devices just fight it out and you get nowhere.
The next tab is the Tools tab. In the tools section the administrator can setup the device password as well as the system time. This allows your DNS to sync with the router, which in our case is the D-Link Xtreme N that gets it’s time from one of our PCs. If you don’t like this approach you can easily set it up to look up the time on a different online server.
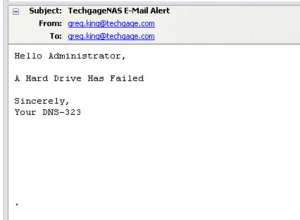
You also have the ability to reset the NAS to the factory defaults, restart it if there were any changes made that require such a thing. It is in the tools tab that we find the ability to upgrade the firmware and setup the DNS up to notify an administrator by email if a drive fails. This is a handy feature if the DNS is placed somewhere other than right beside the administrator. While not to in depth, as you will see, the email is to the point and lets you know that you should really get things fixed.
Another useful feature found in the tools tab is the ability to set the NAS to go into standby mode after a set amount of time that it sits inactive. This not only saves money over the life of the unit but also saves your hard drives from spinning constantly 24/7. There is a slight delay when bringing the NAS out of standby but we never experienced it lasting any longer than 15-20 seconds.
The last feature found in the Tools section is the RAID management options. This is where you can redo your RAID settings should you decide you want to go from a RAID 0 array to a RAID 1 array. This simply gives you the same formatting options that we dealt with at the initial setup.
The last two tabs are status and sign off. The last one is quite self explanatory and the first is pretty easy to figure out as well. In the status tab, this give you all of the information you could desire about the DNS-323, the network its apart of and the hard drives themselves. If you want to check the amount of space still open, you can look here. If you are wondering what the temperatures of the hard drives are, this is where you would look.
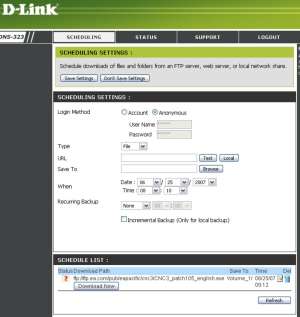
One more feature that we would like to point on is the scheduled downloads. When you first log in, you enter the user name and password (hopefully by this time you have changed it from the default “admin”) and instead of logging in under the configuration icon, you select the schedule downloads button. Here you can provide the DNS a download link to follow, give it a time to download and leave it be… another instance that echoes Ronco’s “Set it and forget it!” One thing that I personally recommend is that you test the link first. When you do, it will follow the link, make sure it’s a valid download link and to verify that it is, and that it checked, it will give you the size of the file to be downloaded.
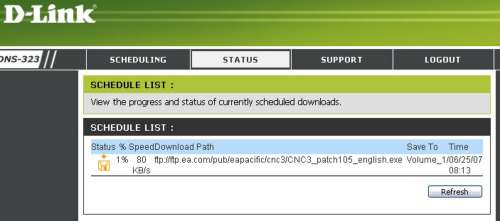
Once the link is verified and the time is set, you simply save the settings and wait. This is handy if you want to download something but don’t want to keep the PC powered on. You can check the status of the download once it’s in motion and it will show you the download speed, the percent of completion as well as the download link. You can cancel this download at any time. When you set up the download, it allows you to select on the NAS where you want to save it.
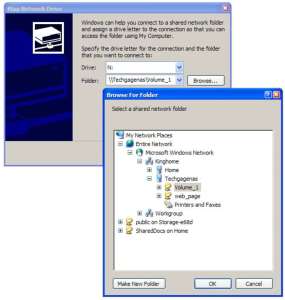
For those of you who really don’t need all of the extras that the DNS-323 provides, and simply want to expand your network storage, all that needs to be done is to map the NAS to your PC. In our case, the server’s name is TechgageNAS (which is what we named it) and the folder that houses the data is called Volume_1. As you can see in the picture, the mapping goes as such: \TechgageNASVolume_1. We have it a drive letter and it was done. There isn’t anything to it and most anyone can accomplish this with relative ease.
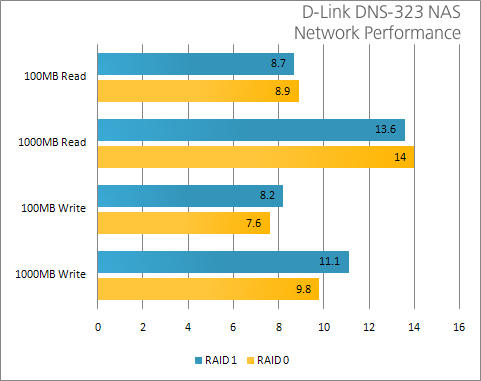
In our testing of the NAS, we simply transferred a 600 MB file across the network off of the NAS and then onto it. We timed the transfer and with the time, figured out the MB/s speeds of the NAS. This was done in RAID 0 and 1 and each array was tested in 100MB and 1000MB LAN spends.
Rob: I forgot the graph. Could you make one up pretty please with sugar on top? Thanks.
Support our efforts! With ad revenue at an all-time low for written websites, we're relying more than ever on reader support to help us continue putting so much effort into this type of content. You can support us by becoming a Patron, or by using our Amazon shopping affiliate links listed through our articles. Thanks for your support!


