- Qualcomm Launches Snapdragon 4 Gen 2 Mobile Platform
- AMD Launches Ryzen PRO 7000 Series Mobile & Desktop Platform
- Intel Launches Sleek Single-Slot Arc Pro A60 Workstation Graphics Card
- NVIDIA Announces Latest Ada Lovelace Additions: GeForce RTX 4060 Ti & RTX 4060
- Maxon Redshift With AMD Radeon GPU Rendering Support Now Available
Social & RSS Feeds
Latest Videos


Latest News
DisplayLink – Multi-Display Setups with USB
by Rob Williams on January 24, 2008 in Graphics & Displays
In a world where multi-tasking is a necessity, multi-display configurations are becoming ever more popular. DisplayLink is a new kind of technology that promises to take the hassle out of adding additional displays to your PC – even six is possible. Best of all, you don’t need a second GPU.
Page 2 – Installation, Testing
Before I knew what DisplayLink was, it became apparent fairly quickly that USB-display technology was catching on just from conversing with our usual contacts at this months CES. IOGear, creators of some of the glossiest products on the planet, showed off their External VGA Video Card (#GUC2015V), using DisplayLink’s technologies. At current time though, IOGear only offers a VGA connection, overlooking DVI.
eVGA also had adapters on display during our meeting. Called the UV Plus+, it serves the same purpose as the rest, to transmit video via USB to multiple displays. Their product is by far the best-looking out there, though. That’s easy to notice since the rest of them are as bland as a white wall. Theirs are also stackable, and solid enough so they will not move around on your desk by accident.
One of the more readily available offerings in the US market is Toshiba’s dynadock USB docking station. Built for notebooks, it allows you to connect to a DVI or VGA display, depending on the model you purchase. That issue alone is one that could confuse consumers. From what I can see, there are no DisplayLink products available that offer both DVI and VGA, it’s either one or the other. To make matters worse, most companies only offer one or the other, such as IOGear’s product. Ideally, a DVI version would be the best choice, even if you can’t use it at the time, since DVI-to-VGA adapters are readily available, and may even be included in some of the products.
That’s not everything to look-out for though. At current time, DisplayLink markets two different chipsets for these devices, the DL-120 and DL-160, with the difference being the performance capabilities. The DL-120, for example, will not utilize resolutions above 1280×1024 (or 1400×1050 wide-screen), while the DL-160 bumps up the specs to 1600×1200 (or 1680×1050 wide-screen). Luckily, most people should not have to worry about this, since the manufacturers site should clearly state the maximum allowed resolution of their device.
DisplayLink Installation
During CES, I happened to stumble on DisplayLink’s booth, which is actually the reason I found out what their company did. Until that point, I didn’t clue into the fact that the USB-display products I saw up to that point utilized their technology. Before I left, they slipped me a media kit, which contained two DisplayLink DVI adapters, various cables and the required software. Note that this is not a commercially available version, as DisplayLink themselves do not sell the end-product. Rather, their partners do.

No matter which method you choose to go with multi-display setups, the most ideal method is having all of your displays utilize the same resolution, just for the fact that when you have a couple different displays using a wild variation of different resolutions, it can hinder multi-tasking a bit. That said, I don’t have three displays of the same resolution, and instead used my television and Windows machine’s display to test out the capabilities.
First and foremost, the installation really couldn’t have been any easier. As you can see in the above photo, DVI cables (not included) must be connected to the device and then plugged into the monitor. From there, a standard USB cable runs from the device to your machine. In the case where DisplayLink is built into the monitor itself, such as with the LG L206WU, you just need to run the USB cable from one display to the next.
Once the hardware was connected, I installed the software and had a quick reboot. After the software installation, I was skeptical that Windows was going to boot and light up the external displays, but sure enough, it did. That… was by far one of the most easiest installations I have ever dealt with – not a single issue along the way.
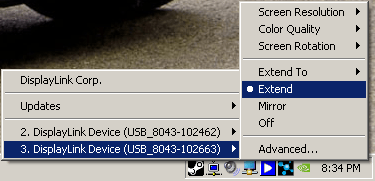
To control the monitors, there’s a small icon in the systray that looks similar to the one Windows uses for network shared-storage, which also happens to be there. Right-clicking this will allow you to tweak the connected displays, whether by changing the color quality, resolution or rotation. You can also mirror a display or change it’s alignment, similar to how you can in the Windows display settings.
On the next page, I’ll continue with thoughts on testing and also wrap up with my final thoughts.

Support our efforts! With ad revenue at an all-time low for written websites, we're relying more than ever on reader support to help us continue putting so much effort into this type of content. You can support us by becoming a Patron, or by using our Amazon shopping affiliate links listed through our articles. Thanks for your support!

Rob Williams
Rob founded Techgage in 2005 to be an 'Advocate of the consumer', focusing on fair reviews and keeping people apprised of news in the tech world. Catering to both enthusiasts and businesses alike; from desktop gaming to professional workstations, and all the supporting software.


