- Qualcomm Launches Snapdragon 4 Gen 2 Mobile Platform
- AMD Launches Ryzen PRO 7000 Series Mobile & Desktop Platform
- Intel Launches Sleek Single-Slot Arc Pro A60 Workstation Graphics Card
- NVIDIA Announces Latest Ada Lovelace Additions: GeForce RTX 4060 Ti & RTX 4060
- Maxon Redshift With AMD Radeon GPU Rendering Support Now Available
Enabling Auto-Logon and the Administrator Account in Vista & 7

Have you ever wanted to create an automatic logon for your Windows PC but couldn’t find the option to do so? Or, on the disruptive side, have you ever found yourself without administrative access? We have… far too many times, and have decided to produce an article that offers up a slew of different ways to take care of both tasks.
Page 1 – Introduction; Enabling a Windows Vista / 7 Automatic Logon
While both Windows Vista and 7 have obvious advantages over Windows XP, especially with regards to their ease-of-use, there are occasions that can arise where you may have to smack your head and wonder what went through Microsoft’s collective minds during development. In an article I wrote earlier this year entitled, “10 Things Linux Does Better than Windows“, I summed up most of my personal gripes against the OS.
Of all the items mentioned there, the one that has personally affected me in the worst way ever since Vista’s launch is the process of automatically logging into a user at boot. During the XP days, I never encountered problems with having this work, thanks in part to the useful TweakUI utility, but with both Vista and 7, the process can at times be a bit more complicated.
It’s not so much the fact that it’s harder to create an auto-logon for either Vista or 7, but the chance of experiencing a brutal side-effect seems to be far greater. Over the past couple of years, I’ve been bit by random issues related to auto-logons more than once, and on more than one PC. This includes an incident that occurred just this past weekend. Do I have bad luck? I’m not sure, but one thing I do know is that I’m not alone. If you search Google for anything related to the Administrator account or auto-logons, there will be no shortage of content.
I considered the incident last weekend to be sort of a last straw, and instead of continuing to become flustered with that issue and others like it, I decided to produce this quick article in hopes that it will aide those who run into similar issues down the road. Because the auto-logon and Administrator account can be tied together into the same issue, I’m covering both aspects here. Whether you want to simply create an auto-logon or find yourself locked out of an Administrator account, this article should help you get back into your PC smoothly.
I’d also like to note that I might not be covering all of the methods of being able to accomplish these tasks, but generally speaking, these should work for you. If not, or if there’s another method that you know of that should be mentioned, please let us know.
Creating an Auto-Logon in Windows Vista & 7 – Method #1
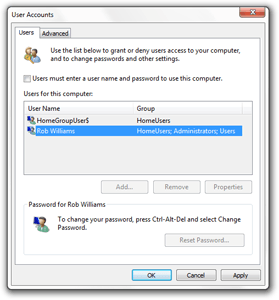
For the most part, creating an auto-logon is easy, requiring only a few steps. The first one is to log into the account with Administrator access that you want to create the auto-logon for, and then load up the “Run” line by hitting Windows Key + R. Alternatively, you could enter “run” into the Start Menu search box and access it there. Once the prompt is loaded, type in “control userpasswords2”, without quotes, and hit enter.
Note: You could also use “netplwiz” in place of “control userpasswords2”.
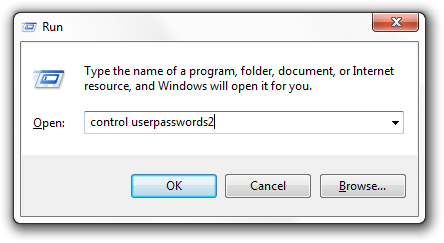
You should be greeted by this pop-up:
By default, the “Users must enter a user name and password to use this computer.” is enabled, and it’s for that reason that you must type in a password after each boot. If you guessed that to remedy the situation, all you’d have to do is uncheck the box, you’re correct. After doing so, and hitting “Apply”, you’ll be required to enter your password twice. If you don’t have a password, simply click “OK” to close the prompt.
At this point, you should be good to reboot without any issues and have the auto-logon function as you’d expect. If for some bizarre reason this method doesn’t work, there is another slightly more complex alternative.
Creating an Auto-Logon in Windows Vista & 7 – Method #2
The secondary method for creating an auto-logon isn’t too much more difficult than the first, but it’s a bit easier to accidentally make a mistake. It requires editing entries in the Windows registry, which is generally considered a dangerous place for inexperienced users to be. But, what we’ll be doing involves only one folder, so the risk is minimal.
Like the first step, this one requires a user account with Administrator rights, so if you’re using a Guest or Standard user account, you’ll be unable to finalize these changes.
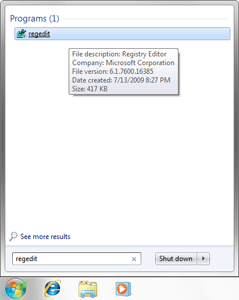
To access the registry, click on the Start Menu orb and then type “regedit” into the search box. The result should be displayed above, and you can simply click it to load it up.
To access the correct folder, you need to navigate the tree to the point mentioned below. There are multiple folders within the registry that share the same name, so for the sake of making sure you’re going to be editing the correct one, it’s best to navigate it manually. Simply double-click HKEY_LOCAL_MACHINE and then each of the others until you reach the “Winlogon” folder.
HKEY_LOCAL_MACHINE
> SOFTWARE
> Microsoft
> Windows NT
> CurrentVersion
> Winlogon
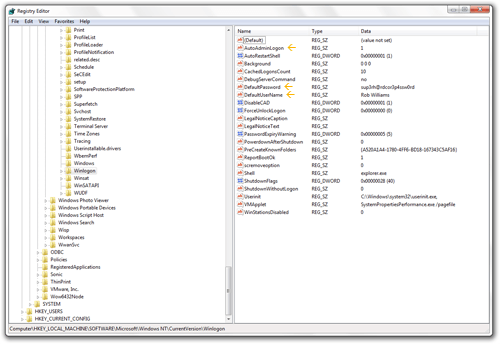
In the right pane, you should see a large number of strings as in the example below. The first thing to tackle from this point is the “AutoAdminLogon” entry, which is set to “0” by default, which amounts to “disabled”. You need to double-click it, change the value to 1, and then you’re good to continue onto the next step.
If neither the “DefaultUserName” nor “DefaultPassword” strings exist, you must create them in this list manually (by right-clicking in the white space and clicking on “New” and then “String Value”) and also enter the appropriate values. The values required are self explanatory, but it’s important to make sure that they are correct. If you use spaces in your username like I do, then make sure that’s reflected. Even if you do make an error here, you’re not going to be out of luck, so don’t worry. The side-effect will be that when you boot up the next time, “Other User” will be the option displayed at the login screen.
Once those three options are created and altered, you’re good to reboot and enjoy your automatic logon. Again, if for some reason the auto-logon doesn’t work, go back into the registry and double-check the three entries in that folder to make sure nothing’s out of place.
Creating an auto-logon is a rather simple process, but what happens if you find yourself without Administrator access? In my personal history, I’ve run into this issue three or four times, and believe it or not, there is more than one way to fix it, no matter how broke you think your system is. We’ll cover all of those on the following page.
Support our efforts! With ad revenue at an all-time low for written websites, we're relying more than ever on reader support to help us continue putting so much effort into this type of content. You can support us by becoming a Patron, or by using our Amazon shopping affiliate links listed through our articles. Thanks for your support!


