- Qualcomm Launches Snapdragon 4 Gen 2 Mobile Platform
- AMD Launches Ryzen PRO 7000 Series Mobile & Desktop Platform
- Intel Launches Sleek Single-Slot Arc Pro A60 Workstation Graphics Card
- NVIDIA Announces Latest Ada Lovelace Additions: GeForce RTX 4060 Ti & RTX 4060
- Maxon Redshift With AMD Radeon GPU Rendering Support Now Available
Social & RSS Feeds
Latest Videos


Latest News
Establishing a Golden Standard? ASUS Z87-EXPERT Motherboard Review
by Rob Williams on August 30, 2013 in Motherboards
ASUS’ golden Z87 mainstream lineup suggests that the company means to set the standard for motherboards, and we aim to find out how close it gets to doing so with a look at its Z87-EXPERT. It features a robust configuration – even including Thunderbolt – and of course, has seen a number of EFI and AiSuite III enhancements.
Page 2 – A Hardware Tour of ASUS’ Z87-EXPERT
Since ASUS has availed us a nice high-res top-down view shot of its Z87-EXPERT, I thought we’d start out taking a look at it to gain an easier understanding of what we’re dealing with – especially with regards to where all of the notable connectors are located.
The first thing I scan a motherboard for once I tear it out of the box is the number of fan headers made available, and their locations. There’s been a recent trend where vendors have begun putting at least five headers on their mainstream and above boards, and that’s great to see.
In the case of this EXPERT board, there are six fan headers at the ready: Two can be found to the top-right of the socket, while another can be seen to the bottom-left. This takes care of your CPU and back chassis fans. For the rest, two more headers are made available to the right of the DIMM slots (one is center, and one just below), and lastly, one is situated next to the USB headers and chassis connectors.

Also seen in this image is the single USB 3.0 header to the bottom-right of the DIMM slots, the chassis connectors at the absolute bottom-right of the board (a preference of mine), four internal USB 2.0 headers, an onboard power switch at the bottom, an LED error code screen (another big plus), and the 8-pin power connector situated horizontally at the top – yet another preference, given it tends to be easier to route your cable in behind the motherboard tray when it’s in this position and not too far into the board.
Continuing on, let’s take a brief look at all of the areas of the board.
First up, the top-right of the board, where the 4x DIMM slots can be found (again, supporting up to 32GB of RAM @ DDR3-3000 speeds), the two fan headers, the single USB 3.0 internal header, and also the MemOK! button (helps with booting if incompatible memory is installed – a rarer case nowadays).

At the bottom-right corner, from left-to-right, we have a power button, EFI error code readout, BIOS Flashback button, DirectKey button, 4x USB 2.0 headers, the lone bottom fan header, the chassis connectors, and above that, TPU and EPU modifier switches.

I mentioned a “DirectKey” button – but what is it? Pushing it will immediately reset your PC and boot straight into the EFI, saving a bit of time. The use here for overclockers is obvious, though it can also have use for the regular folk, too. Should you want your reset button to always result in a quick boot-to-EFI, you’re able to apply a jumper to the “DRCT” header directly above the chassis connectors to take care of that. This is one of the more hidden – but neatest – new features to ASUS’ Z87 lineup.
Moving along to the bottom-left, we find 3x PCIe x16 slots (usable as x8+x8 in dual-GPU or x8+x4+x4 in tri-GPU), and four PCIe x1 slots. I do wish the CMOS battery was located a bit lower on the board so that you wouldn’t have to remove a GPU in order to get at it, but nowadays, chances of you needing to remove that is rather rare. And if you do have to, another option is to apply a jumper to the CLRTC header towards the bottom-right of the board.

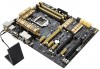
There’s not too much to see in this corner of the board except for the socket – and we’re all quite aware of what those look like. Whether or not you like the gold PWM heatsink will really depend on your tastes, but its style is certainly suitable. Just below the left section of that heatsink is a fan header for the back chassis fan, and to the right side of the top are two headers for the CPU cooler; the top-most one can’t be seen in this photo…

… but it can be seen in this photo:

The above angle doesn’t reveal anything we haven’t already seen, but it does give a clearer idea of what you’ll be working with once the board is in your chassis.
At the back, we find 6x USB 3.0 ports (the left-most four are ASMedia; the two beside the audio connectors are Intel), the built-in Wi-Fi / Bluetooth module, HDMI, DVI, VGA, LAN and the full fleet of audio connectors. To the absolute right of these ports, the lone Thunderbolt connector. Quite small given the massive premium it tacks onto a board, isn’t it?

It’s worth noting that for this board, ASUS worked with ASMedia to provide a solution that would assure all back USB 3.0 ports perform just the same. This is important, because to date, no third-party has been able to match the performance of these ports by either Intel or AMD (the same goes for SATA). In our testing, we found the result to be good. In order to achieve this, performance of the Intel ports is degraded to a level not even worth noting (or more accurately, one that’s not going to be noticeable in the real world).
With the Z87-EXPERT, ASUS includes 4x SATA cables, the Wi-Fi dock, I/O back panel insert, a 2-way SLI bridge, Q-Connector (to make connecting the small chassis wires a bit easier) and also some documentation and driver DVD-ROM (stashed inside the manual).

The Z87-EXPERT is a rather feature-packed board on the hardware-level, but like before, ASUS doesn’t stop its work there, instead opting to provide the market’s best EFI solution – or at least attempting to. Let’s take a look at that next.

Support our efforts! With ad revenue at an all-time low for written websites, we're relying more than ever on reader support to help us continue putting so much effort into this type of content. You can support us by becoming a Patron, or by using our Amazon shopping affiliate links listed through our articles. Thanks for your support!

Rob Williams
Rob founded Techgage in 2005 to be an 'Advocate of the consumer', focusing on fair reviews and keeping people apprised of news in the tech world. Catering to both enthusiasts and businesses alike; from desktop gaming to professional workstations, and all the supporting software.


