- Qualcomm Launches Snapdragon 4 Gen 2 Mobile Platform
- AMD Launches Ryzen PRO 7000 Series Mobile & Desktop Platform
- Intel Launches Sleek Single-Slot Arc Pro A60 Workstation Graphics Card
- NVIDIA Announces Latest Ada Lovelace Additions: GeForce RTX 4060 Ti & RTX 4060
- Maxon Redshift With AMD Radeon GPU Rendering Support Now Available
Social & RSS Feeds
Latest Videos


Latest News
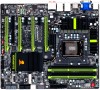
GIGABYTE G1.Sniper 3 Motherboard Review
by Rob Williams on May 3, 2013 in Motherboards
The motherboard market is loaded with options targeted squarely at overclockers and the general enthusiast, but finding a board – much less an entire series – dedicated to gamers is difficult. GIGABYTE realized that back in 2011, and thus its G1 series was born. In this article, we’re taking a look at the company’s current Z77 offering, the G1.Sniper 3.
Page 2 – A Look at the EFI
An archive including all of these screenshots can be snatched here (.ZIP, 2.5MB).
Despite the fact that it’s been available in enthusiast form for a couple of years now, EFIs are still hit-or-miss in terms of design and ease-of-use. With our look at ASUS’ P9X79 PRO a couple of weeks ago, I raved over what ASUS had delivered. Its EFI solution is extremely well-thought-out, good-looking and easy to use. Best of all, it doesn’t force you to haul out a mouse. Fortunately, GIGABYTE’s isn’t far off the mark, although it does have a couple of quirks.
The first thing you see after entering the EFI is a splashscreen, which unfortunately isn’t pictured here. You can see an example of one here. This screen shows off a semi-interactive 3D motherboard. The problem is that it’s finicky – so finicky, I just ignore it. Also, generally speaking, the first place I ever want to go when I enter an EFI is the tweaking section; to get to that here, you must hit the left arrow a couple of times to hover over the M.I.T. icon rather than right – which would be expected given it’s the first icon.
As I’m now finding out, this is a finicky nature that’s hard to describe through text. In ASUS’ solution, its splashscreen defaults your selection to a button that when clicked, allows you to go straight to the advanced GUI. There, you can also use the mouse to click certain things, but it’s far less finicky. I think the problem with GIGABYTE’s solution is that the company opted for a bit of a 3D design – ASUS’ choice is flat.
Once into the advanced version of GIGABYTE’s EFI though, most of my complaints vanish.

The landing spot is the “System” section, which is where you can quickly view your BIOS information and set the date. If you need to enable hotplugging on any SATA port, you’ll need to go into the ATA Port Information sub-section.
M.I.T. (Motherboard Intelligent Tweaker)
While it’s not touted as being a board for overclocking, there’s no reason for GIGABYTE to not offer related options on its G1.Sniper 3. And it does – in full-force. Everything you should need will be here, at least to the overclocker like me who doesn’t take things quite as seriously as others.
Once into the M.I.T. section, you’ll be greeted to a couple of sub-sections and quick bits of information at the bottom (including temperature, which I prefer to see at an even earlier screen given it might be important to do so).

The “M.I.T. Current Status” screen gives a complete rundown of current memory and CPU settings along with temperatures. Given all of the free space that’s left, a cool filler would be PSU voltages. Maybe for the future.

Light tweaking takes place under the “M.I.T. Advanced Frequency Settings” section, where you can control the CPU and RAM clocks – but not timings (that’s the next menu). For those who might not care to overclock but do want to use their memory at full-spec, the XMP profile can be selected here.

As this has all been seen before, I’ll let the rest of these images speak for themselves. For those who’d rather view everything in a convenient archive, hit up the URL at the top of this page.


BIOS Features, Peripherals & Et cetera
The remaining sections speak for themselves better than the overclocking ones do, even to the layman. Light power options can be dealt with in its respective section, but the heart of GIGABYTE’s 3D Power Control is kept under the “Advanced Voltage Settings” in the M.I.T. menu.


Overall, GIGABYTE’s current EFI is hardly poor by any stretch, especially in comparison to some others out there, but with Intel’s next-generation launch to happen relatively soon, I really do hope to see some improvements made. I feel that ASUS has set a standard where EFI is concerned, and if companies have to resort to copy-catting, it’s going to be best for the consumer in the end.

Support our efforts! With ad revenue at an all-time low for written websites, we're relying more than ever on reader support to help us continue putting so much effort into this type of content. You can support us by becoming a Patron, or by using our Amazon shopping affiliate links listed through our articles. Thanks for your support!

Rob Williams
Rob founded Techgage in 2005 to be an 'Advocate of the consumer', focusing on fair reviews and keeping people apprised of news in the tech world. Catering to both enthusiasts and businesses alike; from desktop gaming to professional workstations, and all the supporting software.


